Mint is one of the easiest herbs to grow and propagate at home. Known for its fresh aroma and culinary uses, mint spreads rapidly and thrives in both garden beds and containers. If you want to expand your mint collection or share it with friends, propagation is a simple and effective method. The most successful way to propagate mint is through stem cuttings, and with a little care, you’ll have new, healthy plants in no time.
Why Propagate Mint?
Mint plants, especially popular varieties like spearmint and peppermint, tend to grow quickly and can become invasive in gardens if not contained. By propagating mint, you can control where it grows, refresh old plants, and ensure a consistent supply throughout the year. Propagated mint plants also tend to be more vigorous because they are clones of a mature, healthy plant.
Choosing a Healthy Mint Plant
The first step in successful propagation is selecting a healthy mother plant. Look for a mint plant that has lush green leaves, firm stems, and no signs of pests or disease. The best time to take cuttings is in the morning when the plant is well-hydrated and temperatures are cooler.
Choose non-flowering stems, as flowering diverts the plant’s energy away from vegetative growth. Stems that are about 4 to 6 inches long are ideal for cuttings.
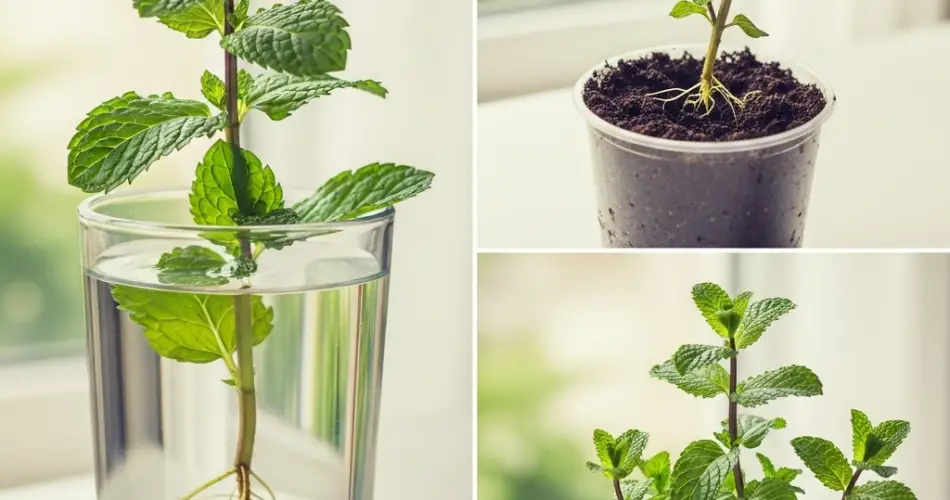
Propagating Mint in Water
One of the most popular and reliable ways to propagate mint is in water. Here’s how to do it:
-
Take Cuttings – Using clean, sharp scissors or pruning shears, snip 4- to 6-inch stems just below a node (the point where leaves emerge). Remove the leaves from the bottom half of the cutting.
-
Place in Water – Fill a glass or jar with fresh water and place the cuttings inside, making sure the leaf nodes are submerged. Keep the top leaves above water to avoid rotting.
-
Provide Light – Put the jar in a bright, indirect light location such as a windowsill. Avoid direct sunlight, which may overheat the water and damage the cuttings.
-
Change Water Regularly – Change the water every two to three days to keep it fresh and oxygenated. This helps prevent bacteria from building up and promotes healthy root development.
-
Wait for Roots – In about 7 to 14 days, you’ll begin to see white roots forming from the submerged nodes. Once the roots are 1 to 2 inches long, your mint cuttings are ready to be planted in soil.
Planting Mint Cuttings in Soil
When the roots are well developed, prepare a small pot or garden bed with well-draining, nutrient-rich soil. Mint thrives in moist but not soggy soil and prefers partial to full sunlight.
-
Prepare the Pot – Choose a pot with drainage holes. Fill it with potting mix and moisten it lightly.
-
Transplant the Cutting – Make a small hole in the soil with your finger or a stick. Gently place the rooted cutting in the hole and cover the roots with soil. Press gently around the base to secure it.
-
Water and Monitor – Water the newly planted mint well and place it in a semi-shaded area for the first few days to help it adjust. After a week, move it to a sunnier spot.
Tips for Successful Mint Growth
-
Container Growing – Mint spreads aggressively. Growing it in containers helps control its spread and makes propagation easier.
-
Regular Pruning – Trim the plant often to encourage bushy growth and prevent it from becoming leggy or flowering too early.
-
Avoid Overwatering – Mint likes moisture but doesn’t tolerate soggy roots. Ensure proper drainage to avoid root rot.
-
Fertilizing – Mint doesn’t need heavy feeding. Use a mild liquid fertilizer every 4 to 6 weeks during active growing months for best results.
Final Thoughts
Propagating mint at home is an easy and rewarding gardening activity. With just a few stem cuttings, you can grow a thriving mint patch that provides a steady supply of fresh leaves for tea, cooking, or natural remedies. Whether you grow it indoors on a sunny windowsill or in outdoor pots, mint is a low-maintenance herb that rewards even the most novice gardeners. Keep an eye on it, trim regularly, and enjoy the endless benefits of this versatile plant.


