Strawberries are a favorite fruit for many home gardeners, and for good reason—they’re sweet, nutritious, and relatively easy to grow. But what if you don’t have a large garden or access to planting beds? Surprisingly, strawberries can be grown in discarded plastic bottles, and not only does this method save space and money, but it can also result in a surprisingly abundant harvest.
This guide explains how you can grow strawberries in recycled plastic bottles, using minimal space while achieving maximum results. Whether you live in an apartment, have a small balcony, or just want a creative and eco-friendly gardening project, this method is practical, productive, and fun.
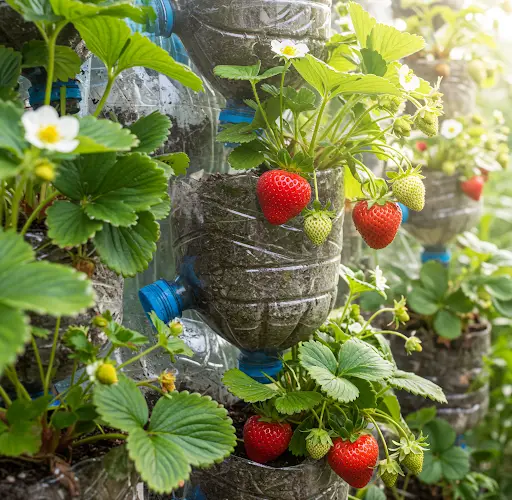
Why Use Plastic Bottles?
Using plastic bottles as containers for growing strawberries offers several benefits:
-
Recycling-friendly – gives new life to waste materials
-
Compact design – ideal for small spaces or vertical gardening
-
Better water control – reduces the risk of overwatering
-
Mobility – easy to move to follow the sunlight
-
Cost-effective – no need to buy pots or raised beds
With a few cuts and holes, you can turn used bottles into productive mini-gardens.
What You’ll Need
-
1.5- or 2-liter plastic bottles (cleaned and label-free)
-
Strawberry seedlings (preferably everbearing or day-neutral varieties)
-
Good-quality potting mix with compost
-
Sharp knife or scissors
-
Screwdriver or nail for poking holes
-
Small rocks or pebbles (for drainage)
-
String, hooks, or racks for hanging (optional)
-
Organic fertilizer or compost tea
-
A watering can with a gentle spout
Step-by-Step: Growing Strawberries in Plastic Bottles
1. Prepare the Bottle
Clean your plastic bottles thoroughly. Use a knife to cut a large rectangular opening on one side of the bottle for planting. Leave enough space around the edges to maintain the structure.
Poke small holes in the bottom of the bottle for drainage. You can also make additional holes along the sides if you plan to create a vertical garden system with multiple planting pockets.
If hanging, make two small holes near the top and tie string or wire to hang the bottle securely.
2. Layer the Bottom
Place a few small rocks or pebbles at the bottom of the bottle to promote drainage and prevent root rot.
3. Add Soil and Fertilizer
Fill the bottle about three-quarters full with a light, well-draining potting mix. You can mix in compost or aged manure to enrich the soil.
Strawberries prefer slightly acidic to neutral pH (5.5–7). Adding a little compost tea or organic fertilizer every two weeks can keep the plants thriving.
4. Plant the Strawberries
Gently place one strawberry seedling into each bottle opening. Ensure the crown of the plant—the part where leaves emerge—is just above the soil. Burying the crown can lead to rot, while exposing the roots can cause stress.
Lightly pat the soil around the roots and water gently until the soil is moist but not soggy.
5. Sunlight and Placement
Strawberries need at least 6–8 hours of sunlight per day. Place the bottles where they can receive full sun—on windowsills, balconies, or hanging along walls or fences.
You can hang bottles vertically or arrange them on a stand or rack to save space and maximize light exposure.
6. Watering and Care
Since plastic bottles can dry out quickly, regular watering is important. Check the soil daily and water whenever the top inch feels dry. Make sure excess water can drain freely.
To prevent nutrient depletion, feed the plants every 2–3 weeks with:
-
Organic compost tea
-
Fish emulsion
-
Liquid seaweed
-
Crushed banana peel soaked in water (rich in potassium)
Trim off old leaves and runners (unless you want to propagate new plants), and remove any weeds that may appear.
7. Mulching
Add a thin layer of dry leaves, straw, or coconut husk on top of the soil to help retain moisture, keep the fruit clean, and prevent weed growth. Even in small containers, mulching makes a noticeable difference.
Harvesting Your Strawberries
Depending on the variety, strawberries begin producing fruit within 4–6 weeks after planting. The fruits are ready to harvest when they are fully red, plump, and slightly soft to the touch.
Pick early in the morning for the best flavor and keep harvesting regularly to encourage more fruit production.
Surprising Results
Many gardeners are amazed by how productive this simple method can be. With good sunlight, regular watering, and basic care, even a small collection of plastic bottles can yield a surprisingly large number of strawberries throughout the growing season.
By repurposing materials that would otherwise be discarded, you not only reduce waste but also create a low-cost, highly rewarding source of fresh fruit at home.
Final Tips
-
Use everbearing or day-neutral strawberry varieties for continuous harvest
-
Monitor for pests like aphids or spider mites and treat organically if needed
-
Replace the soil after each season to prevent disease buildup
-
Propagate runners in new bottles to expand your strawberry garden
Conclusion
Growing strawberries in plastic bottles proves that space and resources are not barriers to home gardening. With a few simple steps and regular care, you can turn discarded containers into fruitful mini-gardens bursting with sweet, homegrown berries. It’s an excellent project for families, urban dwellers, or anyone looking to enjoy sustainable gardening from the comfort of home.


