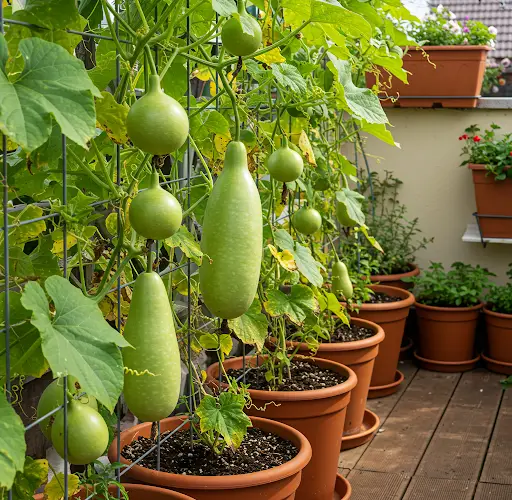
Bottle gourd (Lagenaria siceraria), also known as calabash, long melon, or lauki, is a nutritious and versatile vegetable that’s easy to grow at home. While traditionally cultivated in large garden spaces, this climbing plant adapts beautifully to small urban areas—especially terraces and balconies—when given proper care and support.
The best part? The method for growing bottle gourd on your terrace is not only simple, but it also yields tender, flavorful fruits that are perfect for cooking. Whether you’re a gardening beginner or just looking to make the most of your terrace, this step-by-step method will guide you to success.
1. Choosing the Right Container
Growing bottle gourd in containers is ideal for limited spaces, and selecting the proper pot or grow bag is key to healthy growth.
Recommended container size:
-
Minimum 18–20 inches deep and wide
-
Grow bags, large plastic tubs, or earthen pots all work well
Ensure the container has proper drainage holes to prevent waterlogging, which can harm the roots.
2. Soil Preparation
Bottle gourd thrives in fertile, well-drained soil that retains enough moisture without becoming soggy. Prepare a loose, nutrient-rich soil mix.
Ideal potting mix:
-
40% garden soil or loamy soil
-
30% compost or aged manure
-
20% cocopeat for water retention
-
10% sand or perlite for aeration
Mix well and fill the container, leaving 2–3 inches from the top for mulching or watering.
3. Sowing Bottle Gourd Seeds
Bottle gourd seeds are large and sprout quickly when pre-soaked. Before planting, soak the seeds in water overnight to speed up germination.
Sowing instructions:
-
Sow 2–3 seeds directly in the center of the container, 1 inch deep
-
Water gently after sowing
-
Keep in a sunny, warm spot with at least 6 hours of sunlight daily
Germination typically takes 5–7 days. Once seedlings emerge, thin them down to the healthiest one or two plants.
4. Watering Needs
Consistent watering is essential for bottle gourd. The plant is sensitive to both drought and overwatering, so aim for balance.
Watering tips:
-
Water when the top 1 inch of soil feels dry
-
Avoid wetting the leaves to reduce fungal disease
-
During hot weather, water early morning or late evening
Use mulch (dry leaves, straw, or coco husk) on top of the soil to retain moisture and regulate temperature.
5. Support Structure for Vertical Growth
Bottle gourd is a fast-growing vine that requires strong vertical support. On a terrace, you can create a simple yet effective trellis system.
Trellis ideas:
-
Bamboo or wooden poles tied together in a teepee or grid shape
-
Iron rods or wire frames attached to walls or railings
-
Nylon netting or ropes suspended above the pot
As the vine grows, gently guide and tie the tendrils to the support. Vertical growth encourages better air circulation, more flowers, and easier fruit harvest.
6. Flowering and Pollination
Bottle gourd produces separate male and female flowers. Male flowers appear first, followed by female flowers with a small fruit-like swelling at the base.
Pollination tips:
-
Bees and other insects usually handle pollination
-
If fruit development is poor, hand pollination can help—use a soft brush to transfer pollen from male to female flowers in the morning
Proper pollination leads to healthy fruit set and higher yields.
7. Feeding and Care
While the plant starts off strong with a rich soil mix, feeding it every 2–3 weeks boosts its productivity.
Natural fertilizers:
-
Compost tea or vermicompost
-
Banana peel liquid (rich in potassium)
-
Diluted cow dung slurry
Avoid chemical fertilizers; organic options support long-term soil health and lead to sweeter, more tender gourds.
Prune any dead leaves or excess shoots to keep the plant well-ventilated and focused on fruiting.
8. Pest and Disease Management
Bottle gourd is relatively hardy but may attract pests like aphids or whiteflies, especially in humid conditions.
Prevention and remedies:
-
Spray neem oil mixed with water every 7–10 days as a natural pesticide
-
Remove affected leaves manually if infestation is minor
-
Ensure the area around the plant stays clean and free of debris
Good air circulation and regular observation keep most problems in check.
9. Harvesting Bottle Gourd
Fruits are typically ready for harvest 50–60 days after sowing. Bottle gourd should be harvested while still young and tender for the best taste.
Signs it’s ready:
-
Smooth, light green skin
-
Feels firm but not hard
-
Around 10–18 inches long, depending on the variety
Use a sharp knife or pruning shears to cut the fruit, leaving a small part of the stem attached. Regular harvesting encourages the plant to keep producing more.
Final Thoughts
Growing bottle gourd on your terrace is a gratifying experience. It requires minimal inputs, just a bit of care, and rewards you with a fresh supply of delicious, homegrown vegetables. By using containers, organic practices, and smart vertical gardening techniques, even small spaces can turn into productive green corners.
This simple and natural growing method proves that anyone—regardless of space or experience—can enjoy sweet, healthy bottle gourds right from their terrace garden.


