Super Cool Garden Hanging: Recycling Plastic Bottles into Beautiful Hanging Flower Pots
Gardening is not only a relaxing and fulfilling hobby but also a great way to contribute to environmental conservation. One creative and eco-friendly way to enhance your garden is by recycling plastic bottles into beautiful hanging flower pots. This method not only helps reduce plastic waste but also allows you to create unique, budget-friendly planters that add charm and greenery to any space.
In this article, we will explore various ways to transform plastic bottles into stunning hanging flower pots. Whether you have a small balcony, a spacious backyard, or just a corner of your home where you want to introduce some greenery, this DIY project is perfect for adding an artistic touch while promoting sustainability.
Why Recycle Plastic Bottles into Hanging Flower Pots?
With the increasing pollution caused by plastic waste, finding innovative ways to repurpose used plastic bottles is crucial. Instead of throwing them away, upcycling plastic bottles into hanging pots serves several benefits:
- Environmental Benefits: Reducing plastic waste prevents pollution, conserves resources, and minimizes landfill usage.
- Cost-Effective: Rather than purchasing expensive planters, repurposing used bottles saves money while allowing you to create stylish pots.
- Creativity and Personalization: You can design and decorate your recycled planters according to your preferences, making them unique and aesthetically pleasing.
- Space-Saving Solution: Hanging planters are ideal for small spaces, allowing you to grow plants even in limited areas.
- Encouraging Greenery: Growing more plants contributes to cleaner air and a healthier environment.
Materials Needed for DIY Hanging Flower Pots
Before starting, gather the following materials:
- Empty plastic bottles (any size, but 1.5L or 2L bottles work best)
- A sharp cutter or scissors
- Sandpaper (optional, for smoothing edges)
- Acrylic paint or spray paint (for decoration)
- Paintbrushes
- Rope, twine, or wire (for hanging)
- A hole punch or drill (to make holes for drainage and hanging)
- Soil and plants (flowers, herbs, or succulents)
- Hot glue gun (optional for decorations)
- Decorative materials like beads, ribbons, or stickers (optional)
Step-by-Step Guide to Making Hanging Flower Pots
Step 1: Choose and Clean the Bottles
Select used plastic bottles of various sizes, depending on the plants you want to grow. Rinse them thoroughly and remove any labels or stickers. Soaking them in warm, soapy water for a few minutes makes it easier to peel off labels.
Step 2: Cut the Bottles
There are different ways to cut plastic bottles for creating unique hanging planters:
- Horizontal Planter: Cut the bottle lengthwise, creating an open-top planter ideal for trailing plants.
- Vertical Planter: Cut off the upper part of the bottle and use the bottom portion to plant flowers.
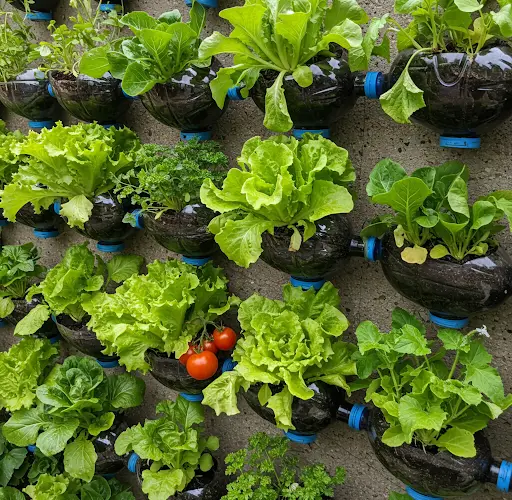
- Upside-Down Planter: Keep the bottle intact, cut a hole at the bottom for the plant, and hang it upside down.
Use sandpaper to smoothen the cut edges and avoid injuries.
Step 3: Create Drainage Holes
Using a drill or a hole punch, make small holes at the bottom of the bottle to allow excess water to drain. Proper drainage prevents root rot and promotes healthy plant growth.
Step 4: Decorate the Bottles
Unleash your creativity by painting and decorating your plastic planters. Use acrylic or spray paint to give them vibrant colors. You can also use markers, stickers, or decoupage techniques to add patterns and designs. Let the paint dry completely before moving on to the next step.
Step 5: Attach the Hanging Rope
Punch or drill holes near the bottle’s opening to insert the rope, twine, or wire for hanging. You can make three or four holes evenly around the bottle to create balance. Thread the rope through the holes and tie secure knots.
Step 6: Add Soil and Plants
Fill the bottle with a suitable potting mix, ensuring it is appropriate for the type of plant you are growing. Add the chosen plant and press the soil gently around it to hold it in place. Water the plant lightly.
Step 7: Hang Your Recycled Planters
Find a suitable location to hang your planters, such as a balcony railing, a garden pergola, or an indoor hook. Make sure the plants receive adequate sunlight and water them regularly according to their needs.
Best Plants for Hanging Bottle Planters
Choosing the right plants ensures your recycled planters thrive beautifully. Here are some great options:
- Flowers: Petunias, marigolds, pansies, and nasturtiums
- Herbs: Basil, mint, oregano, and thyme
- Succulents: Jade plants, aloe vera, and echeveria
- Trailing Plants: English ivy, pothos, string of pearls, and ferns
Maintenance Tips for Hanging Bottle Planters
- Regular Watering: Since plastic bottles retain moisture, monitor watering to prevent overwatering or underwatering.
- Sunlight Exposure: Ensure plants receive adequate sunlight based on their needs.
- Fertilization: Use organic fertilizers or compost to nourish plants periodically.
- Check for Pests: Inspect your plants for pests and remove them promptly.
- Repaint and Redecorate: To maintain the aesthetic appeal, repaint or add new decorations occasionally.
Conclusion
Recycling plastic bottles into beautiful hanging flower pots is a fantastic way to blend creativity with environmental responsibility. This DIY project is not only simple and affordable but also allows you to personalize your garden space with unique, handmade decorations. By following these steps, you can turn waste into stunning green spaces, making your home or garden more vibrant while helping to reduce plastic pollution.
So, the next time you have empty plastic bottles, don’t throw them away—turn them into super cool hanging flower pots and bring nature closer to you in a stylish, sustainable way!


