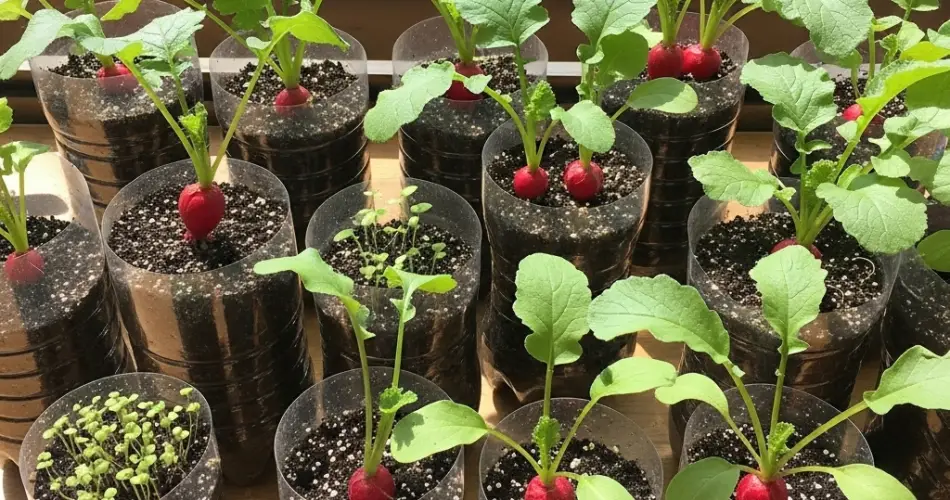
Radishes are one of the fastest-growing and easiest vegetables to start at home. Perfect for beginners and urban gardeners, they sprout quickly, require minimal maintenance, and can be grown in tight spaces. Using cut plastic bottles to propagate radishes is a smart and sustainable way to start your own mini root garden, even on a balcony or kitchen windowsill.
This method gives you full control over soil quality, watering, and space while recycling plastic waste into useful planters. Whether you’re planting round, red radishes or longer white varieties, bottle propagation is simple, fast, and productive.
Why Use Plastic Bottles for Radishes?
Plastic bottles serve as mini greenhouses or containers that allow you to grow food efficiently in small areas. They’re ideal for propagation because they:
-
Provide a warm, protected environment for seedlings
-
Make it easy to monitor growth
-
Improve water management and drainage
-
Reduce the need for traditional pots or raised beds
-
Help reuse plastic waste sustainably
Radishes don’t require deep soil or extensive root space, making them a great fit for bottle gardening.
Materials Needed
To get started, you’ll need:
-
Clear plastic bottles (1-liter or 1.5-liter size works well)
-
Scissors or a sharp knife
-
High-quality potting mix
-
Radish seeds (any variety)
-
Watering can or spray bottle
-
Marker or plant label (optional)
-
Small stones or coco coir chips (for drainage, optional)
Preparing the Bottles
-
Clean and Dry the Bottles
Rinse used bottles thoroughly and let them dry. Remove labels so sunlight can pass through if you’re growing indoors. -
Cut the Bottle
Cut horizontally about 10–12 cm from the base. This bottom section will act as the planter. If you want to reuse the top half, you can invert it as a mini greenhouse or use it as a water catch tray. -
Add Drainage Holes
Use a knife or heated nail to poke several small holes in the bottom of the bottle to allow excess water to drain out. This is essential to prevent root rot. -
(Optional) Add a Drainage Layer
Place a thin layer of gravel, pebbles, or coconut husk chips in the bottom to improve drainage and airflow to the roots.
Choosing Radish Varieties
Many radish varieties grow well in shallow containers, especially:
-
Cherry Belle – Small, round, and matures quickly.
-
French Breakfast – Oblong and crisp, with a mild flavor.
-
White Icicle – Longer, white roots requiring slightly deeper soil.
-
Early Scarlet Globe – A classic favorite, perfect for bottle growing.
Choose quick-maturing varieties if you’re looking for the fastest harvests, as some are ready in just 20–30 days.
Filling and Planting
-
Add the Soil
Fill each bottle base with your soil mix—about 80–90% full. Use a light, well-draining mix:-
1 part garden soil
-
1 part compost
-
1 part sand or coco peat for aeration
-
-
Sow the Seeds
Plant 2–3 seeds per bottle, spaced a few centimeters apart. Press them gently about 1–1.5 cm deep into the soil, then cover lightly. -
Water Gently
Use a spray bottle or fine watering can to moisten the soil. Avoid flooding, as radish seeds are delicate. -
Label (Optional)
If using multiple varieties, mark the bottles with a label to track them easily.
Caring for Young Radishes
Place the bottles in a spot that receives at least 4–6 hours of sunlight per day, such as a balcony, windowsill, or ledge. Keep the soil consistently moist but not soggy.
Radish seedlings usually sprout within 3–7 days. Once they emerge, thin the seedlings by snipping the weaker ones at the base, leaving one strong plant per bottle to ensure enough space for root development.
Maintenance Tips
-
Watering: Water regularly to keep soil evenly moist. Radishes are shallow-rooted, so they dry out quickly in small containers.
-
Sunlight: Ensure daily sun exposure for proper root formation. Leggy, weak plants result from too little light.
-
Feeding: Radishes typically don’t need extra fertilizer if your soil is rich, but you can apply a diluted organic liquid fertilizer every two weeks if growth appears slow.
Avoid nitrogen-heavy feeds, which can encourage leafy growth at the expense of the root.
Harvesting Radishes
Most radishes are ready to harvest in 25–40 days, depending on the variety. Check the top of the root as it pushes above the soil surface. When it reaches a desirable size (usually 2–4 cm in diameter), it’s time to pull them.
Gently loosen the soil and pull the radish straight up. If you wait too long, radishes can become woody or bitter.
Reusing Bottles
After harvesting, remove the used soil and rinse the bottles. You can reuse them for another round of radishes or for other small vegetables and herbs like lettuce, spinach, or basil.
Compost the old soil or refresh it with new compost before replanting.
Final Thoughts
Propagating radishes in cut plastic bottles is a fast, affordable, and eco-friendly way to grow your own food. Perfect for small spaces and new gardeners, this method offers a satisfying harvest in just a few weeks. With a little care and sunlight, you’ll have fresh, crunchy radishes grown right from a recycled container—no backyard garden required.


