If you’ve been thinking about starting a garden but have limited space or no traditional garden beds, don’t worry—peas can be started and grown right in recycled plastic bottles. This clever method is ideal for small-space gardening, giving you a head start on your harvest and helping reduce plastic waste in the process.
Peas are a fast-growing, cool-season vegetable that do well in containers and vertical gardens. Whether you’re looking to grow snap, snow, or shelling peas, starting them in plastic bottles is a convenient and affordable option that ensures healthy seedlings and a thriving future harvest.
Why Use Plastic Bottles for Starting Peas?
Plastic bottles make excellent mini-greenhouses. They retain warmth and moisture, two essential conditions for seed germination. Using them allows you to start seeds indoors or on a balcony, windowsill, or other small space, even before your outdoor planting area is ready.
This method also gives you greater control over each seedling’s development. By the time you transplant them to their final containers or beds, your plants will already have strong roots and a healthy start.
Materials Needed
To get started, gather these simple supplies:
-
1.5- or 2-liter plastic bottles (clear is best)
-
Sharp cutter or scissors
-
Heated pin or nail (for making holes)
-
High-quality potting mix or seed-starting soil
-
Pea seeds (snap, snow, or shelling)
-
Watering can or spray bottle
-
Marker (optional, for labeling varieties)
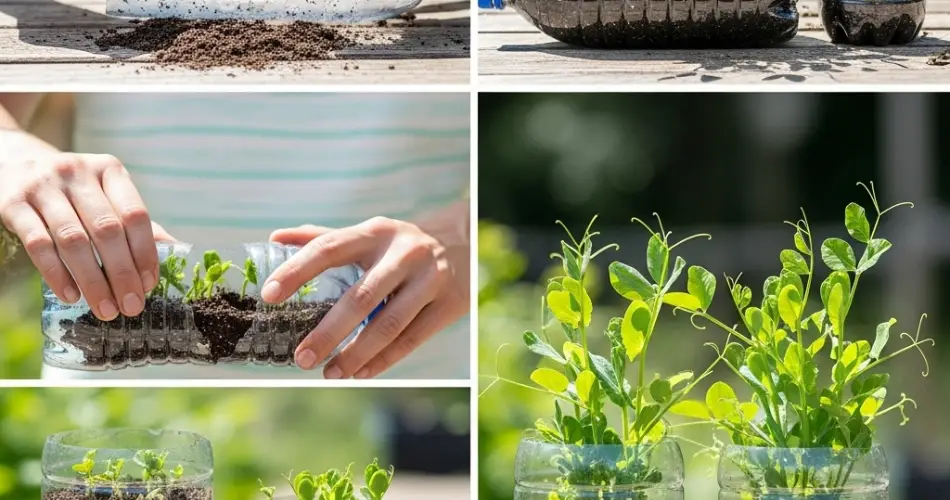
Step 1: Preparing Your Bottles
Clean your bottles thoroughly and remove any labels. Cut each bottle in half horizontally, around the middle. Poke several small holes in the bottom of the lower half for drainage. You can also make a few small slits on the side for airflow.
Use the top half as a dome cover, if desired, to keep warmth and humidity in during germination. Just be sure to remove it once seedlings emerge to avoid mold buildup.
Step 2: Add Soil
Fill each bottom half of the bottle with seed-starting mix or a lightweight potting mix. Avoid using dense garden soil, which can compact in bottles and hinder root growth.
Lightly moisten the soil before planting, making sure it’s damp but not soaked.
Step 3: Plant the Pea Seeds
Plant 1–2 seeds per bottle about 2–3 cm (1 inch) deep. Cover lightly with soil and gently press down to ensure good seed-to-soil contact.
Label your bottles if using different varieties, and place them in a sunny, warm location—like a south-facing windowsill, a balcony, or a sheltered spot outdoors if temperatures are above 10°C (50°F).
Step 4: Provide Warmth and Moisture
Pea seeds germinate best between 10–21°C (50–70°F). Keep the bottles in a warm location and mist the soil regularly to maintain even moisture. Avoid overwatering, as soggy soil can lead to rot.
If using the bottle tops as humidity domes, remove them once sprouts appear to ensure airflow and prevent fungal growth.
Germination usually occurs within 7–14 days, depending on the variety and conditions.
Step 5: Monitor Seedling Growth
Once the seedlings have emerged and formed their first true leaves, ensure they’re getting plenty of light. Without enough sunlight, they may become leggy and weak. Rotate the bottles daily if growing indoors to promote upright growth.
Thin out weaker seedlings if multiple have sprouted in the same container. Keep the strongest one per bottle to avoid overcrowding.
Step 6: Preparing for Transplanting
Pea seedlings can be transplanted when they are about 4–6 inches tall and have developed a few sets of leaves. Before transplanting, harden them off by placing them outdoors for a few hours a day for a week. Gradually increase their exposure to sun and wind to reduce transplant shock.
Peas grow best in cool weather, so aim to transplant them early in the growing season or during cooler months, depending on your local climate.
Step 7: Transplanting Tips
Choose a deep container, raised bed, or garden spot with well-drained soil and full sun. Space each transplant about 5–10 cm (2–4 inches) apart.
As you transplant the seedlings, be careful not to damage their roots. You can cut away the bottle if needed to slide the soil block out gently.
Install a simple trellis, string, or support sticks immediately after transplanting, as most pea varieties will start climbing quickly.
Step 8: Ongoing Care and Harvest
Keep the soil evenly moist, but not soggy. Water near the roots, and avoid wetting the foliage. Peas typically do not need much fertilization, especially if your soil is rich in compost. Overfeeding can lead to more foliage and fewer pods.
Watch for signs of pests like aphids or powdery mildew, especially in humid conditions. Neem oil or diluted soap sprays can help manage common issues naturally.
Depending on the variety, peas are ready to harvest 60–70 days after planting. Pick pods frequently to encourage more production.
Final Thoughts
Starting your pea garden with bottle-based seedlings is a smart, sustainable way to garden in small spaces. It allows you to recycle household materials, gain greater control over early plant development, and enjoy fresh homegrown peas even if you don’t have a backyard.
Whether you’re new to gardening or a seasoned grower looking for space-saving solutions, this method is an easy and effective way to kick-start your next crop of sweet, crunchy peas.


