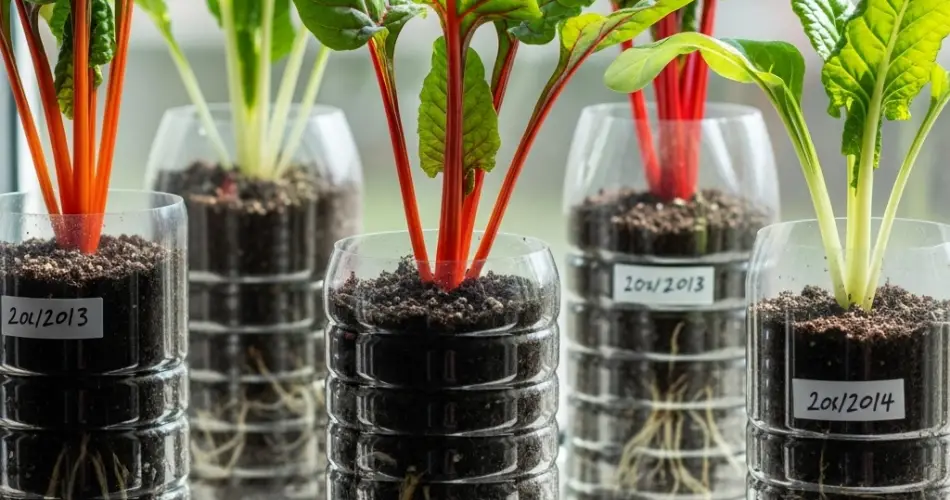
Swiss chard is a vibrant, nutrient-rich leafy green that adds both beauty and flavor to your garden and kitchen. Known for its colorful stems and abundant leaves, it’s also one of the easiest greens to grow. Even without traditional garden beds, you can cultivate Swiss chard successfully by using recycled plastic bottles as planters. This method is cost-effective, space-saving, and environmentally friendly, making it perfect for urban gardeners and beginners alike.
Why Grow Swiss Chard in Bottles?
Plastic bottle gardening offers several advantages. It allows you to make use of limited space, reduce plastic waste, and create a manageable growing system that’s easy to care for. The compact nature of bottle planters means you can place them on balconies, windowsills, fences, or even hang them vertically to save more space.
Swiss chard adapts well to container growing and produces leaves continuously when harvested correctly. By using bottle propagation, you can start from seeds or transplant seedlings and enjoy a steady supply of greens for months.
Materials You’ll Need
To get started, prepare the following items:
-
Large plastic bottles (1.5–2 liters)
-
A sharp knife or scissors
-
Potting mix or a blend of compost and garden soil
-
Swiss chard seeds or seedlings
-
A small trowel or spoon
-
Watering can or spray bottle
Preparing the Bottles
-
Clean the Bottles
Wash and dry the bottles thoroughly to remove any residues. -
Cut the Bottles
Cut each bottle horizontally about one-third of the way down from the top. The bottom section will hold the soil and plant, while the top can be inverted to serve as a mini greenhouse for young seedlings. -
Create Drainage Holes
Using a heated skewer or sharp tool, make several small holes in the bottom of the planter section to prevent waterlogging and root rot. -
Fill with Soil
Add a loose, nutrient-rich potting mix, leaving a few centimeters of space from the rim to prevent spillage during watering.
Propagating Swiss Chard from Seeds
-
Sow the Seeds
Make shallow holes about 1–2 cm deep in the soil. Place one or two seeds in each hole and cover lightly with soil. -
Water Lightly
Moisten the soil gently to avoid displacing the seeds. -
Cover for Germination
Place the cut-off top of the bottle upside down over the planter to create a greenhouse effect. This helps retain warmth and humidity, speeding up germination. -
Monitor Growth
Keep the soil evenly moist. Seeds usually germinate within 5–10 days. Once seedlings reach about 7–10 cm tall, thin them to one strong plant per bottle to give each enough space to thrive.
Propagating from Seedlings
If you prefer a quicker start, use nursery-grown Swiss chard seedlings. Transplant them into prepared bottle planters, making sure the root ball fits comfortably. Water well after planting to help them settle.
Caring for Bottle-Grown Swiss Chard
-
Light Requirements: Swiss chard thrives in full sun but can tolerate partial shade. Aim for at least 5–6 hours of sunlight daily.
-
Watering: Bottle planters tend to dry out faster than traditional pots, so check the soil regularly and water when the top layer feels dry. Avoid overwatering, as excess moisture can cause root problems.
-
Fertilizing: Every 2–3 weeks, feed with a diluted liquid fertilizer or compost tea to encourage healthy leaf growth.
-
Temperature: Swiss chard grows best in mild to cool temperatures, ideally between 10–24°C (50–75°F).
Harvesting Your Swiss Chard
Swiss chard can be harvested once the leaves are about 15–20 cm long. For continuous production, use the “cut-and-come-again” method: harvest the outer leaves first, leaving the central growth intact. This allows the plant to keep producing for months.
If you prefer a full harvest, cut the entire plant at the base. However, in bottle gardens, staggered planting is often better, so you can enjoy a steady supply rather than harvesting all at once.
Advantages of Bottle Propagation for Swiss Chard
-
Eco-Friendly: Gives new life to discarded bottles.
-
Space-Efficient: Perfect for balconies, patios, or small urban spaces.
-
Portable: Easy to move to optimize sunlight or protect from harsh weather.
-
Low Maintenance: Requires minimal weeding and straightforward watering.
-
Productive: Swiss chard grows quickly and yields for a long season.
Troubleshooting Common Issues
-
Yellowing Leaves: May indicate nutrient deficiency—apply a balanced fertilizer.
-
Wilting: Often caused by underwatering or heat stress—check soil moisture and provide shade in extreme heat.
-
Pest Damage: Watch for aphids and leaf miners. Remove pests manually or use mild, natural sprays.
Final Thoughts
Starting a Swiss chard garden using bottle propagation is a smart, sustainable way to grow fresh greens at home. Whether you begin with seeds or seedlings, this method offers a simple, affordable, and eco-conscious approach to gardening. With a little care, your bottle-grown Swiss chard will reward you with colorful, healthy leaves that can be harvested for months, proving that even the smallest spaces can yield abundant harvests.


