Dill (Anethum graveolens) is a flavorful herb loved for its feathery leaves and aromatic seeds. It’s a staple in pickling, salad dressings, and seafood dishes. While dill grows easily from seeds, propagating it from cuttings in recycled plastic bottles offers a fast, cost-effective, and eco-friendly way to grow this herb at home—especially in small spaces or urban environments.
This guide outlines a simple propagation system using plastic bottles, making dill cultivation accessible even for beginners. With just a few household items and a healthy parent plant, you can produce fresh dill starts ready for transplanting into containers, windowsills, or raised beds.
Why Propagate Dill Using Bottles?
Recycling plastic bottles into propagation chambers has several advantages:
-
Budget-friendly: No need for fancy equipment or propagation trays.
-
Sustainable: Reuses plastic waste, reducing your carbon footprint.
-
Space-saving: Fits well on windowsills, countertops, or balconies.
-
Controlled environment: Bottles help retain humidity and protect cuttings.
Although dill is usually grown from seeds, stem cuttings can also root in moist environments under the right conditions. Bottle propagation gives you a convenient way to get a head start on growing new dill plants.
What You’ll Need
-
A clean, transparent plastic bottle (1- to 1.5-liter size)
-
Scissors or a utility knife
-
A healthy dill plant for cuttings
-
Lightweight potting mix or coco peat and perlite blend
-
Small pebbles (optional, for drainage)
-
Rooting hormone (optional)
-
Water in a spray bottle
Optional: masking tape or rubber bands for sealing the bottle.
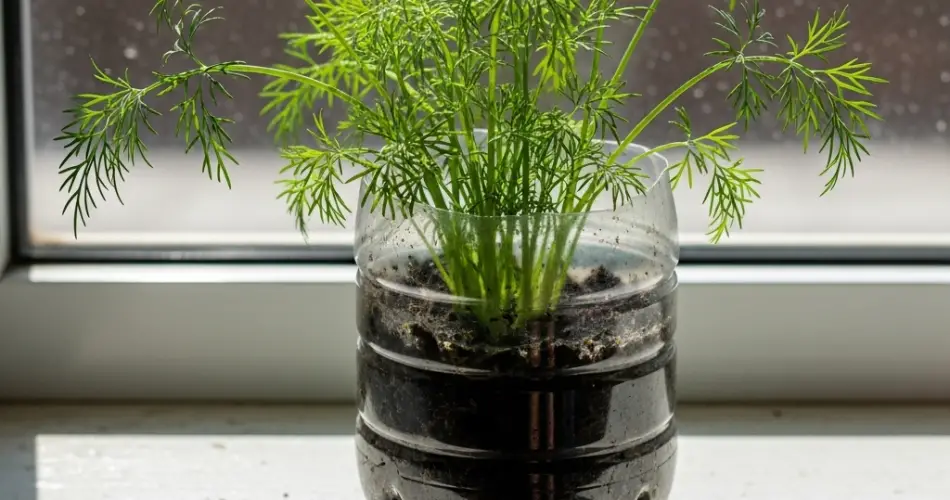
Step 1: Prepare the Bottle
Start by removing any labels from the plastic bottle and rinsing it thoroughly. Cut the bottle in half horizontally. The bottom half will hold the soil and cuttings, while the top half will serve as a humidity dome.
Poke several small holes in the bottom of the lower half to allow water to drain. You can add a thin layer of small stones or gravel to improve drainage, especially if you’re using a soil mix that retains moisture.
Step 2: Select and Prepare Dill Cuttings
Choose a healthy, established dill plant that has soft, green stems. Look for stems that are 4 to 6 inches long, preferably ones that are not flowering.
Using clean scissors or pruning shears, cut the stem just below a leaf node. Strip off the lower leaves, leaving the upper foliage intact. If you have rooting hormone, dip the cut end lightly before planting to encourage faster root formation, though dill often roots well without it.
Step 3: Set Up the Soil
Fill the bottom half of the bottle with a moist, well-draining potting mix. A blend of coco peat and perlite or vermiculite works well for propagation, providing moisture while allowing for air circulation.
Make a small hole in the center of the soil with your finger or a pencil, and gently insert the cutting about 1.5 to 2 inches deep. Lightly firm the soil around the base to support the stem.
Step 4: Cover and Create a Humid Environment
Place the top half of the bottle over the base to create a mini greenhouse effect. This dome traps moisture and warmth, both of which are essential for root development. Leave the cap off or slightly ajar to allow some air exchange and prevent mold buildup.
Mist the interior lightly with a spray bottle to maintain humidity, but avoid drenching the soil. If needed, you can secure the two halves together with tape or rubber bands.
Step 5: Position and Monitor
Place the bottle in a location with bright, indirect light, such as a windowsill or a shaded outdoor corner. Avoid direct sunlight at this stage, as it may overheat the interior of the bottle and damage the cuttings.
Check the cuttings daily. If the soil appears dry, mist it lightly. If condensation builds up excessively inside the dome, open it slightly for ventilation.
In about 10 to 14 days, roots should begin to form. You can check by gently tugging on the cutting—resistance is a good sign of successful rooting.
Step 6: Transition to Open Air
Once your dill cuttings have developed roots and started to show new leaf growth, begin acclimating them to open air. Open the dome for longer periods each day to reduce humidity and strengthen the plant.
After 2 to 3 days of this transition, you can completely remove the bottle top.
Step 7: Transplanting Your New Dill Plant
When the plant is ready, transplant it into a larger container or directly into the garden. Dill prefers:
-
Full sun exposure
-
Well-drained, loose soil
-
Moderate watering, especially during dry periods
Water gently after transplanting and keep the soil lightly moist until the plant is established.
Tips for Success
-
Take cuttings from non-flowering stems to promote root growth.
-
Avoid overcrowding the bottle — one cutting per bottle ensures better airflow.
-
Label bottles if you’re propagating multiple herbs at once.
-
Use clean tools and containers to prevent disease.
Final Thoughts
Propagating dill in recycled bottles is a simple, sustainable method that suits both beginners and seasoned herb growers. With minimal tools and a little patience, you can grow multiple dill plants that provide a steady supply of fresh herbs for cooking and pickling. This small-scale propagation system is not only


