Growing carrots may seem like a project for those with large garden beds, but with the right setup, you can successfully cultivate them even on a small balcony. Using wooden crates as planters, carrots can thrive in limited spaces and produce sweet, crunchy roots with minimal effort. Whether you’re a beginner or a seasoned gardener, growing carrots in crates offers a practical and eco-friendly solution to enjoy homegrown vegetables right at your doorstep.
Why Crates Are Great for Carrots
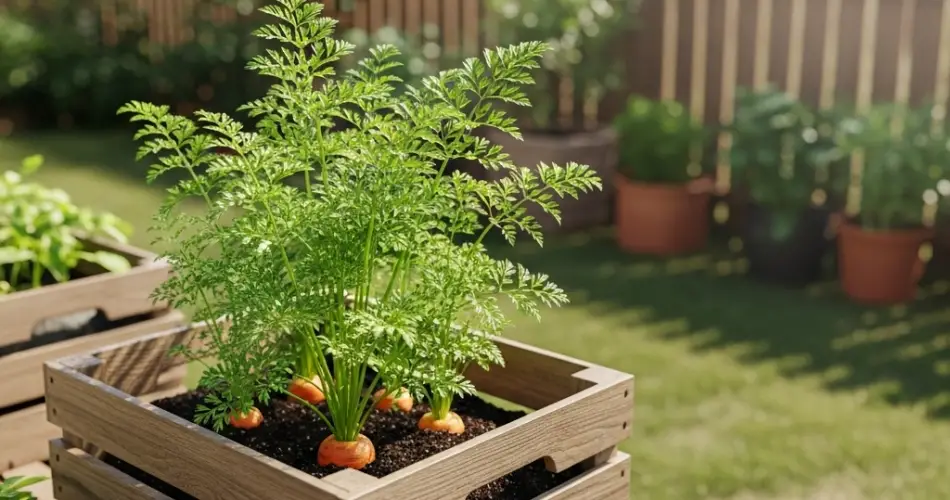
Wooden crates are perfect for container gardening because they’re breathable, easy to move, and naturally rustic in appearance. For carrots, crates provide the deep, loose soil that’s necessary for their roots to grow straight and long. They also allow excellent drainage, which helps prevent root rot and fungal issues. With just a few supplies, you can turn recycled crates into productive carrot beds without needing a backyard.
What You’ll Need
To get started, gather the following materials:
-
A wooden crate at least 10–12 inches deep
-
Landscape fabric or an old burlap sack for lining
-
Quality potting mix with compost or worm castings
-
Carrot seeds (choose varieties suited for containers, like ‘Thumbelina,’ ‘Parisian,’ or ‘Nantes’)
-
A hand trowel and watering can
If the crate has wide gaps between slats, line the inside with fabric or burlap to prevent soil from falling out while still allowing excess water to drain.
Preparing the Crate
Line the inside of your crate with landscape fabric, ensuring it covers all sides and the bottom. This will hold the soil in place and still allow for drainage. Fill the crate with potting mix, ideally one that’s loose, sandy, and well-draining. Avoid using heavy or compacted garden soil, which can hinder root growth and lead to misshapen carrots.
Carrots need soil that’s free of stones and clumps. For best results, sift your soil before planting or mix in coarse sand to improve texture.
Planting the Seeds
Once your crate is filled, gently pat down the surface and moisten it. Create shallow furrows about ¼ inch deep using a stick or your finger. Sprinkle the carrot seeds evenly along the furrows, trying not to cluster them too closely. Lightly cover the seeds with a thin layer of soil and gently mist with water.
Carrot seeds can be slow to germinate—typically taking 10 to 20 days—so patience is key. Keep the soil consistently moist during this period, but not soggy.
Water and Sunlight Requirements
Place your crate in a location that receives at least 6 hours of sunlight daily. Carrots thrive in full sun but can also tolerate partial shade, especially in hotter climates. Water regularly to keep the soil evenly moist. Irregular watering can cause the roots to crack or become bitter.
As the seedlings grow, thin them out once they reach about 2 inches tall. Remove the weakest ones and leave about 2 inches of space between each remaining seedling. This ensures that the roots have enough room to grow straight and healthy.
Feeding and Maintenance
While carrots don’t require heavy feeding, adding a diluted organic liquid fertilizer every few weeks can boost growth. Avoid high-nitrogen fertilizers, as they encourage leaf growth at the expense of the roots.
You can also mulch the surface with straw or dried leaves to retain moisture and keep weeds down. Just be sure to maintain airflow around the plants to prevent rot.
Common Issues to Watch Out For
Carrots grown in containers are less prone to pests, but aphids and carrot flies can still pose problems. Use neem oil spray as a natural deterrent or try companion planting with herbs like rosemary and thyme to mask the scent of carrot foliage.
Make sure the soil remains loose throughout the growing period. If it becomes compacted, it may cause forked or deformed carrots.
Harvesting Your Carrots
Depending on the variety, carrots are usually ready to harvest in 60 to 80 days. You’ll know they’re mature when the tops of the carrots start to peek above the soil and are about the size you want. Gently pull one out to check. If it’s ready, harvest the rest by loosening the soil with a hand tool before pulling.
Don’t wait too long to harvest, as overripe carrots can become woody and lose sweetness.
Enjoying the Results
Rinse your harvested carrots, trim the tops, and store them in the refrigerator for up to a few weeks. You can also use the carrot tops in pesto, soups, or as a garnish—don’t let anything go to waste.
After harvesting, refresh your crate with compost and replant a new batch. Since carrots grow well in cool weather, you can repeat this process several times a year in temperate climates.
Conclusion
Growing carrots in wooden crates is a rewarding and space-efficient way to enjoy fresh, homegrown produce on a balcony. With minimal supplies and a bit of patience, you can cultivate crisp, sweet carrots even in the tightest urban spaces. Whether you’re growing for your family’s table or simply for the joy of gardening, this crate-based method is a smart and sustainable approach to container gardening.


