Cabbage is a versatile and popular vegetable grown worldwide. While many gardeners start cabbage from seeds, propagating cabbage through cuttings is an efficient way to multiply plants and expand your garden. One innovative and sustainable method for rooting cabbage cuttings involves using recycled plastic bottles. This bottle-based technique creates an ideal environment for cuttings to develop roots quickly while promoting sustainable gardening through material reuse.
This article provides a step-by-step guide to rooting cabbage cuttings using plastic bottles, making cabbage propagation accessible and straightforward.
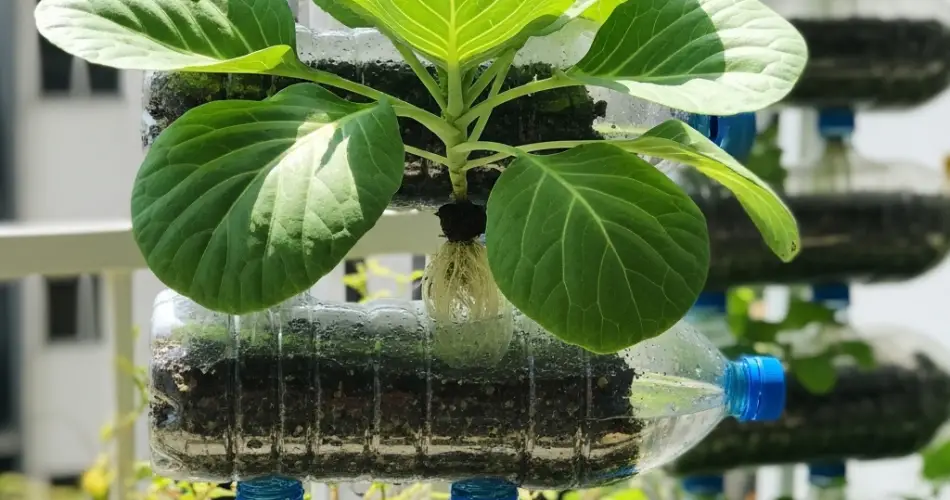
Why Use a Bottle-Based Method for Rooting Cabbage Cuttings?
Plastic bottles serve as inexpensive, readily available propagation chambers that function as mini-greenhouses. They maintain high humidity and warmth, essential factors that encourage root development. Additionally, the transparent nature of bottles allows easy monitoring of root growth and soil moisture, making the process easier for gardeners.
Reusing plastic bottles also reduces environmental waste, making this method eco-friendly and cost-effective.
Materials Needed
-
Clear plastic bottles (1 or 2 liters)
-
Sharp scissors or a craft knife
-
Potting mix or seed-starting soil
-
Healthy cabbage cuttings (4 to 6 inches long)
-
Clean water
-
Rooting hormone (optional but recommended)
-
Spray bottle for misting
-
Labels or markers for identification
Step 1: Preparing the Bottles
Thoroughly wash the plastic bottles to remove any dirt or residues. Remove labels to improve visibility inside the bottle.
Using scissors or a craft knife, cut the bottle horizontally about one-third from the top. The bottom portion will hold soil and cuttings, while the top part can be inverted to create a humidity dome.
Make several drainage holes in the base of the bottom section to prevent waterlogging and root rot. You may also punch ventilation holes in the upper section to allow airflow.
Step 2: Preparing Cabbage Cuttings
Select healthy, disease-free cabbage plants to take cuttings from. Cut 4 to 6-inch sections of the stem just below a leaf node, as this is where roots are most likely to develop.
Remove any lower leaves from the cutting, leaving only a few leaves at the top to reduce water loss and encourage rooting.
Optional: Dip the cut end of each cutting in rooting hormone powder or gel to improve root initiation and growth.
Step 3: Setting Up the Bottle Propagation Environment
Fill the bottom part of the bottle with moist potting mix or seed-starting soil, leaving about an inch of space from the rim.
Make a small hole in the soil to insert the cutting. Place the cutting firmly in the hole and gently press the soil around it to support the stem.
Add water if necessary to keep the soil moist but avoid waterlogging.
Invert the bottle’s top section and place it over the bottom, creating a humidity dome that traps moisture and warmth.
Step 4: Caring for the Cuttings
Place the bottle cloner in a warm, bright location with indirect sunlight. Avoid direct sun, which can overheat the cuttings and cause damage.
Maintain consistent soil moisture by misting with a spray bottle as needed. Avoid overwatering, which can lead to fungal diseases.
Open the dome periodically to improve ventilation and reduce the risk of mold.
Step 5: Monitoring Root Development
Roots should begin to develop within 10 to 21 days, depending on environmental conditions and cabbage variety.
Because the bottle is clear, you can observe root growth without disturbing the cuttings, allowing for timely transplanting once roots are well established.
Step 6: Transplanting Rooted Cuttings
Once roots reach 3 to 5 centimeters (1 to 2 inches) in length, the cuttings are ready to be transplanted.
Carefully remove each cutting from the soil, taking care not to damage delicate roots.
Transplant into larger pots or prepared garden beds with fertile, well-draining soil.
Gradually acclimate plants to outdoor conditions by hardening off for several days before planting in open soil.
Advantages of the Bottle-Based Rooting Method
-
Sustainability: Reuses plastic bottles, reducing environmental waste.
-
Cost-Effectiveness: No need for specialized propagation equipment.
-
Visibility: Transparent bottles make root monitoring easy.
-
Controlled Environment: High humidity and warmth promote faster rooting.
-
Space Efficiency: Compact size is ideal for small indoor spaces or windowsills.
Tips for Success
-
Use disease-free, vigorous parent plants for cuttings.
-
Keep the propagation medium moist but avoid overwatering.
-
Ensure good ventilation to prevent mold or fungal problems.
-
Label your bottles with cutting dates and variety to track progress.
-
Remove the humidity dome gradually once roots begin to form to toughen plants.
Troubleshooting Common Issues
-
Fungal Growth or Mold: Increase ventilation and reduce humidity by removing the dome periodically.
-
Slow Root Development: Ensure adequate warmth and humidity; consider applying rooting hormone.
-
Cutting Wilting: Check moisture levels and avoid direct sun exposure.
-
Root Rot: Ensure proper drainage and avoid soggy soil.
Conclusion
Rooting cabbage cuttings using a bottle-based method is an effective, affordable, and environmentally friendly way to propagate more plants for your garden. This technique offers gardeners a practical alternative to traditional seed-starting methods, with the added benefit of recycling plastic waste.
By following these steps—from bottle preparation and cutting selection to maintenance and transplanting—you can grow healthy cabbage plants ready for transplant in a shorter time. Whether you have limited space or want to embrace sustainable gardening, bottle propagation is a valuable skill to add to your gardening toolkit.


