Starting a bean garden doesn’t require large garden beds or fancy pots. In fact, you can kickstart a thriving bean patch using nothing more than used plastic bottles. This method is ideal for beginners, urban gardeners, and anyone looking to maximize limited space while practicing sustainability. With a few household materials, you can reuse plastic bottles to grow healthy, productive bean plants—right on your balcony, windowsill, or backyard fence.
This guide will walk you through how to use bottles to germinate beans, transplant them, and even grow them through harvest if desired.
Why Use Bottles to Start Beans?
Plastic bottles offer a number of benefits when used as seed starters or mini-greenhouses:
-
Recycled materials: It’s an eco-friendly way to reduce waste.
-
Moisture control: Bottles retain humidity and reduce the need for frequent watering.
-
Mini greenhouses: The enclosed environment promotes faster germination.
-
Space-saving: Great for small spaces and vertical gardening.
-
Transplant-ready: Bottles allow seedlings to develop strong roots before moving to larger containers or garden beds.
Materials You’ll Need
To begin your bottle bean garden, gather the following:
-
1.5L or 2L clear plastic bottles
-
Scissors or utility knife
-
Bean seeds (bush or pole varieties)
-
Potting soil or seed-starting mix
-
Water
-
Marker (optional, for labeling)
-
Small tray or plate to catch excess water
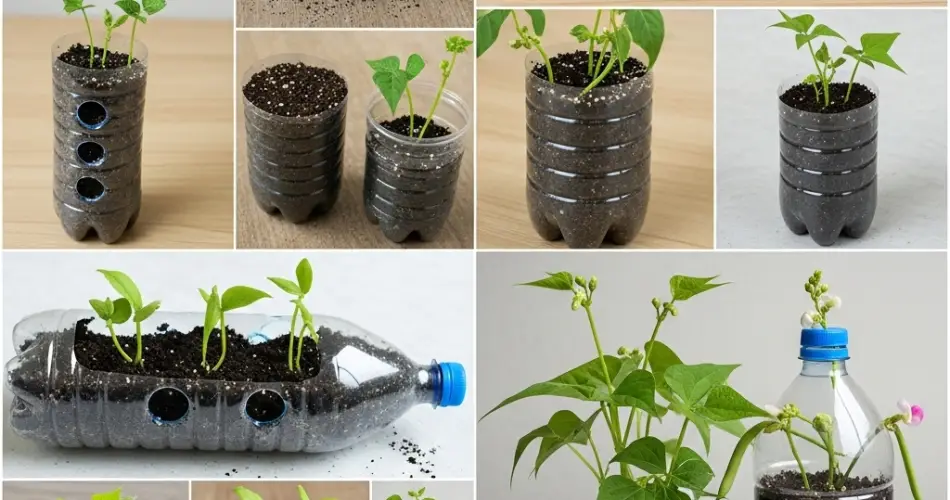
Preparing the Bottles
There are two main ways to prepare bottles for bean propagation:
1. Vertical Bottle Starter
-
Cut the bottle across its middle to create two parts.
-
Poke a few small holes in the bottom half for drainage.
-
Use the bottom half as a mini pot—fill with moist potting soil.
-
Place the top half (without the cap) back over the bottom like a dome to create a greenhouse effect.
2. Horizontal Germination Bed
-
Lay the bottle on its side.
-
Cut a rectangular window along one side (keep the top half intact).
-
Poke small drainage holes on the opposite side (which becomes the bottom).
-
Fill with soil, plant seeds in a row, and cover the window with plastic wrap or a loose-fitting lid to retain moisture.
Sowing the Bean Seeds
Once your bottle planters are ready:
-
Moisten the Soil
Lightly water the potting mix until it’s damp but not soggy. -
Plant the Seeds
Sow bean seeds about 1 inch deep. In the vertical version, plant one seed per bottle base. In the horizontal version, you can fit 3–4 seeds depending on the space. -
Seal and Place
Close the bottle if using the greenhouse style, or cover your germination bed. Place the containers in a sunny, warm spot—beans germinate best at temperatures around 70–80°F (21–27°C).
Caring for Bottle-Grown Bean Seedlings
-
Sunlight: Place the bottles where they get at least 6 hours of sunlight daily.
-
Watering: Check moisture daily. Condensation inside the bottle is normal; only add water when the soil feels dry to the touch.
-
Ventilation: Once sprouts emerge, prop the lid open or remove it during the day to prevent mold and improve airflow.
-
Thinning: If multiple seeds sprout in one bottle, thin out the weakest seedlings to allow space for strong growth.
Transplanting Your Beans
After 10–14 days, your bean seedlings should be a few inches tall and have at least one or two sets of true leaves. At this point, they’re ready for transplanting.
Steps for transplanting:
-
Water the bottle lightly to soften the soil.
-
Carefully remove the seedling without damaging the roots.
-
Transfer it into a larger pot, garden bed, or vertical planter, spacing each plant about 6 inches apart for bush beans or 8–10 inches for pole beans.
-
Water gently after transplanting.
You can also grow beans entirely in larger bottles if space is very limited. Simply cut the bottle lengthwise, add more soil, and provide support like a small stake or trellis.
Optional: Growing Beans Entirely in Bottles
If you prefer to keep your garden ultra-compact, beans can stay in larger bottle containers throughout their lifecycle. Choose dwarf or bush varieties for this method.
-
Ensure good drainage by poking several holes in the bottom.
-
Use rich potting soil mixed with compost.
-
Add a stake or stick to support the growing plant.
-
Place the bottle in a sunny location and keep the soil moist.
Final Thoughts
Growing beans in plastic bottles is a practical and rewarding way to garden without needing much space or budget. With a little creativity, you can turn everyday waste into productive planting vessels that provide fresh, homegrown food. Whether you’re starting seeds or growing to harvest, this method is an excellent solution for eco-conscious urban gardeners looking to grow more with less.


