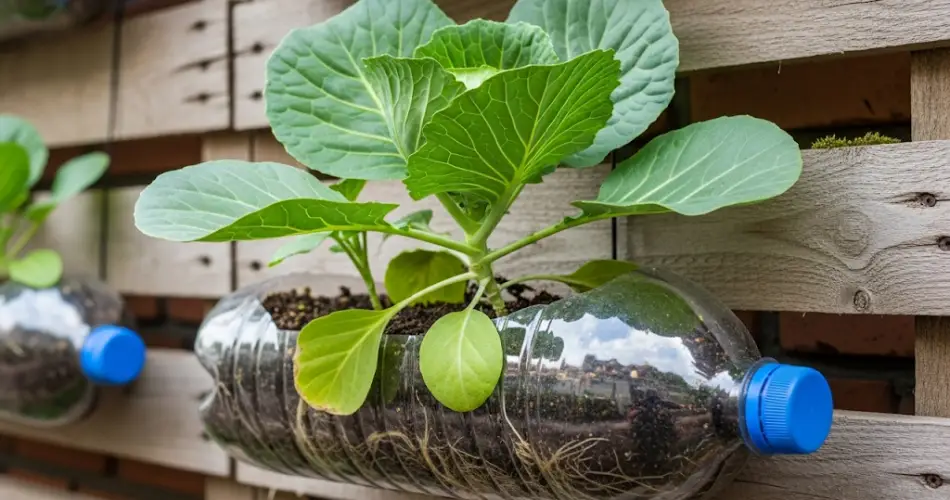
Cabbage, with its tight leafy heads and lush green growth, is often thought of as a garden plant needing space to thrive. But with a bit of creativity, even this traditionally ground-grown crop can be cultivated vertically in recycled bottle wall planters. This sustainable, space-saving method makes cabbage cultivation accessible to urban dwellers and balcony gardeners who want to grow their own fresh greens in limited space.
Here’s how to successfully grow healthy cabbage using wall-mounted plastic bottles, from preparing your containers to harvesting crisp, compact heads.
Why Grow Cabbage in Bottle Wall Planters?
Using recycled plastic bottles for vertical gardening offers numerous advantages:
-
Maximizes space: Ideal for balconies, walls, or narrow pathways.
-
Reuses waste: Turns used bottles into productive growing containers.
-
Improves airflow: Reduces the risk of rot and fungal disease.
-
Decorative: A wall full of leafy greens adds beauty to any home environment.
-
Easy maintenance: At eye level, wall planters make watering and checking on plants more convenient.
Cabbage may seem bulky, but when grown correctly in well-designed containers, even large-headed varieties can adapt to vertical life.
Choosing the Right Cabbage Variety
While standard cabbage can work in large enough containers, smaller or compact varieties are better suited for bottle planters. Look for these types:
-
Mini Cabbage: Compact, early-maturing types such as ‘Golden Acre’ or ‘Pixie’.
-
Savoy Varieties: These offer textured leaves and often grow in tighter heads.
-
Napa (Chinese) Cabbage: Though longer in shape, it adapts well to vertical setups with good root space.
-
Red Express: A smaller red cabbage known for fast maturity and dense heads.
Choose a variety that matures quickly and doesn’t require extensive soil depth.
Materials Needed for the Setup
To start your bottle wall cabbage garden, gather these materials:
-
2-liter plastic bottles (cleaned and labels removed)
-
Sharp knife or scissors
-
Drill or heated nail for drainage holes
-
Sturdy wall, mesh rack, or vertical frame
-
Twine, wire, or cable ties
-
High-quality potting mix
-
Compost or organic fertilizer
-
Cabbage seeds or young seedlings
Preparing the Bottles
-
Cutting the Bottles:
Lay the bottle horizontally and cut out a rectangular window on one side to create a planting pocket. Leave about an inch of border around the window to keep structure. -
Drainage:
Drill or puncture 3–5 holes at the bottom of each bottle for drainage. This prevents waterlogging and root rot. -
Mounting:
Attach the bottles horizontally to your vertical frame or wall using wire, zip ties, or twine. Stagger the bottles in rows, leaving space between them to allow for plant growth and sunlight penetration.
Soil Preparation and Planting
Use a light, well-draining potting mix with plenty of organic material. A mix of compost, coconut coir, and perlite ensures water retention and good drainage.
-
Filling: Fill each bottle with soil, leaving about an inch from the top.
-
Planting: If using seeds, sow 2–3 per bottle and thin to the healthiest one once they germinate. For seedlings, gently transplant one into each bottle’s planting pocket.
-
Watering: Water lightly but regularly. The small soil volume means it can dry out quickly, especially in hot weather.
Caring for Cabbage in Bottles
1. Sunlight
Cabbage loves full sun—at least 5–6 hours daily. Place your vertical planter where it gets good exposure.
2. Fertilization
Bottle-grown plants need extra nutrition due to limited soil:
-
Apply a diluted liquid fertilizer or compost tea every two weeks.
-
Mix slow-release organic fertilizer into the soil at planting time.
-
Crushed eggshells or banana peel compost can add calcium and potassium.
3. Watering
Check soil moisture daily. Avoid letting it dry out completely, but ensure the water drains well to prevent soggy roots.
4. Pest Control
Watch out for common cabbage pests like aphids, cabbage worms, or whiteflies. Spray neem oil or use insect-repelling companion plants like garlic or marigolds near the setup.
5. Pruning and Spacing
Remove damaged or yellowing leaves to encourage airflow and reduce disease. Avoid overcrowding; each cabbage needs room to form a head.
Supporting Cabbage Growth
As the cabbage matures, the growing head can get heavy. If necessary, use mesh or a soft sling (like cloth or netting) to support the cabbage head in the bottle opening and prevent drooping.
Because the plant grows outward and downward in this vertical setup, make sure there’s space below each bottle to accommodate the growing foliage.
Harvesting Your Wall-Grown Cabbage
Cabbage is typically ready to harvest 70–90 days after planting, depending on the variety. You’ll know it’s ready when the head feels firm and compact to the touch. Use a sharp knife to cut the cabbage head just above the base, leaving the root in place. In some cases, new baby heads may sprout from the base afterward.
Final Tips
-
Rotate the setup occasionally if sunlight is uneven.
-
Refresh the soil in the bottles between plantings to prevent nutrient depletion.
-
Use mulch or organic top-dressing to conserve moisture.
Conclusion
With a bit of ingenuity, even a leafy vegetable like cabbage can thrive in a vertical garden made from recycled bottles. Not only do you get to enjoy fresh, homegrown cabbage, but you also make a positive impact by reusing materials and growing your own food in a sustainable, space-saving way.
Whether you’re working with a narrow balcony or a sunny outdoor wall, wall-mounted bottle planters provide a productive and beautiful solution for urban gardening success.