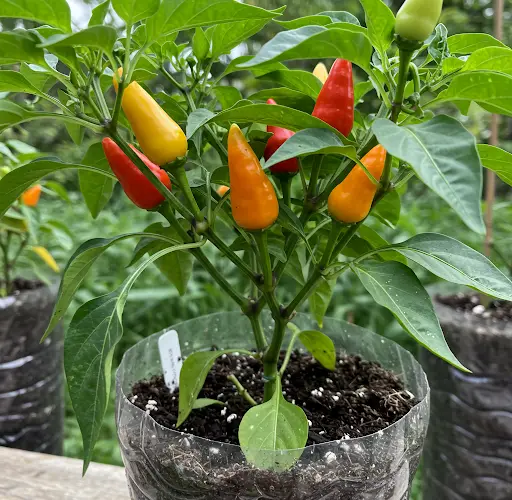
Growing Hot Pepper Plants Using Plastic Bottles
If you love the fiery flavor of hot peppers and are looking for a sustainable way to grow them at home, consider using recycled plastic bottles as planters. This budget-friendly method is perfect for gardeners with limited space and a desire to reduce plastic waste. Whether you’re growing chili peppers, cayenne, or bird’s eye varieties, plastic bottles can provide a simple yet effective container solution for your mini pepper garden.
With just a few household items and a sunny spot, you can cultivate thriving hot pepper plants using discarded plastic bottles—ideal for balconies, patios, windowsills, or even vertical gardens.
Why Grow Hot Peppers in Plastic Bottles?
Plastic bottles are lightweight, waterproof, and easy to repurpose. When transformed into planters, they can support the healthy growth of pepper plants while minimizing environmental impact. Here are a few reasons why plastic bottles are perfect for this task:
-
Reusability: Gives a second life to single-use plastic.
-
Compact Size: Fits in small areas, ideal for urban gardeners.
-
Customizable: Can be hung, stacked, or modified for vertical gardening.
-
Cost-Effective: No need to buy pots—just reuse what you already have.
Materials Needed:
-
1- or 2-liter plastic bottles
-
Scissors or a utility knife
-
A nail or heated pin for drainage holes
-
Organic potting soil or garden soil with compost
-
Hot pepper seeds or seedlings
-
Water
-
Optional: rope or wire for hanging, paint or markers for decoration
Step 1: Choose and Prepare the Bottles
Start with clean, empty bottles. Remove labels and wash thoroughly to eliminate any sugar or residue that may attract insects or mold.
Decide on your bottle design based on available space:
Vertical Planters (great for hanging)
-
Cut a rectangular opening on one side of the bottle.
-
Punch holes at the top on both sides for string or wire.
-
Create drainage holes in the bottom.
Horizontal Planters (ideal for shelf or railing placement)
-
Cut a wide window on the side.
-
Poke several drainage holes on the underside.
-
Use stones inside to help with balance.
For vertical gardens, you can even hang multiple bottles in a stacked design by threading rope through the top and bottom.
Step 2: Add Soil and Plant Your Seeds
Use a well-draining mix that peppers love:
-
40% garden soil
-
30% compost or organic manure
-
30% sand or cocopeat
This combination ensures proper aeration, nutrition, and drainage—critical for healthy pepper plants.
Fill your bottle planter with the soil mix, leaving about an inch from the top. If using seeds, plant them ¼ inch deep and cover lightly. If transplanting seedlings, dig a small hole, place the root ball in, and gently firm the soil around it.
Step 3: Provide Light, Heat, and Support
Peppers thrive in full sunlight and warm temperatures. Place your bottle planters where they can receive 6–8 hours of sunlight daily. If you’re growing indoors, a sunny windowsill or under a grow light will work too.
Since pepper plants can get top-heavy once they begin fruiting, insert a small stick or bamboo skewer into the soil early on to use as a support. Tie the stem gently with twine as it grows taller.
Step 4: Watering and Feeding
Water your pepper plant regularly but avoid overwatering. The top inch of soil should be dry before watering again. In hot weather, this might mean watering daily—just be sure to check soil moisture.
Feed your pepper plant every 2–3 weeks with an organic fertilizer like compost tea, banana peel solution, or diluted fish emulsion. These natural feeds promote healthy foliage and fruit development.
Step 5: Pest Control and Plant Maintenance
While peppers are relatively hardy, they can still attract pests like aphids or whiteflies. Spray your plants with neem oil diluted in water once a week as a preventive measure. You can also introduce companion plants like basil or marigold to help repel insects naturally.
Regularly prune lower leaves and remove any yellow or dead foliage. As the plant matures, pinch off the early flower buds to encourage bushier growth and stronger roots.
Step 6: Harvesting
Most hot pepper varieties are ready to harvest 60–90 days after transplanting, depending on the type. The color of the fruit—green, red, orange, or yellow—indicates ripeness. Use scissors to snip the peppers from the plant rather than pulling them off, which could damage the stem.
Continued harvesting encourages the plant to produce more fruit throughout the season.
Tips for Success:
-
If your area experiences cooler temperatures, bring the bottles indoors at night or during storms.
-
Avoid using bottles that are brittle or heavily damaged, as they may crack under sun exposure.
-
Label each bottle with the pepper variety and sowing date for easy tracking.
-
Try experimenting with different chili types—each variety brings its own level of heat and flavor.
Conclusion
Growing hot pepper plants in recycled plastic bottles is a creative and sustainable gardening technique that combines functionality with eco-conscious living. Whether you’re limited on space or just looking for an easy way to start gardening, this method is a fun, effective solution.
Not only will you enjoy a continuous supply of spicy peppers, but you’ll also contribute to reducing plastic waste—one pepper plant at a time.