Recycle a Plastic Container to Grow Green Herbs at Home
Growing your own green herbs at home is one of the easiest and most rewarding ways to enhance your cooking while also promoting sustainability. Not only do home-grown herbs add fresh flavors to your meals, but they can also be grown in small spaces, making them perfect for apartments, balconies, and even windowsills.
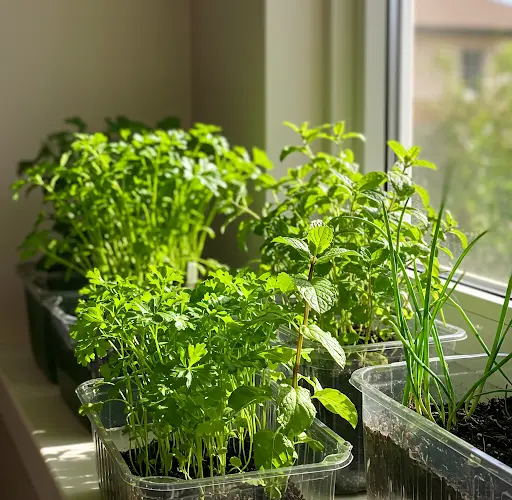
One of the most eco-friendly ways to grow herbs is by repurposing plastic containers, which would otherwise contribute to waste. By upcycling plastic containers, you can create functional and attractive planters that help reduce plastic waste while giving you the joy of harvesting fresh herbs. Let’s walk through how you can recycle plastic containers to grow green herbs at home.
Why Recycle Plastic Containers for Herb Gardening?
Plastic containers are not only widely available but are also durable, lightweight, and versatile. Using them to grow herbs offers several benefits:
-
Sustainability: By reusing plastic containers, you help reduce the amount of waste that ends up in landfills or the ocean.
-
Cost-effective: Recycling plastic containers eliminates the need to buy expensive planters, making herb gardening more affordable.
-
Space-saving: Plastic containers come in various sizes, allowing you to grow herbs even in small spaces like windowsills or countertops.
With a bit of creativity and care, these containers can be transformed into effective, low-maintenance herb gardens.
What You’ll Need:
-
Clean, empty plastic containers (e.g., milk jugs, yogurt containers, takeout containers, or soda bottles)
-
Scissors or a utility knife
-
A nail or drill for making drainage holes
-
Organic potting soil or compost
-
Herb seeds or seedlings (e.g., basil, parsley, cilantro, mint, or thyme)
-
Water
-
Optional: Paint, twine, or labels for decoration
Step 1: Prepare the Plastic Containers
The first step is to clean your plastic containers thoroughly. Rinse them with warm water to remove any food residue, and allow them to dry completely. You can use any plastic container you have on hand, but be mindful of the size based on the herb you want to grow. For instance, basil or mint will need a larger container than parsley or thyme.
Next, you’ll need to create drainage holes to ensure the roots don’t rot from excess water. Use a nail or a drill to poke several small holes in the bottom of the container. Proper drainage is crucial, as standing water can lead to root rot and unhealthy plants.
Step 2: Add Soil and Plant Your Herbs
Once your containers are ready, it’s time to fill them with soil. Choose organic potting soil or a well-draining compost mix to give your herbs the best start. Fill the container about ¾ full, leaving some space at the top to prevent soil from spilling over when watering.
Now, plant your herb seeds or seedlings. If you’re starting from seeds, follow the instructions on the seed packet regarding depth and spacing. Typically, herb seeds should be sown about ¼ to ½ inch deep. If you’re using seedlings, gently plant them into the soil, making sure the roots are well-covered and stable.
Make sure each container is designated for a single herb or a small group of similar herbs to avoid overcrowding. Herbs like basil, parsley, and cilantro grow well together, while mint should be grown alone as it tends to spread rapidly.
Step 3: Provide Proper Care
After planting your herbs, it’s essential to place them in a location where they will receive plenty of sunlight. Most herbs require at least 4-6 hours of direct sunlight each day. A windowsill, balcony, or countertop near a sunny window is ideal. If you’re growing herbs indoors, consider rotating the containers occasionally to ensure even growth.
Water your herbs regularly, but make sure the soil doesn’t become soggy. Overwatering can lead to root rot, so it’s important to allow the soil to dry out slightly between watering sessions. Watering once the top inch of soil feels dry is generally a good rule of thumb.
If you’re growing multiple herbs in one container, keep an eye on their growth and trim any overgrown plants to allow space for others. Regular pruning helps to promote new growth and keeps your herbs healthy.
Step 4: Harvesting Your Herbs
One of the best parts of growing herbs at home is the ability to harvest them fresh whenever you need them. Most herbs will be ready for harvesting in about 4 to 6 weeks, depending on the variety. When harvesting, always use clean, sharp scissors or pruning shears to cut the leaves. To encourage more growth, avoid cutting off the entire plant—harvest leaves from the top, leaving the lower leaves to continue growing.
For herbs like basil, you can trim the leaves regularly, while for herbs like thyme, it’s better to harvest a few sprigs at a time. Be sure to remove any dead or yellowing leaves to maintain plant health.
Extra Tips for Growing Green Herbs in Recycled Containers:
-
Decorate your containers: If you’d like to make your herb garden more aesthetically pleasing, consider painting your plastic containers with non-toxic paint or decorating them with twine. You can also label the containers so you know which herb is growing where.
-
Add a water reservoir: For an easy self-watering system, place a small piece of cloth or string in the drainage holes to help wick up water from a reservoir at the bottom of the container. This helps ensure your herbs are consistently hydrated.
-
Ensure proper air circulation: If growing indoors, ensure your herbs have enough air circulation to prevent fungal diseases. Avoid placing them in overly humid areas.
Conclusion
Recycling plastic containers for growing green herbs at home is a simple, sustainable, and cost-effective way to enjoy fresh herbs year-round. Whether you’re new to gardening or an experienced grower, this method is a great way to reduce waste and create your own little herb garden, no matter the size of your space. By following these easy steps, you’ll have a thriving herb garden in no time—ready to add vibrant flavors to your meals.