Radishes are fast-growing, nutrient-rich root vegetables that are perfect for home gardens, including small-space or container setups. Using cut plastic bottles for propagation offers an eco-friendly, low-cost solution for starting and growing radishes, especially for urban gardeners with limited space. This method recycles common household waste while providing a compact environment ideal for nurturing healthy radish plants.
Here’s a detailed guide on how to propagate and grow radishes using cut plastic bottles—from seed sowing to harvest.
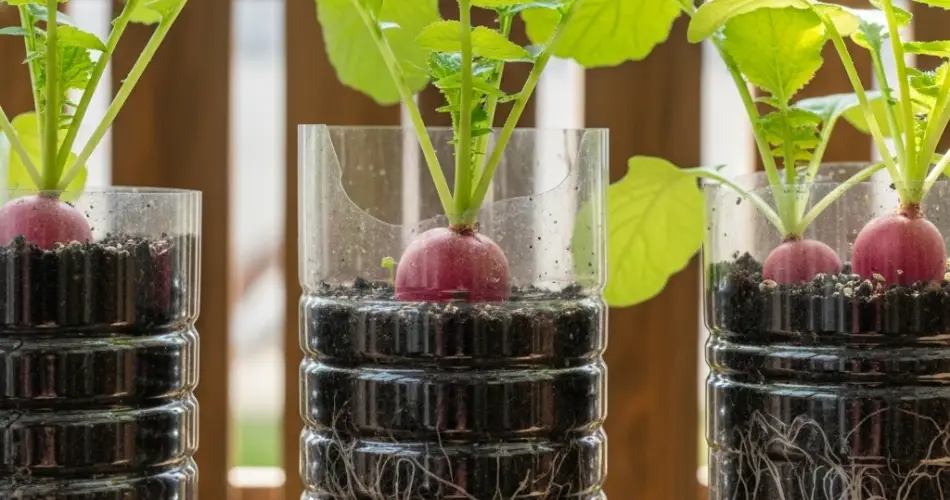
Why Use Cut Bottles for Radish Propagation?
Cut plastic bottles make excellent mini planters for radish propagation. They allow for good soil depth, drainage, and root observation while saving money and reducing plastic waste. Transparent bottles are especially useful for checking moisture levels and root growth without disturbing the plant. Radishes have a short growing cycle and don’t require extensive root space, making them ideal candidates for bottle-based gardening.
What You’ll Need
-
Clear plastic bottles (1.5 or 2-liter size)
-
Sharp scissors or a craft knife
-
Radish seeds (any fast-growing variety)
-
Light, well-draining soil (a mix of compost, garden soil, and sand or perlite)
-
Water spray bottle or small watering can
-
Tray or shallow basin (to catch excess water)
-
Toothpick or stick (for making planting holes)
Optional:
-
Marker and ruler (for cutting guides)
-
Paper towel or cloth (to cover bottom holes during filling)
Preparing the Bottles
-
Cutting the Bottle:
Cut the plastic bottle horizontally about 5–6 inches from the base. The bottom part will serve as your radish planter. Make sure the bottle is clean and dry before use. -
Add Drainage Holes:
Poke 4–6 holes in the bottom of the cut bottle using a heated nail or a sharp tool. These allow excess water to escape and prevent root rot. -
Fill with Soil:
Add a layer of moist, well-draining soil into the bottle. Radishes grow best in loose soil that allows the roots to expand easily. Avoid compact or clay-heavy soil, as it may cause the roots to become misshapen. -
Level and Moisten:
Gently pat down the soil without pressing it too tightly. Use a spray bottle to lightly moisten the surface before planting.
Sowing the Radish Seeds
Use your finger, a toothpick, or a small stick to poke shallow holes about ½ inch deep. Plant 2–3 radish seeds per hole and cover lightly with soil. Keep seeds spaced about 2 inches apart to allow room for root development.
Mist the soil again to ensure good contact between the seeds and the soil. Place the bottle planter in a sunny location where it can receive at least 5–6 hours of direct sunlight daily. A balcony, windowsill, or sunny kitchen ledge works well.
Germination and Early Growth
Radish seeds germinate quickly, usually within 3–7 days. During this time, maintain consistent soil moisture without overwatering. Use a spray bottle or gentle stream of water to keep the soil damp but not soggy.
Once the seedlings develop their first true leaves, thin them out by snipping the weakest ones at the soil line. Leave only the healthiest seedling per cluster to ensure each plant has enough room to grow a full-sized root.
Bottle Care and Plant Maintenance
As the radishes grow, keep the bottle in a spot with full sun exposure. Rotate the bottle occasionally to ensure even light distribution. Check the drainage regularly—if water collects at the bottom, tilt the bottle slightly or create additional holes.
Water consistently but avoid flooding the soil. Radishes don’t like wet feet, but they also suffer if the soil dries out completely. You can apply a diluted liquid fertilizer every two weeks to promote steady growth, though radishes generally do well in nutrient-rich soil without much extra feeding.
Monitoring Growth and Harvesting
Depending on the variety, radishes are ready to harvest within 25 to 35 days. You’ll notice the round tops of the roots peeking above the soil surface. To check readiness, gently brush away a bit of soil and inspect the size. If they’ve reached about 1 inch in diameter (or the variety’s recommended size), they’re ready to pick.
Harvest by gently pulling the radish out by the base of its leaves. If the soil is dry, water lightly first to make the process easier.
Reusing Bottles and Successive Plantings
After harvesting, remove leftover roots and refresh the soil with compost or replace it completely before replanting. Bottles can be reused multiple times if cleaned and dried properly between plantings.
Radishes grow best in cooler seasons, so try multiple rounds during spring and fall. With staggered planting, you can maintain a continuous supply of fresh radishes throughout the growing season.
Final Thoughts
Propagating radishes in cut plastic bottles is a sustainable, space-efficient gardening method that’s perfect for beginners and city dwellers. With minimal materials and effort, you can enjoy crisp, peppery radishes fresh from your own micro-garden. Whether you’re growing on a balcony, windowsill, or patio, this technique brings root vegetable gardening right to your fingertips.


