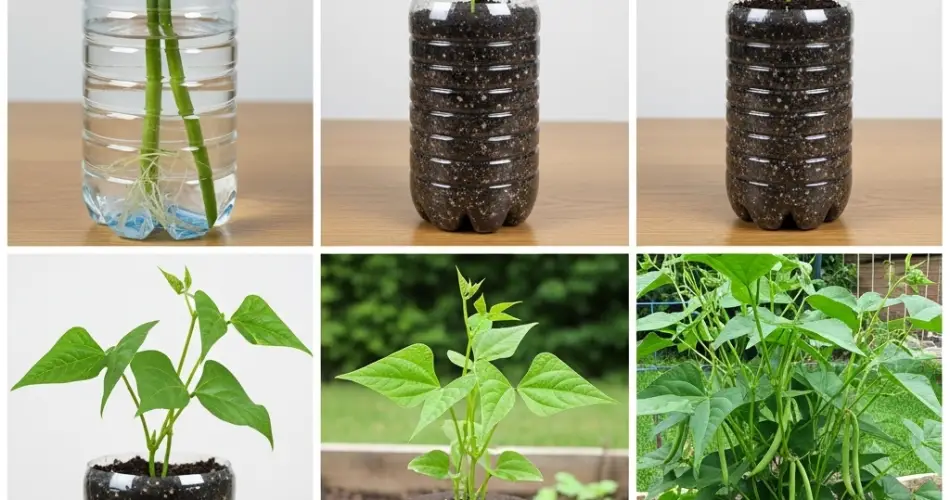
Green beans are fast-growing, productive vegetables that are easy to propagate and perfect for home gardens. Whether you’re growing bush beans or climbing pole beans, starting your seedlings in a controlled environment increases the success of your crop. One creative and sustainable way to do this is by using recycled plastic bottles as mini nurseries.
Bottle nurseries offer a clean, cost-effective, and compact method to start green bean seedlings, especially for gardeners working with limited space. Whether you’re growing on a balcony, backyard, or kitchen windowsill, this method is practical, eco-friendly, and simple enough for beginners. This article will guide you step-by-step through propagating green bean seedlings using plastic bottles.
Why Use Plastic Bottles for Seedling Propagation?
Plastic bottle nurseries are becoming increasingly popular due to their practicality. Here’s why they’re an ideal option:
-
Budget-friendly – Recycle plastic bottles you already have at home.
-
Compact – Perfect for starting seedlings in small spaces.
-
Portable – Easy to move indoors or outdoors to adjust light and temperature.
-
Eco-conscious – A great way to reduce household plastic waste.
-
Customizable – Easily modify the size, shape, and drainage.
Green beans, with their rapid germination and early vigor, thrive when started in small, well-drained containers like these.
What You’ll Need
Before you begin, gather these materials:
-
1 large plastic bottle (1.5 to 2 liters)
-
Scissors or a utility knife
-
A nail or skewer (to poke drainage holes)
-
Potting mix or seed-starting mix
-
Green bean seeds (bush or pole variety)
-
Spray bottle or watering can
-
Optional: Labels or markers for date/variety tracking
Step-by-Step Guide to Creating Bottle Nurseries
Step 1: Prepare the Bottle
Start by cleaning the bottle thoroughly and removing the label. Then, use scissors or a knife to cut the bottle horizontally about one-third from the top. The bottom section will serve as your seedling pot.
Poke several small holes at the bottom using a nail or skewer to allow excess water to drain. For added stability and moisture retention, you can keep the top portion of the bottle and use it as a dome to trap humidity—essentially creating a mini greenhouse.
Step 2: Prepare the Soil
Green beans prefer well-draining soil with moderate fertility. For starting seedlings, use a light seed-starting mix or create your own by combining:
-
40% compost or aged manure
-
30% loam or garden soil
-
30% cocopeat, sand, or perlite for aeration
Lightly moisten the soil before filling the bottle. Avoid compacting the soil—keep it airy to allow for root development.
Step 3: Plant the Seeds
Make small holes about 1 inch deep in the soil. Drop one green bean seed into each hole and cover loosely with soil. If you’re using a wide bottle, you can plant 2–3 seeds, spacing them a couple of inches apart.
Gently water the soil with a spray bottle or watering can. The goal is to moisten the soil without over-saturating it.
Step 4: Provide the Right Environment
Place your bottle nursery in a warm, bright area that receives at least 4–6 hours of indirect sunlight each day. A windowsill, covered patio, or well-lit indoor spot is ideal. If using the bottle top as a greenhouse cover, remove it for an hour daily to allow fresh air in and reduce fungal risk.
Green beans typically germinate within 5–10 days. Keep the soil consistently moist during this period, but be careful not to overwater.
Care and Maintenance of Seedlings
-
Thinning: Once the seedlings emerge and grow to about 3 inches tall, thin them out to one healthy seedling per bottle if multiple seeds were sown.
-
Hardening off: About a week before transplanting, gradually expose the seedlings to outdoor conditions for a few hours each day. Increase the duration daily to strengthen the plants.
-
Feeding: Seedlings don’t need much feeding in the first two weeks. After that, you can water them with diluted compost tea or an organic fertilizer once a week to encourage steady growth.
Transplanting Seedlings
When the seedlings are 4–6 inches tall and have at least 2–3 true leaves, they’re ready to move to their final growing space. Green beans dislike root disturbance, so transplant gently:
-
Water the seedling well a few hours before transplanting.
-
Carefully remove the entire soil block with the roots intact.
-
Plant it into garden beds, pots, or larger containers with rich, well-drained soil.
-
Water after transplanting and keep in partial shade for a day or two before moving into full sun.
If growing pole beans, provide a trellis or stake at planting time to prevent damaging roots later on.
Bonus Tips
-
Label your bottles with planting dates to keep track of germination and transplant timelines.
-
Use multiple bottles to start successive batches of green beans for a continuous harvest.
-
Try bottom watering by placing the bottle in a shallow tray of water for even moisture absorption.
Final Thoughts
Propagating green bean seedlings in bottle nurseries is a simple, efficient, and eco-friendly gardening method that anyone can try. It’s especially useful for small-space growers or those looking to start their gardens early indoors. With just a few recycled materials and a bit of care, you’ll be well on your way to growing strong, healthy green bean plants—ready to thrive and produce a generous harvest throughout the season.


