Growing lettuce hydroponically is a simple, space-saving way to enjoy fresh greens year-round, even if you don’t have access to a large garden. With the right setup, you can turn discarded plastic bottles into productive mini-hydroponic systems. This method is low-cost, eco-friendly, and perfect for beginners who want to try their hand at soilless gardening.
Why Choose Hydroponics for Lettuce?
Hydroponic gardening involves growing plants in water enriched with nutrients instead of soil. Lettuce thrives in this environment because it has shallow roots, grows quickly, and does not require deep planting space. Without soil, you eliminate common problems like weeds and many soil-borne pests. Additionally, hydroponic systems can produce healthier, faster-growing plants since the nutrients are delivered directly to the roots.
Using plastic bottles for hydroponics is a sustainable choice because it recycles waste while reducing the need for expensive gardening containers. It’s also easy to scale: you can start with one or two bottles and expand your setup as you gain experience.
Materials You’ll Need
To set up a simple plastic bottle hydroponic system for lettuce, gather the following:
-
One large plastic bottle (1.5–2 liters works well)
-
A sharp utility knife or scissors
-
Lettuce seeds or seedlings
-
A small piece of sponge, rockwool, or cotton for seed germination
-
Hydroponic nutrient solution
-
Water
-
A dark cloth or paper to wrap the lower part of the bottle (optional, to prevent algae growth)
Preparing the Bottle System
-
Cut the Bottle
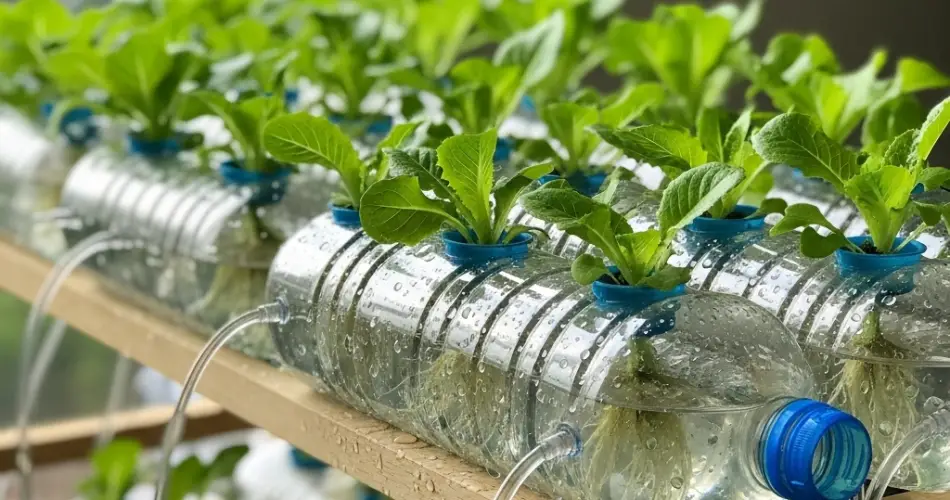
Using scissors or a utility knife, carefully cut the plastic bottle horizontally into two parts: an upper section (with the neck and cap) and a lower section that will serve as the water reservoir. -
Make the Wick Hole
Puncture a small hole in the bottle cap. This is where the wick or sponge will go, allowing water and nutrients to reach the plant roots. You can use a strip of cloth, a shoelace, or a small piece of sponge for the wick. -
Assemble the Planter
Place the upper section of the bottle upside-down inside the lower section, so the neck points downward into the water reservoir. The wick should hang from the bottle cap into the nutrient solution below. -
Wrap the Base (Optional)
To reduce algae growth, wrap the lower section of the bottle in dark paper or cloth to block sunlight from reaching the water.
Germinating Lettuce Seeds
Before placing your lettuce into the hydroponic bottle, you’ll need to germinate the seeds. Moisten a small piece of sponge, rockwool, or cotton and place two to three seeds on it. Keep the germination medium in a warm, well-lit area, ensuring it remains moist but not waterlogged. Within a few days, you should see tiny sprouts emerging.
Once the seedlings have grown to about 3–4 centimeters tall and developed their first true leaves, they are ready to be transferred to the bottle system.
Setting Up the Hydroponic Nutrient Solution
Fill the lower section of the bottle with water and mix in your hydroponic nutrients according to the instructions on the package. Lettuce prefers a mild nutrient concentration, so avoid over-fertilizing, which can harm the roots. The pH level of the solution should be around 5.5–6.5 for optimal growth.
Transplanting the Seedlings
Place the germinated seedlings (still in their sponge or rockwool) into the neck of the bottle’s upper section, ensuring the wick is in contact with the nutrient solution below. The sponge will hold the plant upright while allowing roots to grow down through the bottle neck into the water.
Care and Maintenance
-
Lighting: Lettuce needs at least 10–12 hours of light daily. If growing indoors, place the bottles near a sunny window or use grow lights.
-
Water and Nutrients: Check the water level regularly and top it up with nutrient solution as needed. Change the entire solution every one to two weeks to prevent nutrient imbalances and algae buildup.
-
Temperature: Lettuce prefers cooler temperatures, ideally between 15–22°C (59–72°F). Avoid placing your system in hot, direct sunlight for prolonged periods, as this can cause the plants to bolt.
Harvesting Your Lettuce
Lettuce grown hydroponically can be harvested as early as 4–6 weeks after transplanting, depending on the variety. You can either harvest the entire plant or practice “cut and come again” harvesting, where you trim the outer leaves and allow the center to keep producing.
Advantages of This Method
-
Low Cost: Uses recycled bottles instead of specialized hydroponic containers.
-
Compact Design: Fits on windowsills, balconies, or small indoor spaces.
-
Clean and Efficient: No soil means less mess and fewer pests.
-
Sustainable: Reduces plastic waste while providing fresh food.
Final Thoughts
Hydroponically growing lettuce in plastic bottles is a practical and rewarding project for both beginners and experienced gardeners. It combines the benefits of hydroponics with sustainable recycling, offering a continuous supply of fresh, crisp greens right at home. With just a little care and attention, you can enjoy delicious, homegrown lettuce throughout the year—without needing a traditional garden space.


