Growing garlic at home doesn’t require a large garden or fancy equipment. In fact, with just a few plastic bottles and some basic supplies, you can cultivate fresh, flavorful garlic in the smallest of spaces. This method is perfect for balcony gardeners, apartment dwellers, or anyone looking to reuse plastic bottles while enjoying a sustainable harvest.
Garlic is not only a kitchen essential but also easy to grow and surprisingly adaptable to container gardening. With the right technique, you can grow healthy garlic bulbs in upcycled 2-liter bottles, giving you fresh cloves and edible greens in just a few months.
Why Grow Garlic in Plastic Bottles?
Using plastic bottles as planters is a clever way to recycle waste while making the most of limited space. Bottles are lightweight, easy to hang or stack, and cost nothing if you’re reusing household items. Garlic doesn’t require deep containers, making it ideal for bottle planting.
This method also lets you control soil quality, reduce pests, and grow crops year-round—even indoors or on balconies.
Materials You’ll Need:
-
2-liter plastic bottles (clean and label-free)
-
Sharp knife or cutter
-
Nail or screwdriver (to make drainage holes)
-
Garlic cloves (firm, untreated, and not sprouting mold)
-
Potting mix (light, rich in organic matter)
-
Compost or slow-release organic fertilizer
-
Watering can or spray bottle
-
String or wire (if hanging the bottles)
Step 1: Select the Right Garlic Cloves
Choose large, healthy garlic bulbs. Avoid using store-bought garlic that has been chemically treated to prevent sprouting. If possible, opt for organic garlic or cloves sourced from a nursery or farmer’s market.
Separate the bulb into individual cloves, but leave the papery skin intact. Choose the largest outer cloves for planting and save the smaller inner ones for cooking.
Step 2: Prepare the Bottles
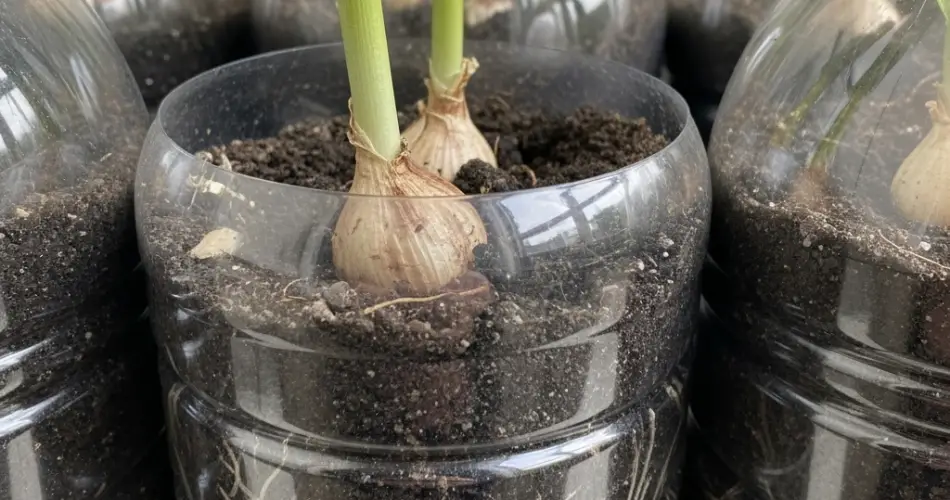
Wash the plastic bottles and remove any labels. Using a knife or cutter, cut a rectangular window along one side of the bottle, leaving about a 2-inch border all around for support. This will be your planting window.
Poke 4–6 holes in the bottom of the bottle for drainage. If you want to hang the bottle later, make two small holes near the top and thread string or wire through them for support.
Step 3: Add Soil and Compost
Fill the bottle about two-thirds full with a well-draining potting mix enriched with compost or aged manure. Garlic prefers loose, fertile soil with good airflow around the roots.
Avoid over-packing the soil, as compacted soil can hinder root development.
Step 4: Plant the Garlic Cloves
Make small holes about 2–3 inches deep in the soil. Place each garlic clove in the hole with the flat root end facing down and the pointed tip facing up. If using a large bottle, you can fit two or three cloves with at least 4 inches of space between them.
Cover the cloves with soil and press gently to remove air pockets.
Step 5: Position for Light
Garlic needs at least 6 hours of sunlight daily. Place the bottles in a sunny spot such as a windowsill, balcony, or patio. If sunlight is limited, consider rotating the bottles daily or using grow lights indoors.
If you’re hanging the bottles, make sure they are securely fastened and not swinging in strong winds.
Step 6: Watering Routine
Garlic likes evenly moist soil but is prone to rot if overwatered. Check moisture levels by feeling the top inch of soil—water only when it feels dry. Use a spray bottle or watering can with a narrow spout to avoid overwatering.
Reduce watering slightly once the plants start to mature and yellowing of leaves begins, as this signals the start of bulb development.
Step 7: Feeding and Maintenance
Feed the plants every 2–3 weeks with a diluted liquid fertilizer or compost tea to boost bulb growth. Trim off any yellow or damaged leaves, and ensure good airflow around each plant to reduce disease risks.
You can also snip garlic greens (the leaves) once they reach about 6 inches long. Use them as flavorful garnishes while the bulbs continue to develop underground.
Step 8: Harvesting Garlic
Garlic takes about 90–120 days to mature, depending on the variety. It’s ready to harvest when the lower leaves begin to dry out and turn brown, while the upper leaves stay green.
To harvest, gently remove the garlic bulb from the soil. Avoid tugging hard; instead, loosen the soil first. Let the harvested bulbs dry in a cool, shaded place for 1–2 weeks. Once cured, trim the roots and leaves and store the bulbs in a cool, dry place.
Tips for Success
-
Use softneck garlic varieties if you live in a warm climate; hardneck types do better in colder regions.
-
Don’t overcrowd the bottle—each clove needs enough space to form a full bulb.
-
Keep bottles raised slightly or placed on a tray to allow excess water to drain easily.
-
You can stagger planting dates for a continuous garlic harvest throughout the year.
-
Save a few healthy cloves from your harvest for your next planting cycle.
Conclusion
Growing garlic in plastic bottles is an eco-friendly, low-maintenance way to enjoy homegrown flavor in even the smallest of spaces. With a little care, patience, and sunlight, you’ll have your own supply of fresh garlic bulbs and greens—grown entirely from recycled materials. It’s a practical solution for anyone seeking sustainability, space-saving ideas, or simply a deeper connection with their food.


