Simple and Effective Plant Watering System Using Plastic Bottles
During the summer, high temperatures and limited rainfall can create a challenging environment for growing fruits and vegetables. Plants require consistent moisture to thrive, and without it, their growth—and the quality of their fruits—can suffer. While professional drip irrigation systems are often used in greenhouses or large gardens, these setups aren’t always practical for smaller gardens or for plants spaced irregularly. In such cases, a low-cost, efficient solution can be found in an everyday item: the plastic bottle.
Plastic bottles, often discarded after use, can be easily repurposed into a practical watering system. This method not only helps maintain consistent soil moisture during hot weather but also contributes to environmental sustainability by reducing plastic waste.
Why Use Plastic Bottles for Watering?
Watering with plastic bottles offers several advantages:
-
Conserves Water: Water is delivered slowly and directly to the root zone, minimizing evaporation and runoff.
-
Reduces Fungal Risk: Because the leaves remain dry, there’s a lower risk of fungal diseases commonly caused by water lingering on foliage.
-
Cost-Effective: No need for expensive irrigation equipment—just a few basic materials.
-
Eco-Friendly: Repurposing plastic bottles helps reduce waste.
What You’ll Need
-
1-liter or 1.5-liter plastic bottles (one for each plant)
-
Small pieces of sponge or cloth
-
A knife or scissors for cutting
-
Access to clean water
Step-by-Step Instructions
1. Prepare the Bottles
Start by removing the caps from the bottles. Then, using a knife or scissors, cut off the bottom of each bottle. This open end will act as the water inlet, making it easy to fill the bottle with water later.
2. Add a Sponge or Cloth
Insert a piece of sponge or folded cloth into the neck of each bottle (where the cap used to be). The material should be thick enough to slow down the water flow, allowing it to drip slowly into the soil. This ensures gradual and even watering rather than releasing water too quickly.
3. Install the Bottles in the Garden
Dig a small hole next to each plant, about 15 cm away from the base. The depth should match the root system of the plant—around 15 cm deep is ideal for common garden crops like tomatoes and peppers.
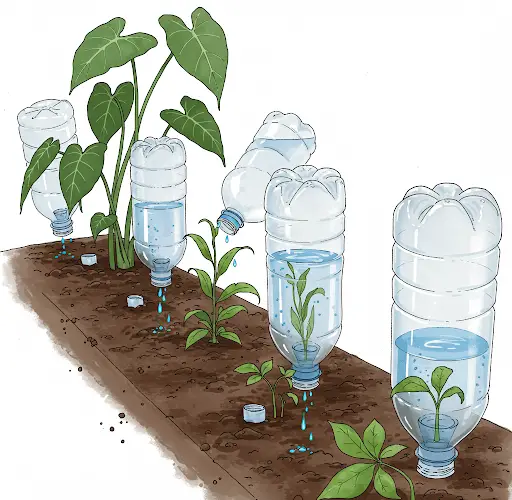
Place the bottle upside down in the hole, with the neck pointing down and the open bottom facing up. Fill in the soil around the bottle to hold it securely in place. The sponge or cloth will act as a filter, slowly releasing water into the surrounding soil.
4. Water the Plants
Fill the inverted bottles with water during the early morning or late evening hours, which are the best times to water plants. A 1-liter bottle is usually sufficient for one watering session in hot, dry weather. The water will gradually seep through the sponge into the soil, keeping the root zone moist over an extended period.
Key Benefits of This Method
-
Targeted Watering: Water is delivered directly to the roots, where it’s needed most.
-
Slow Release: The sponge or cloth ensures that the water doesn’t drain out too quickly, allowing the soil to absorb it efficiently.
-
Longer Soil Moisture Retention: Water penetrates deeper into the ground, making it more accessible to roots and less prone to surface evaporation.
-
Temperature Balance: Water stored in the bottles gradually adjusts to ambient temperature, preventing root shock that can occur when cold water is applied directly to warm soil.
Where This Method Works Best
This watering system is perfect for:
-
Vegetable Gardens: Especially effective for plants like tomatoes, peppers, cucumbers, and eggplants.
-
Container Plants: A great way to maintain consistent moisture in pots and grow bags.
-
Flower Beds: Helps ornamental plants stay healthy during dry spells.
-
Balconies and Terraces: Easy to set up and maintain in small spaces.
Final Thoughts
Using plastic bottles as a DIY irrigation system is a simple, effective, and environmentally conscious way to care for your plants during hot summer months. This method ensures that your plants receive a steady supply of water, promotes healthy root development, and reduces the risk of diseases caused by excess moisture on foliage.
It’s a practical solution for gardeners of all experience levels—and a smart way to make use of materials that would otherwise end up in the trash. With just a little effort, you can keep your garden green, healthy, and productive all summer long.


