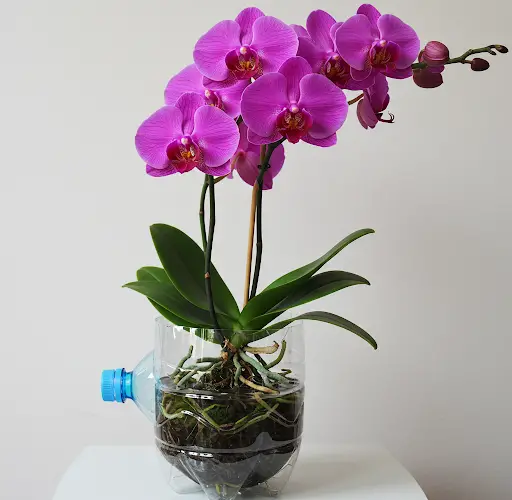
How to Make a Self-Watering Orchid Pot Using Recycled Materials
Orchids are delicate plants that require precise watering to thrive. Many people lose their orchids due to overwatering or neglecting irrigation altogether. A self-watering system can help maintain the right moisture levels, reducing the chances of root rot and dehydration.
This article explains how to create a self-watering orchid pot using recycled materials, ensuring optimal hydration while promoting healthy growth and flowering.
Choosing the Right Materials
To make this self-watering system, a transparent plastic bottle is ideal. Transparent bottles allow light to reach the orchid’s roots, which can benefit its overall health. The entire bottle will be used, including both the top and bottom sections.
A sharp knife or utility blade is required to cut the bottle, and holes will need to be made for the self-watering function. Tools like a heated nail, soldering iron, or the tip of a heated knife can be used to create these holes.
Creating the Self-Watering Mechanism
-
Preparing the Bottle – Start by cutting the plastic bottle in half. The top portion will be inverted and placed inside the bottom portion, acting as a reservoir for water.
-
Making Drainage Holes – Using a heated nail or similar tool, create multiple small holes in the cap of the bottle. This will allow water to pass through while preventing excessive moisture buildup.
-
Additional Ventilation Holes – Small holes should also be added around the lower section of the top half of the bottle. These holes will ensure that the water is evenly distributed without stagnating.
-
Adding a Wicking System – To further regulate moisture, some natural fiber, such as coconut fiber, can be placed inside. Coconut fiber helps retain moisture and slowly releases it to the orchid roots as needed.
Assembling the Self-Watering Pot
Once the bottle has been prepared with drainage and ventilation holes, it’s time to assemble the pot:
-
Placing the Charcoal Base – A layer of charcoal is added to the bottom of the inverted top section of the bottle. This serves multiple purposes:
-
Charcoal improves drainage.
-
It retains moisture without waterlogging the roots.
-
It contains nutrients such as phosphorus, potassium, and magnesium that aid plant growth.
-
-
Securing the Orchid – The orchid should be gently removed from its current pot, ensuring that its roots are not damaged. Any old or decaying substrate should be removed. The orchid is then placed in the new self-watering system, with additional charcoal or coconut fiber added around the roots for support.
-
Fixing the Structure – If needed, a wire or clip can be used to secure the orchid in place. Some orchids require staking for stability, especially those with tall flowering spikes.
-
Filling the Water Reservoir – The bottom section of the bottle is filled with filtered water to prevent the buildup of chlorine, which can affect plant health. The water level should not touch the roots directly; instead, moisture will rise naturally through evaporation and absorption by the substrate.
How the Self-Watering System Works
The water in the lower section of the bottle evaporates, creating a humid environment that keeps the roots hydrated without the risk of overwatering. The ventilation holes allow excess moisture to escape, preventing fungal growth and root rot.
To further improve the system, adding a layer of coconut fiber to the substrate will increase moisture retention and extend the time between watering. This means the orchid will receive a consistent level of hydration without requiring daily maintenance.
Benefits of This Self-Watering Orchid Pot
-
Prevents Overwatering and Root Rot – The controlled water release prevents excess moisture from accumulating, reducing the risk of fungal infections.
-
Ensures Consistent Hydration – The wicking action of charcoal and coconut fiber keeps the orchid’s roots evenly moist.
-
Utilizes Recycled Materials – By repurposing plastic bottles, this system contributes to sustainable gardening practices.
-
Provides Nutrients – The charcoal base enhances soil quality by supplying essential minerals.
Additional Tips for Optimal Orchid Care
-
Use Filtered or Rainwater – Chlorine and other chemicals in tap water can harm orchids over time.
-
Monitor the Water Level – The reservoir should be refilled when it becomes empty, ensuring continuous hydration.
-
Maintain Airflow Around Roots – Orchids prefer good air circulation, so avoid compacting the substrate too tightly.
-
Choose the Right Location – Orchids thrive in indirect light. A bright area with filtered sunlight is ideal for growth.
Conclusion
This self-watering orchid pot provides an easy and sustainable solution for maintaining healthy orchids with minimal effort. By utilizing simple materials like recycled plastic bottles, charcoal, and coconut fiber, this system ensures optimal moisture levels while reducing the risk of overwatering.
With this method, orchids can thrive with better hydration, enhanced nutrient absorption, and a lower need for frequent watering. Whether for beginners or experienced gardeners, this innovative approach offers an efficient way to care for orchids while promoting eco-friendly gardening practices.


