Growing onions at home doesn’t require a garden bed or even a large container. With just a few recycled plastic bottles and some basic materials, you can easily propagate onions in a clean, space-saving way. Whether you’re looking to grow green onion tops or develop full bulbs, plastic bottles offer an accessible and efficient method that works even in small spaces.
This quick and tidy approach is ideal for urban gardeners, beginners, and anyone interested in growing food from kitchen scraps. Here’s a step-by-step guide to propagating onions in plastic bottles—an eco-friendly project that turns waste into fresh harvests.
Why Propagate Onions in Bottles?
Plastic bottles are ideal for home gardening projects, especially when space or resources are limited. Onions grow well in containers, and their shallow root systems make them perfect candidates for bottle growing. Here are a few benefits of this method:
-
Compact and efficient – Great for balconies, patios, or kitchen windows.
-
Budget-friendly – Reuse discarded bottles instead of buying pots.
-
Tidy and low-maintenance – No messy soil spills and easy to water.
-
Eco-conscious – A smart way to recycle and reduce plastic waste.
You can propagate onions from leftover bulbs, onion bottoms, or sets (small immature onions). Green onion varieties (scallions) are particularly well-suited to bottle propagation but bulb onions can also be grown with the right care.
Materials You’ll Need
To begin, gather these basic materials:
-
1 large plastic bottle (1.5 to 2 liters)
-
Scissors or a utility knife
-
A nail or skewer for making holes
-
Potting soil or compost-rich growing medium
-
Onion bottoms, small bulbs, or green onion cuttings
-
Spray bottle or watering can
-
Optional: gravel or coco coir for the base layer
Step-by-Step Guide to Onion Propagation in Bottles
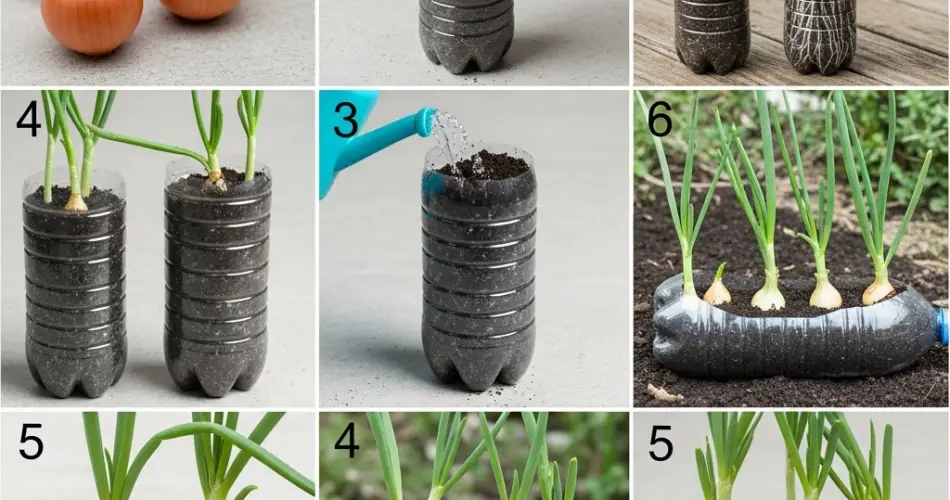
Step 1: Prepare the Bottle
Cut the bottle horizontally about one-third from the top. The bottom part will hold your soil and onions. If you’d like to make a vertical growing tower, cut holes around the sides of the bottle where the onion sets will be placed.
Use a hot nail or skewer to poke 4–6 drainage holes in the bottom. If you’re stacking or hanging bottles, add holes for string or wire support.
Step 2: Prepare the Onion Cuttings or Bulbs
There are several ways to start onions:
-
From bulbs or sets: Use small, firm bulbs or onion sets. Remove any dry outer layers, but don’t damage the roots or inner core.
-
From onion bottoms: Cut off the root base of an onion (about 1 inch thick) and allow it to dry for a day before planting.
-
From green onion scraps: Save the white base with roots and about 1 inch of stem.
You can sprout them in water first or plant them directly into soil.
Step 3: Add Soil and Plant the Onions
Fill the bottle with potting mix, leaving 1–2 inches from the top. Use a well-draining, nutrient-rich soil blend with compost and a bit of sand or perlite.
-
For vertical towers, place bulbs in the side holes, root end facing inward, and cover with soil.
-
For basic planting, place onion bottoms or bulbs in the soil about 1–2 inches deep, with the pointed side facing up.
Water lightly after planting.
Step 4: Sunlight and Watering
Place the bottle in a sunny spot—onions need at least 5–6 hours of sunlight daily for healthy growth. A windowsill, balcony, or sunny corner works well.
Water lightly when the top layer of soil begins to dry. Avoid overwatering, especially in bottles without excellent drainage. A spray bottle works well to keep the soil evenly moist without disturbing roots.
Step 5: Maintenance and Growth Tips
-
Fertilizing: After two weeks, feed with diluted compost tea or a balanced organic liquid fertilizer every 10–14 days.
-
Airflow: Ensure the growing area is well-ventilated to prevent mold or fungus.
-
Mulching: A light layer of dried leaves or rice husks on top of the soil helps retain moisture and regulate temperature.
If you’re growing green onions, trim the tops as needed. If you’re growing for bulbs, allow the tops to grow fully and dry out before harvesting.
Harvesting Your Onions
Green Onions/Scallions:
-
Ready in 2–3 weeks.
-
Harvest by snipping the green tops once they’re about 6–8 inches tall.
-
Leave the base in the soil for regrowth.
Bulb Onions:
-
Take about 90–120 days to mature.
-
Harvest when the green tops begin to yellow and fall over.
-
Gently pull from the soil and let cure in a dry, shaded area for 1–2 weeks before storage.
Bonus Tips
-
Stagger plantings every 1–2 weeks for a continuous harvest.
-
Label your bottles with the planting date or onion variety.
-
Use multiple bottles to maximize output in a small space.
-
Rotate bottles occasionally for even sun exposure on all sides.
Final Thoughts
Onion propagation in plastic bottles is a clever and convenient method that makes home gardening accessible to everyone. It’s quick to set up, requires minimal materials, and delivers fresh onions for your kitchen without the need for a full garden. Whether you want to grow scallions for your soups or harvest full bulbs for cooking, this technique is a clean, practical solution for fresh homegrown onions all year round.


