Never Buy Potatoes Again: How to Grow Potatoes Effortlessly in Used Styrofoam Boxes
Growing your own potatoes at home might sound like a labor-intensive task, but what if you could do it almost effortlessly—and with materials you already have lying around? That’s exactly what this method offers. By using used Styrofoam boxes, you can grow a generous supply of potatoes without digging, weeding, or managing a full garden.
This simple and sustainable approach is ideal for beginners and seasoned gardeners alike. Whether you have a yard, a balcony, or a small patio, you can grow your own potatoes with minimal effort and excellent results.
Why Grow Potatoes at Home?
Potatoes are a kitchen staple in households around the world. Growing your own ensures you always have a fresh supply of this versatile vegetable. Plus, it:
-
Reduces food costs
-
Provides food security
-
Is fun and educational for the family
-
Reduces waste by repurposing old materials
-
Gives you full control over what goes into your food—no chemicals or pesticides
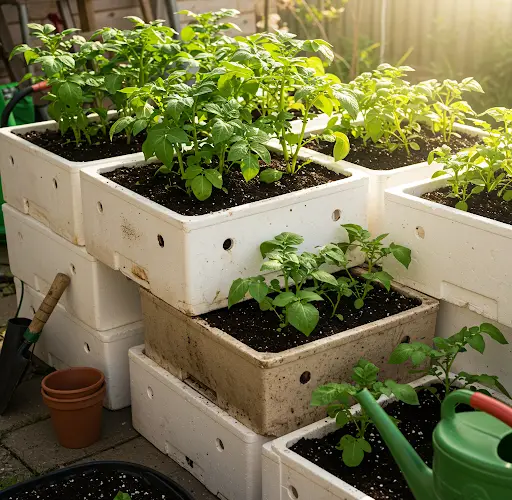
Why Use Styrofoam Boxes?
Styrofoam boxes—commonly used for storing fish, produce, or takeout—are often discarded after use. Repurposing them as potato planters has several benefits:
-
Excellent insulation helps keep the soil temperature stable
-
Lightweight and easy to move
-
Great drainage with a few added holes
-
Free or inexpensive
-
Space-saving and ideal for patios, balconies, or tight spaces
What You’ll Need
-
1–2 used Styrofoam boxes with lids (depth of at least 10–12 inches)
-
Seed potatoes or sprouted potatoes from your kitchen
-
Loose, well-draining soil or compost
-
A sharp knife (if cutting larger potatoes)
-
Watering can or spray bottle
-
A sunny location (4–6 hours of sunlight per day)
Step-by-Step Instructions
Step 1: Prepare the Styrofoam Boxes
Start by cleaning your Styrofoam boxes. Poke several small drainage holes at the bottom using a screwdriver, knife, or drill. This is crucial to avoid waterlogging the soil and rotting the potatoes.
Optional: You can line the bottom with a layer of dry leaves or shredded newspaper to improve drainage.
Step 2: Prepare Your Potatoes
You can use seed potatoes from a nursery or allow store-bought potatoes to sprout. Cut larger potatoes into pieces, making sure each chunk has at least one eye (sprout). Let the pieces dry for a day before planting to prevent rot.
Small potatoes can be planted whole.
Step 3: Fill the Boxes
Add about 4 inches of loose soil or compost to the bottom of each box. Gently place your potato pieces on top, eyes facing upward, spacing them 4–6 inches apart. Cover them with another 2–3 inches of soil.
As the plants grow, you’ll add more soil—a technique known as “hilling”—to encourage more tuber formation.
Step 4: Water Lightly and Wait
Water just enough to moisten the soil, but not so much that it becomes soggy. Keep the soil slightly moist throughout the growing period. Place the boxes in a sunny spot that receives at least 4–6 hours of sunlight daily.
Now, let nature do the rest! The Styrofoam helps retain heat and moisture, reducing the need for frequent watering or maintenance.
Ongoing Care
Once the green shoots appear and grow to about 6 inches tall, add more soil around the base to cover most of the stems. Repeat this hilling process 2–3 times over the growing season.
Check moisture regularly and water lightly if the soil feels dry. Aside from that, this method requires very little effort.
If you notice pests like aphids, you can spray a mild soap-and-water solution or use neem oil as a natural deterrent.
Harvesting Your Potatoes
Depending on the variety and growing conditions, potatoes are usually ready to harvest 80–100 days after planting.
The best sign that your potatoes are ready is when the green plants begin to yellow and wilt. Stop watering at this point. After about a week, gently dig through the soil with your hands to reveal your homegrown potatoes.
Because they’re grown in soft soil in a box, harvesting is clean and easy—no tools required!
Extra Tips for Success
-
Use compost-rich soil to give your plants a nutrient boost.
-
Avoid overwatering, especially during the final weeks of growth.
-
Place a net or cover over the boxes if you’re in a rainy or pest-prone area.
-
Label your boxes if you’re growing different potato varieties.
-
Reuse the boxes for the next crop—just refresh the soil.
Final Thoughts
Who knew growing potatoes could be this easy? With just a few repurposed Styrofoam boxes, some soil, and a bit of sunlight, you can enjoy a steady supply of delicious, homegrown potatoes—without any digging or heavy lifting.
This method is perfect for urban gardeners, beginners, or anyone who wants to reduce waste while growing food sustainably. Try it out once, and you might never go back to store-bought potatoes again.