Swiss chard is a nutrient-rich leafy green that’s easy to grow and incredibly productive, making it a top choice for home gardeners. One of the most creative and space-saving ways to cultivate and multiply Swiss chard is by using recycled plastic bottles. This method is ideal for urban environments, where space is limited but creativity can flourish. By reusing bottles, you not only reduce waste but also build a sustainable and efficient garden system.
In this guide, you’ll learn how to propagate and grow Swiss chard using simple bottle-based techniques that require minimal space, tools, and investment.
Why Swiss Chard Thrives in Bottles
Swiss chard adapts well to container gardening, and plastic bottles offer an excellent growing medium due to their lightweight, compact size, and easy modification. The plant’s roots are not too deep, which makes shallow and narrow containers a viable option. When maintained correctly, bottle-grown Swiss chard can be harvested repeatedly, providing a long-term source of fresh greens.
This technique is especially useful if you want to propagate more plants from existing ones, maximizing your yield without needing to purchase new seedlings.
Materials You’ll Need
To get started with bottle propagation, gather the following:
-
Clean plastic bottles (1.5 to 2 liters)
-
A sharp knife or scissors
-
A nail or screwdriver to make drainage holes
-
Potting mix enriched with compost
-
Swiss chard seeds or cuttings
-
Spray bottle or small watering can
-
Wire, rope, or string (optional, for hanging setups)
Preparing the Bottle Planters
There are two main styles of bottle planters: horizontal and vertical. Choose based on your available space.
Horizontal Setup (Shelf or Ground Layout):
-
Lay the bottle on its side.
-
Cut a wide opening along the top side to form a planting window.
-
Poke 4–5 drainage holes along the bottom.
Vertical Setup (Wall or Hanging Layout):
-
Cut a rectangular window along the side.
-
Make holes at the bottom for drainage.
-
Attach wire or string for hanging if needed.
Ensure all bottles are well-drained to avoid waterlogging, which can cause root rot.
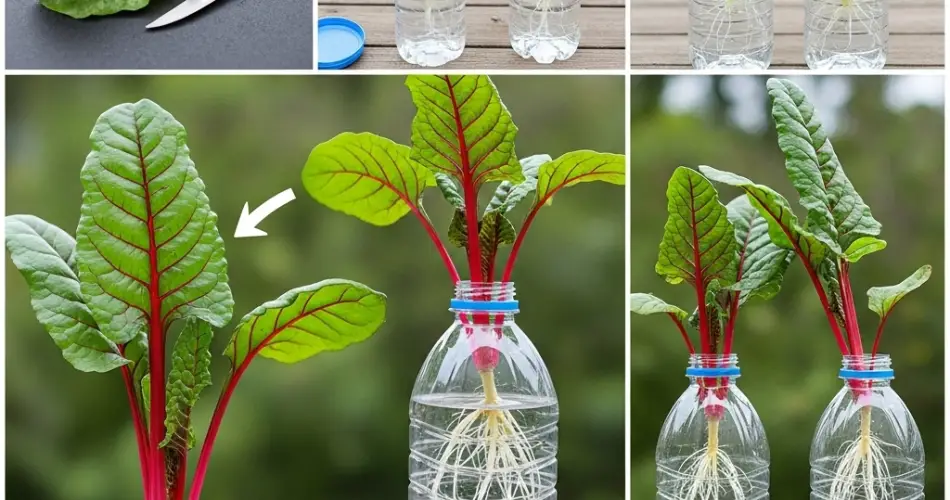
Propagating Swiss Chard from Cuttings
One unique way to multiply Swiss chard is by using leftover stem bases, a technique especially useful if you already grow or buy fresh chard regularly.
Steps to Propagate from Cuttings:
-
Cut the Base:
After using the leaves, save about 2–3 inches of the thick white or red stem (the part nearest the root). -
Place in Water:
Submerge the stem base in a shallow dish of clean water. Change the water every day. -
Wait for Regrowth:
In about 4–6 days, new leaves and root nubs will begin to appear. -
Transfer to Soil:
Once roots are visible, plant the cutting into a bottle filled with moist potting mix. Water gently to settle the soil.
This regrowth method is a sustainable way to multiply your chard plants without seeds.
Starting from Seeds
If you prefer to grow from seed:
-
Fill your bottle with damp, nutrient-rich soil.
-
Plant 2–3 seeds in each bottle, about 1 cm deep.
-
Cover lightly and water gently.
-
Keep in partial sunlight and ensure the soil remains moist.
-
Once seedlings have 3–4 true leaves, thin them to leave only the healthiest one.
Placement and Light Requirements
Swiss chard needs 4–6 hours of light daily but does well with partial shade, especially in hot climates. Ideal locations include balconies, fences, sunny windows, or wall-mounted racks.
If using vertical hanging bottles, stagger the placement to ensure each plant gets enough light without being shaded by those above.
Watering and Feeding
Bottle-grown plants need regular but gentle watering. Use a spray bottle to avoid disturbing the roots. During warm weather, check moisture daily. Too much water without drainage will suffocate the roots, so never skip the drainage holes.
Feed your Swiss chard every two weeks with a diluted organic fertilizer such as compost tea, seaweed extract, or vermicompost leachate.
Harvesting and Maintenance
Swiss chard can be harvested multiple times. Begin harvesting once the plant is 6–8 inches tall.
-
Snip off the outer leaves first and leave the inner core untouched.
-
Regular harvesting encourages new growth.
-
Avoid overharvesting at one time; always leave some leaves so the plant can regenerate.
Bottle-grown chard will continue to produce leaves for several months with proper care.
Pests and Troubleshooting
Swiss chard is fairly resilient, but you might notice:
-
Aphids or leaf miners: Spray with neem oil or soapy water.
-
Yellowing leaves: Could indicate overwatering or nutrient deficiency.
-
Slow growth: Add compost or liquid fertilizer to boost nutrition.
Always keep the bottle planters clean, remove debris, and rotate the containers occasionally to ensure even light exposure.
Final Thoughts
Using bottles to propagate and grow Swiss chard is an eco-friendly, budget-conscious, and space-efficient method that’s perfect for beginners and experienced gardeners alike. Whether you start from cuttings or seeds, this approach allows you to grow vibrant, healthy greens on your balcony, patio, or wall with minimal effort.
By mastering bottle-based techniques, you can enjoy a constant supply of Swiss chard—while contributing to a more sustainable lifestyle through creative recycling and homegrown food.


