Lighten Floor Grout: The Simple Trick to Make Them Look Like New
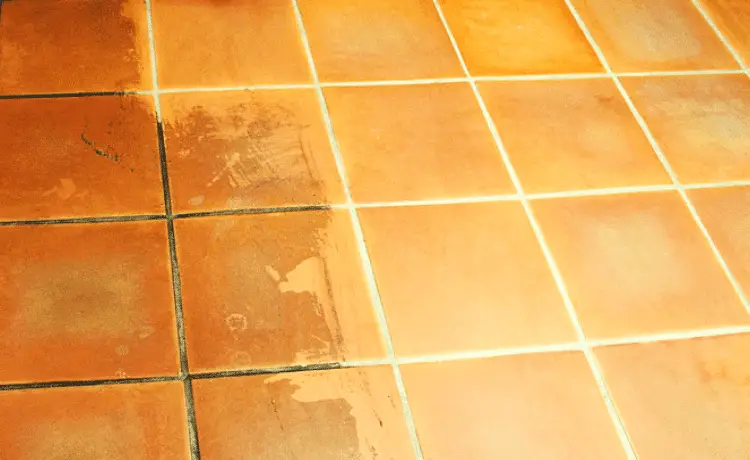
Floor grout often goes unnoticed until it becomes visibly dirty and discolored. Despite its subtle appearance, grout plays a crucial role in maintaining the overall aesthetics of your floors. Over time, dust, dirt, and debris settle between the tiles, causing grout lines to lose their luster and making the entire floor look dull. Fortunately, there’s an easy and natural solution to restore grout to its original shine without the need for harsh chemicals or expensive cleaners. The best part? It can be done with just one simple swipe.
The secret to spotless grout lies in two common household ingredients that you likely already have in your kitchen—vinegar and baking soda. This dynamic duo is not only an effective natural cleaning solution but also safe and eco-friendly. With just a few minutes of preparation and minimal effort, you can transform your grout and make your floors look brand new again.
Why Grout Cleaning Is Important
Grout is the material that fills the spaces between your tiles. Its porous nature makes it prone to absorbing dirt, grime, and stains over time. When grout becomes dirty, it can affect the appearance of the entire floor, no matter how clean the tiles themselves are. Regular cleaning is essential to maintain the beauty of your floors, and keeping the grout bright and clean ensures that your living space looks fresh and well-maintained.
Many people find cleaning grout to be a tedious task, often resorting to expensive chemical cleaners that don’t always produce the desired results. However, there is a much simpler, cost-effective, and natural method for cleaning grout that will save you time and money while delivering exceptional results.
The Natural Grout-Cleaning Solution
The key to brightening and cleaning grout naturally is the combination of baking soda and white vinegar. Both of these ingredients have been used for generations as powerful household cleaners, and when combined, they create an effective solution that can tackle even the toughest grout stains.
Here’s how you can lighten and restore your floor grout in just one swipe:
What You’ll Need:
- ½ cup of baking soda
- ½ cup of white vinegar
- An old toothbrush or soft-bristle brush
- Clean water for rinsing
- A clean cloth for drying
Step-by-Step Guide to Cleaning Grout
1. Prepare the Cleaning Solution
Start by mixing equal parts baking soda and white vinegar in a bowl—about half a cup of each should do the trick. Once you combine these two ingredients, you’ll notice a fizzy reaction, which is a sign that the cleaning agents are being activated. This bubbling reaction helps to loosen dirt and break down stubborn stains trapped in the grout.
2. Apply the Solution to the Grout
Using an old toothbrush or a soft-bristle brush, apply the baking soda and vinegar mixture directly to the grout lines. Make sure to spread the solution evenly, covering all the grout in between the tiles. Pay special attention to areas that are more heavily stained or dirty, as these spots may need a little extra care.
3. Let the Solution Sit
After applying the mixture, allow it to sit on the grout for about 10 to 15 minutes. This resting time gives the baking soda and vinegar enough time to penetrate the dirt and grime embedded in the grout. The mixture will work its magic, breaking down any buildup and lifting stains to the surface.
4. Scrub the Grout
Once the solution has had time to work, take your toothbrush or brush and scrub the grout lines vigorously. The abrasive texture of the baking soda will help to loosen and remove any remaining dirt or debris from the grout, while the vinegar helps to disinfect and deodorize. For particularly stubborn areas, you may need to apply a little more pressure, but in most cases, the dirt will come off easily.
5. Rinse the Grout
After scrubbing the grout lines, rinse the area thoroughly with clean water. You can use a damp cloth or sponge to wipe away any remaining baking soda and vinegar mixture. Make sure to rinse the grout well to remove all traces of the cleaning solution, leaving behind only clean and bright grout lines.
6. Dry and Admire the Results
Finally, take a clean cloth and dry the floor. You’ll be amazed by the transformation—your grout will look significantly lighter, and the floor will regain its original shine, giving the appearance of a newly installed floor. The best part is that this entire process can be completed in just a matter of minutes.
The Benefits of Using Vinegar and Baking Soda for Grout Cleaning
Aside from being incredibly effective, using natural ingredients like vinegar and baking soda for cleaning offers several other benefits:
- Eco-Friendly: Vinegar and baking soda are biodegradable and non-toxic, making them a safe option for both your home and the environment. You won’t have to worry about exposing your family or pets to harmful chemicals.
- Cost-Effective: These two ingredients are inexpensive and can be found in almost every household. Unlike store-bought cleaners, which can be costly and full of chemicals, vinegar and baking soda offer a budget-friendly alternative that works just as well, if not better.
- Versatile: This cleaning method works not just for grout but for other household surfaces too. You can use the same baking soda and vinegar mixture to clean bathroom tiles, kitchen countertops, sinks, and even appliances.
Conclusion
Cleaning grout doesn’t have to be a time-consuming or expensive task. With just two simple ingredients—baking soda and white vinegar—you can restore your grout lines to their original brightness and make your floors look like new again. This natural, one-swipe trick is not only effective but also safe, environmentally friendly, and easy on your wallet. So, next time you notice your grout looking dull or dirty, give this method a try and enjoy spotless, sparkling floors in no time.