Kale is one of the most nutrient-dense leafy greens you can grow at home—and with vertical gardening, you don’t even need a backyard or garden bed. Whether you’re working with a sunny balcony, a wall near your kitchen, or a fence in a small courtyard, vertical kale gardening is a space-smart solution that yields fresh, flavorful greens all season long.
Using repurposed materials like plastic bottles, fabric pockets, or tiered shelves, vertical kale gardening offers a practical, eco-conscious way to grow your own superfood even in the smallest spaces.
Why Kale Is Perfect for Vertical Gardening
Kale is a hardy green that thrives in containers and limited soil volume. Its shallow roots, compact leaf structure, and ability to tolerate cooler temperatures make it especially suitable for vertical setups. Many kale varieties—such as curly kale, dinosaur kale (Lacinato), and Red Russian—grow well in wall-mounted or stacked systems.
Not only is kale easy to grow, but it also brings beauty to your space with its textured leaves and shades of green and purple. With just a little care, you can have a living wall of edible greens that’s as nutritious as it is attractive.
Materials for Your Vertical Kale Garden
To set up a vertical kale system, you’ll need basic tools and materials, most of which can be sourced sustainably or even found around the house. Here’s a simple list to get started:
-
Vertical structure: Trellis, pallet, wooden frame, hanging rack, or wire mesh
-
Containers: 1.5–2L plastic bottles, grow bags, wall-mounted pots, or fabric shoe organizers
-
Potting mix: Lightweight soil enriched with compost or worm castings
-
Kale seeds or seedlings
-
Hooks, nails, or screws (for mounting)
-
Watering can or spray bottle
Make sure your chosen wall or fence gets at least 4–6 hours of sunlight per day.
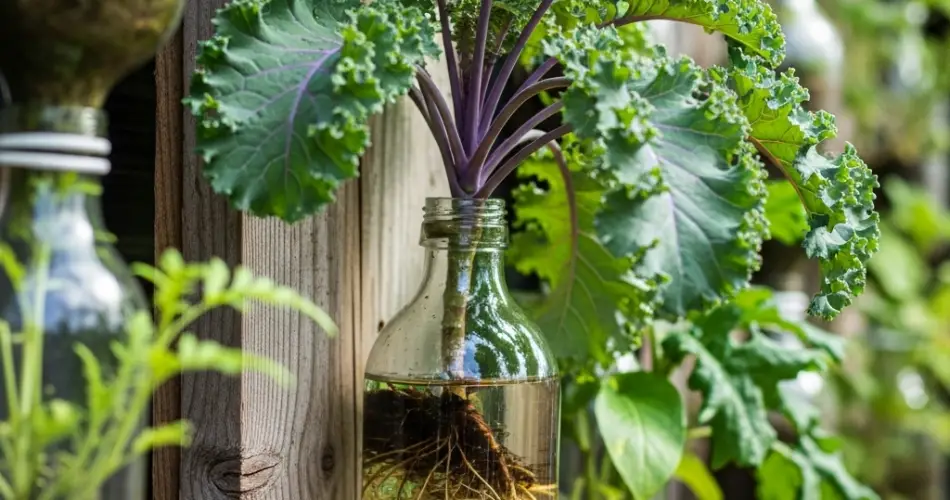
Preparing Your Containers
Plastic bottles are a popular choice for vertical gardens. Simply cut an opening on the side, add drainage holes at the bottom, and mount them horizontally or vertically. Fill with potting mix, and they’re ready to go.
If you’re using fabric pouches or wall pockets, line the pockets with breathable material like burlap to hold the soil while allowing excess water to drain.
For a DIY wooden or PVC shelf system, line each shelf with containers or trays, ensuring adequate drainage and spacing for airflow between plants.
Soil and Planting Tips
Kale needs nutrient-rich, well-draining soil. Mix high-quality potting soil with compost or slow-release organic fertilizer before planting. Avoid using dense garden soil in containers, as it can retain too much water and restrict root growth.
If starting from seeds, sow them about ¼ to ½ inch deep. Keep the soil moist until germination, which usually takes 5–10 days. For faster results, transplant nursery seedlings directly into the containers.
Space kale plants about 6–8 inches apart to ensure each one has room to grow and proper airflow to prevent mildew.
Light, Water, and Maintenance
Kale prefers cool weather and grows best in partial to full sun. Morning sun and afternoon shade work well, especially in hot climates. In cooler weather, full sun helps speed up growth.
Water consistently to keep the soil moist but not soggy. Vertical gardens dry out faster than ground beds, so check regularly. A watering can with a long spout or a drip irrigation system can make maintenance easier.
Feeding your kale every 2–3 weeks with a diluted organic fertilizer or compost tea will encourage steady growth and leaf production.
Harvesting Kale
You can begin harvesting kale once the leaves are about 6–8 inches long. Use scissors or your hands to cut the outer leaves, allowing the inner ones to keep growing. This cut-and-come-again method lets you enjoy multiple harvests from the same plant over several months.
Regular harvesting also encourages the plant to produce new leaves and prevents it from bolting (going to seed).
Pests and Disease Prevention
Kale can be affected by aphids, cabbage worms, and flea beetles. In a vertical setup, pest issues are often reduced due to improved airflow and plant separation. Still, it’s good to inspect leaves regularly.
Use neem oil spray or insecticidal soap if you spot any pests. Remove any yellowing or chewed leaves promptly to maintain plant health.
Also, avoid overwatering to prevent root rot and fungal diseases. If you’re growing kale in humid conditions, space containers to promote ventilation.
Extra Tips for Success
-
Rotate containers every week if sun exposure is uneven.
-
Add mulch, like shredded straw or dried leaves, to retain moisture and keep roots cool.
-
Install a small shade cloth during summer if the sun is too intense.
-
Re-seed or replace plants every 3–4 months for a continuous supply of fresh leaves.
Final Thoughts
With a bit of creativity and some repurposed containers, you can grow kale vertically just about anywhere. This method not only conserves space and water but also turns walls and fences into productive green zones. Whether you’re looking to add fresh greens to your meals or just enjoy the visual appeal of a leafy vertical garden, kale is an easy and rewarding choice.


