If you’re short on space but eager to grow your own food, kale is one of the easiest and most rewarding leafy greens to cultivate. Even better, you don’t need traditional pots or a backyard garden to get started. With just a few recycled plastic bottles, you can propagate and grow kale right from your balcony, patio, or wall—without spending on planters or taking up too much room. This method is perfect for urban gardeners looking for a sustainable way to enjoy fresh, nutritious greens at home.
Here’s a practical guide to multiplying kale plants using bottles instead of pots.
Why Kale is Perfect for Bottle Gardening
Kale is a hardy vegetable that tolerates a wide range of conditions and is ideal for container growing. Its shallow root system allows it to thrive even in compact environments, and it responds well to cut-and-come-again harvesting. Using bottles to grow kale not only helps save money, but it also supports eco-friendly gardening practices by reusing plastic waste.
What You Need
To get started with this DIY gardening project, you’ll need:
-
Clean plastic bottles (1.5 or 2-liter soda bottles work best)
-
Knife or scissors
-
Screwdriver or nail (to make holes)
-
Garden soil mixed with compost
-
Kale cuttings or seeds
-
Water spray bottle or watering can
-
Twine or wire (optional, for hanging)
Preparing the Bottles
You can set up your bottle planters in two main configurations depending on your available space:
1. Horizontal Bottles (Shelf Planters):
-
Lay the bottle on its side and cut a rectangular window on the top.
-
Leave enough space around the cut to keep the structure firm.
-
Make 3–5 drainage holes on the bottom.
2. Vertical Bottles (Hanging or Wall Planters):
-
Cut a window on the side and hang the bottle upside-down or upright.
-
Add small drainage holes at the base.
No matter the style, ensure proper drainage to avoid soggy roots, which can lead to disease.
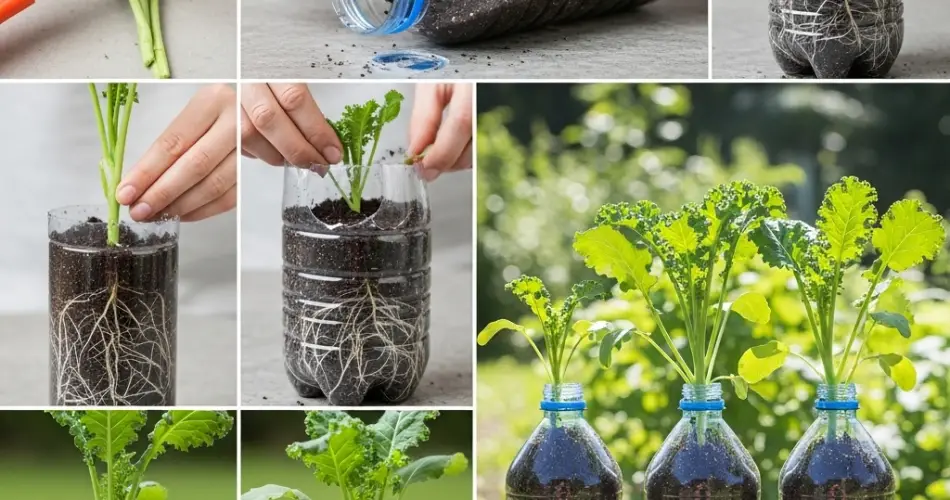
Using Kale Cuttings for Propagation
One of the most efficient ways to multiply kale without buying new seeds is through stem cuttings. If you already have a kale plant or access to fresh cuttings, you can regrow new plants easily.
Steps to Propagate Kale from Cuttings:
-
Select Healthy Stems:
Look for mature stems with several leaves and a firm base. Cut about 4–6 inches from the top. -
Prepare the Cuttings:
Remove the lower leaves, leaving only a few at the top. This helps the plant focus energy on root development. -
Root in Water (Optional):
Place the cutting in a glass of clean water. Within 4–7 days, you should see root growth. -
Transplant into Bottles:
Once roots are about 1–2 inches long, plant the cuttings into the prepared bottle with soil. Water immediately after planting.
Direct Growing from Seeds
If you don’t have access to cuttings, kale can be started from seeds directly in the bottle planters.
-
Fill the bottle with moist soil.
-
Sow 2–3 seeds per bottle and cover lightly with soil.
-
Keep the soil moist and place in partial shade until germination (5–10 days).
-
Thin the seedlings to leave only the strongest one or two.
Placement and Sunlight
Kale prefers cooler temperatures and partial to full sunlight. Aim for at least 4–6 hours of sunlight per day. Place the bottles where they receive morning sun and are shaded from intense afternoon heat. Walls, fences, balconies, and even windowsills are great places for these mini-gardens.
Watering and Fertilizing
Water the kale once or twice a day, depending on the weather and container size. Use a spray bottle to gently moisten the soil and avoid overwatering, especially in vertical setups. The bottles’ small size means they dry out faster, so consistent moisture is essential.
Every 10–14 days, apply a diluted organic fertilizer like compost tea, fish emulsion, or a seaweed solution to support strong leaf growth.
Harvesting and Regrowth
Kale is ideal for continuous harvests. Once the plant reaches about 6 inches tall and has a strong base of leaves, you can start harvesting.
-
Pick the outermost leaves first, leaving the center growth intact.
-
Harvesting regularly encourages the plant to produce more leaves.
-
Well-maintained kale plants can continue producing for several months.
If the plant becomes leggy or stops growing, remove and restart with new cuttings or seeds.
Pests and Care Tips
Kale is relatively pest-resistant, but you might encounter aphids, cabbage worms, or flea beetles. To prevent these:
-
Inspect leaves regularly.
-
Use neem oil or a mild soap spray as a natural remedy.
-
Keep bottles clean and remove any yellowing or dead leaves.
Rotate your bottles’ locations occasionally to improve airflow and reduce humidity buildup, which can invite disease.
Expand Your Bottle Garden
Once your kale bottle garden is thriving, consider adding other greens like lettuce, spinach, or arugula using the same method. You can even stack bottles vertically using wooden frames or wire supports to make the most of tight spaces.
Final Thoughts
Growing kale in bottles is a brilliant way to cultivate healthy greens without the need for pots or a garden bed. Whether you propagate from cuttings or start from seed, this method is affordable, efficient, and environmentally friendly. With a bit of sunlight, care, and patience, you can enjoy a steady supply of fresh kale right outside your window—one bottle at a time.


