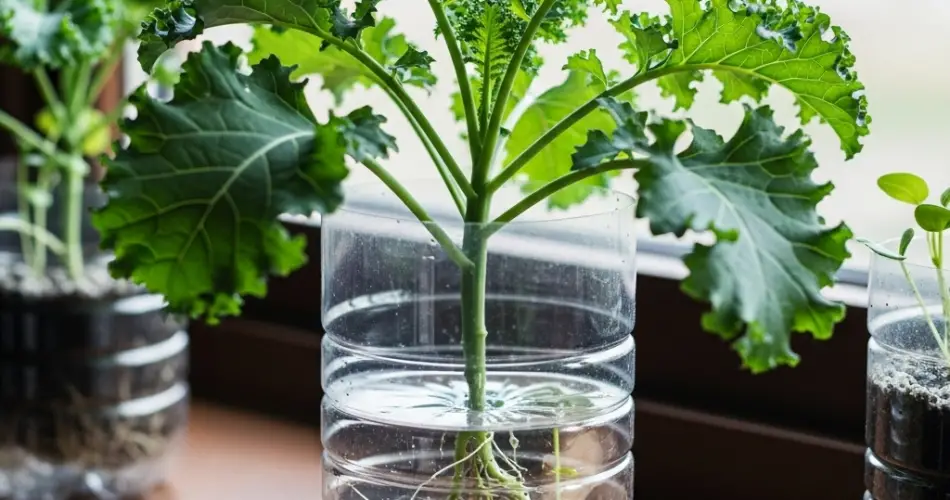
Kale is a hardy, nutrient-rich leafy green that grows well in various conditions, making it ideal for small-scale, sustainable gardening projects. Even without a traditional garden bed, you can grow kale successfully using recycled plastic bottles. This method not only saves space but also promotes eco-friendly practices by giving discarded containers a new purpose. With the right setup, you can propagate kale from both seeds and cuttings, ensuring a steady supply of fresh leaves for your kitchen.
Why Grow Kale in Plastic Bottles?
Plastic bottle gardening is an excellent solution for urban dwellers, balcony gardeners, or anyone looking to grow vegetables in limited space. Bottles can serve as compact planters that fit on windowsills, walls, or small outdoor areas. They conserve water, are easy to move around, and help reduce plastic waste. Kale, with its resilience and fast growth, is perfectly suited for this method.
Another advantage is flexibility—whether you want to start from seeds or propagate from cuttings, both approaches work well in bottle gardens. This makes it possible to grow new plants without purchasing new seedlings each time.
Materials Needed
Before starting, gather the following items:
-
Large plastic bottles (1.5–2 liters work best)
-
A sharp utility knife or scissors
-
Potting mix or a mix of compost and garden soil
-
Kale seeds or fresh kale cuttings
-
A small trowel or spoon
-
Watering can or spray bottle
Preparing the Bottles
-
Cut the Bottles
Wash and dry the bottles thoroughly. Using scissors or a utility knife, cut each bottle horizontally about one-third of the way down from the top. The bottom section will serve as the planter, while the top section can be inverted and placed inside to create a mini greenhouse effect for young seedlings. -
Add Drainage Holes
Use a heated metal skewer or sharp tool to create several small drainage holes in the bottom of the planter section. Good drainage prevents root rot and keeps plants healthy. -
Fill with Soil
Add potting mix or a compost-soil blend to the planter, leaving about 3–4 cm of space from the top. The soil should be loose, well-draining, and rich in organic matter to support strong growth.
Propagating Kale from Seeds
-
Sow the Seeds
Make shallow holes about 1 cm deep and place one or two seeds in each hole. Cover lightly with soil and gently pat down. -
Water Gently
Moisten the soil using a spray bottle or gentle watering can to avoid displacing the seeds. -
Create a Mini Greenhouse
Place the cut-off bottle top upside down over the planted section to trap humidity and warmth. This speeds up germination and protects the seeds from pests. -
Germination and Care
Keep the soil consistently moist but not waterlogged. Seeds typically germinate within 5–10 days. Once seedlings are about 7–10 cm tall and have developed several leaves, you can thin them to one strong plant per bottle.
Propagating Kale from Cuttings
-
Choose Healthy Stems
Select a fresh, healthy kale stem that is free from disease or pests. Ideally, the cutting should be about 10–15 cm long and have a few leaves at the top. -
Prepare the Cutting
Remove the lower leaves, leaving only two or three at the top. This reduces water loss and encourages root formation. -
Plant the Cutting
Insert the stem about 5 cm deep into the prepared bottle planter filled with moist soil. Firm the soil around it to provide support. -
Maintain Moisture
Keep the soil slightly moist and place the bottle in a bright but indirect light location. Root development usually begins within two weeks.
Ongoing Care for Bottle-Grown Kale
-
Light: Kale needs at least 6 hours of sunlight daily. Place bottles on a sunny balcony, windowsill, or outdoor space.
-
Water: Maintain consistent soil moisture without overwatering. Bottles can dry out faster than traditional pots, so check regularly.
-
Feeding: Every 2–3 weeks, feed with a diluted liquid fertilizer to encourage leafy growth.
-
Pest Management: Watch out for aphids and caterpillars. Remove pests by hand or spray plants with a mild soap solution.
-
Temperature: Kale grows best in cool conditions, ideally between 15–21°C (59–70°F).
Harvesting Your Kale
Kale can be harvested once the leaves are about the size of your hand. For a continuous harvest, pick the outer leaves first while leaving the inner leaves to keep growing. This “cut-and-come-again” method can provide fresh kale for months from a single plant.
Benefits of This Method
-
Sustainable: Recycles plastic bottles, reducing waste.
-
Space-Saving: Perfect for small gardens, balconies, and indoor growing.
-
Low-Cost: Requires minimal investment in materials.
-
Versatile: Allows propagation from both seeds and cuttings.
-
Fresh Supply: Provides a steady source of nutrient-rich greens.
Final Thoughts
Growing kale in plastic bottles is a rewarding and eco-friendly gardening approach. Whether you start from seeds or cuttings, this method allows you to produce fresh, healthy greens with minimal resources. With regular care, your bottle garden can provide a continuous harvest while promoting sustainable living. It’s proof that you don’t need a large plot of land—or even traditional pots—to enjoy the satisfaction of homegrown vegetables.


