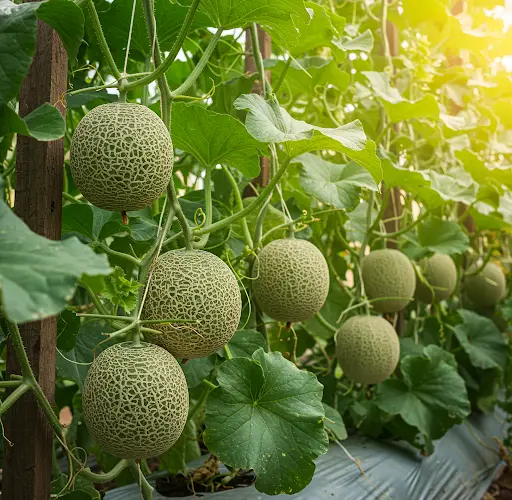
If You Follow This Method, Growing Cantaloupe Will Be Easy – The Fruit Will Be Big & Very Sweet
Cantaloupe, also known as muskmelon, is a delicious and refreshing fruit packed with vitamins and antioxidants. Many people think growing cantaloupe is difficult, but with the right method, you can produce large, sweet melons in your own backyard or even in containers.
In this guide, we’ll share the best techniques to grow cantaloupes successfully—from seed selection to planting, watering, and harvesting—for a bountiful and flavorful harvest.
Why Grow Your Own Cantaloupe?
Homegrown cantaloupe offers several benefits:
- Sweeter & More Flavorful: Store-bought melons are often picked unripe.
- Fresh & Organic: You control what goes into your soil and plants.
- Cost-Effective: Grow multiple melons for the price of one store-bought fruit.
- Rich in Nutrients: High in vitamin C, vitamin A, fiber, and antioxidants.
Step-by-Step Guide to Growing Large, Sweet Cantaloupes
Materials Needed:
- Cantaloupe seeds or seedlings (choose a high-yield, sweet variety)
- Well-draining, sandy soil
- Organic compost or fertilizer
- Mulch (straw, dry leaves, or black plastic)
- Trellis or ground space for vine growth
- Watering can or drip irrigation system
- Pollination tools (such as a small paintbrush, if needed)
Step 1: Choosing the Right Variety
For sweet, high-yield melons, consider these popular varieties:
- Hale’s Best Jumbo: Classic heirloom variety with juicy, sweet flesh.
- Ambrosia: Exceptionally sweet with a strong aroma.
- Sugar Cube: Compact and perfect for container gardening.
- Charentais: A French variety known for its rich flavor and small size.
Choose a variety suited to your climate and garden space.
Step 2: Selecting the Best Location
Cantaloupes need warmth and sunlight to thrive:
- Sun Exposure: Choose a spot with at least 6-8 hours of direct sunlight per day.
- Soil Requirements: Use well-draining, sandy loam soil rich in organic matter.
- Space: Allow plenty of room for vines to spread—2-3 feet apart per plant.
If you have limited space, consider growing cantaloupe vertically on a trellis.
Step 3: Preparing the Soil
- Loosen the soil to a depth of 12-18 inches to promote deep roots.
- Mix in compost, aged manure, or organic fertilizer to enrich the soil.
- Ensure the soil has a pH of 6.0-6.8 for optimal growth.
- Create mounds or raised beds to improve drainage and soil warmth.
Step 4: Planting Cantaloupe
Starting from Seeds:
- Direct sow seeds outdoors after the last frost when the soil is at least 70°F (21°C).
- Plant 2-3 seeds per hole, about 1 inch deep, spacing 2-3 feet apart.
- Once seedlings emerge, thin to one strong plant per spot.
Starting from Seedlings:
- Transplant seedlings once they have at least 2-3 true leaves.
- Space plants 2-3 feet apart in rows or raised beds.
- Water immediately after transplanting to reduce shock.
Step 5: Watering and Mulching
- Water deeply 2-3 times per week, keeping the soil consistently moist but not soggy.
- Reduce watering when fruits start to mature to enhance sweetness.
- Apply a 2-inch layer of mulch (straw, black plastic, or dry leaves) to retain moisture and prevent weeds.
- Use drip irrigation to keep leaves dry and avoid fungal diseases.
Step 6: Providing Support and Managing Vines
- Ground Growth: Let vines sprawl naturally, but ensure good airflow.
- Trellis Growth: Train vines vertically on a trellis to save space and improve fruit quality.
- If using a trellis, use slings or netting to support growing melons.
Step 7: Fertilizing for Bigger, Sweeter Fruits
- Early Growth: Apply a balanced fertilizer (10-10-10 NPK) after seedlings establish.
- Flowering Stage: Switch to a low-nitrogen, high-potassium fertilizer (like 5-10-10) to promote fruiting.
- Organic Boost: Use banana peel tea or compost tea for natural potassium.
- Avoid too much nitrogen, which leads to excessive leaves instead of fruit.
Step 8: Pollination for More Fruit
Cantaloupes rely on bees for pollination. If you don’t see bees, hand-pollinate:
- Use a small paintbrush or cotton swab to transfer pollen from male to female flowers.
- Identify male flowers (thin stems) and female flowers (tiny fruit at the base).
- Repeat this process daily during flowering for higher fruit yield.
Step 9: Managing Pests and Diseases
| Problem | Cause | Solution |
|---|---|---|
| Yellow leaves | Overwatering or nitrogen deficiency | Reduce watering and adjust fertilizer |
| Powdery mildew | Fungal infection from humidity | Ensure good airflow and spray with neem oil |
| Aphids | Sap-sucking insects | Spray soapy water or use ladybugs |
| Fruit rot | Excess moisture or soil contact | Use mulch and elevate fruit off the ground |
Step 10: Harvesting for Maximum Sweetness
- Cantaloupes take 70-90 days to fully mature.
- Signs of ripeness:
- The stem easily separates from the fruit (slips off naturally).
- The skin changes from green to golden-orange.
- A strong, sweet aroma develops near the stem.
- Cut melons with sharp scissors or pruners to avoid damaging vines.
Bonus Tips for a Bigger, Sweeter Harvest
- Rotate crops each season to prevent soil depletion and diseases.
- Limit to 2-3 fruits per plant for bigger melons.
- Expose melons to more sunlight by adjusting vine placement.
- Use Epsom salt spray to boost magnesium for better fruit flavor.
- Store harvested melons at room temperature for a few days to enhance sweetness.
Final Thoughts
By following this proven method, growing cantaloupes will be easy and rewarding. With proper care, your plants will produce large, juicy, and incredibly sweet melons that surpass store-bought varieties. Try it today and enjoy delicious homegrown cantaloupes all season long!


