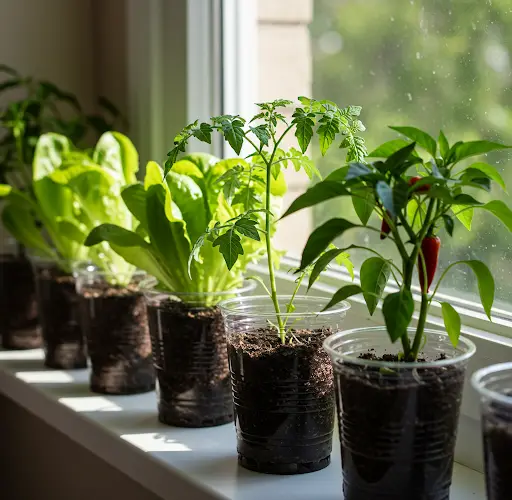
No Garden? No Problem! How to Grow Vegetables Without Soil Using Plastic Cups
Urban living often limits access to garden space, but that doesn’t mean you can’t grow your own vegetables. If you have a sunny windowsill, balcony, or terrace, you can grow fresh, healthy greens at home — even without soil. All you need are a few plastic cups and a simple hydroponic or soilless growing method.
This DIY technique is ideal for beginners, students, apartment dwellers, or anyone who wants to try growing food indoors with minimal space and supplies. Here’s a step-by-step guide to growing vegetables without soil using plastic cups.
What You’ll Need
To get started, gather the following materials:
-
Clean plastic cups (preferably transparent and 200–500 ml in size)
-
A sharp needle or pin (to make drainage or aeration holes)
-
A container or tray to hold water (for bottom watering or wicking)
-
Coco peat, perlite, or hydrogel (as a growing medium)
-
Seeds of your choice (lettuce, spinach, basil, fenugreek, coriander, etc.)
-
Water
-
Optional: Nutrient solution or organic liquid fertilizer
Step 1: Preparing the Cups
Take clean, transparent plastic cups and make small holes at the bottom using a hot pin or needle. This allows excess water to drain and air to circulate, preventing root rot.
If you plan to use a wicking method, you can insert a cotton thread or strip of cloth through the bottom of the cup and dangle it into the water reservoir to draw up moisture.
Place the cups in a tray or shallow container that can hold water to help maintain consistent moisture in the growing medium.
Step 2: Choosing a Growing Medium
Since you won’t be using soil, choose a soilless growing medium that retains moisture and provides good aeration. The best options include:
-
Coco peat: Lightweight, absorbent, and ideal for seed starting.
-
Perlite: Improves drainage and aeration; best when mixed with coco peat.
-
Hydrogel crystals: Absorb and release water gradually, perfect for hydroponic setups.
-
Vermiculite: Holds moisture well and promotes seed germination.
You can use any of these alone or in combination. Fill each cup about 3/4 full with the chosen medium.
Step 3: Sowing the Seeds
Sprinkle the seeds on top of the moist growing medium. If the seeds are large (like coriander or fenugreek), cover them lightly with a thin layer of coco peat. For small seeds (like lettuce or basil), simply press them gently into the surface.
Mist the surface lightly with water to ensure the seeds are in contact with the medium. Cover the cups loosely with a plastic sheet or cling film to create a mini greenhouse effect and aid germination.
Place the cups in a warm, shaded area for 2–3 days until the seeds sprout.
Step 4: Providing Light and Water
Once the seedlings appear, remove the plastic cover and place the cups in a bright, sunny location — preferably where they can receive at least 4 to 6 hours of indirect sunlight each day.
Keep the growing medium moist but not soggy. You can:
-
Mist the surface regularly with water.
-
Pour a small amount of water into the tray so the plants absorb moisture from below.
-
Use the wick method to maintain steady hydration.
If you’re growing your plants longer term (more than 2 weeks), consider adding a diluted organic liquid fertilizer or hydroponic nutrient solution once a week to support healthy growth.
Step 5: Harvesting Your Greens
Most leafy greens can be harvested within 2 to 4 weeks of sowing. You can either cut the leaves at the base or trim only the outer leaves and let the plant regrow.
Here are some vegetables that grow especially well in this method:
-
Spinach – Fast-growing and highly nutritious
-
Fenugreek (methi) – Mild, slightly bitter greens perfect for curries
-
Coriander – Great for garnishing and flavoring dishes
-
Basil – Fragrant and ideal for salads or pasta
-
Lettuce – Crisp and perfect for fresh salads
-
Mustard greens – Spicy and full of flavor
Tips for Success
-
Avoid direct harsh sunlight, especially in the early stages, as it can dry out the growing medium quickly.
-
Thin out seedlings if they’re overcrowded to give each plant room to grow.
-
Clean the water tray regularly to prevent algae or mosquito breeding.
-
Always use clean cups and fresh water to maintain hygiene and prevent fungal issues.
-
Experiment with different seed types to find what grows best in your setup.
Final Thoughts
This simple, space-saving method of growing vegetables without soil is not only cost-effective but also incredibly rewarding. Whether you want to grow herbs for cooking or leafy greens for salads, plastic cup gardening is a great way to start your journey toward sustainable, home-grown food — no garden required.
Give it a try, and you’ll be amazed at how much you can grow with so little.


