Radishes are one of the quickest and easiest vegetables to grow, making them a perfect choice for home gardeners. Their crisp texture, peppery flavor, and short growing cycle make them both rewarding and practical. While radishes are traditionally grown outdoors in garden beds, they can also be successfully started indoors using something you already have at home: plastic bottles.
Upcycling bottles into planters is not only eco-friendly but also a great way to enjoy fresh radishes even if you don’t have access to a yard or large garden space. With the right setup, you can turn your windowsill, balcony, or kitchen corner into a productive mini-garden.
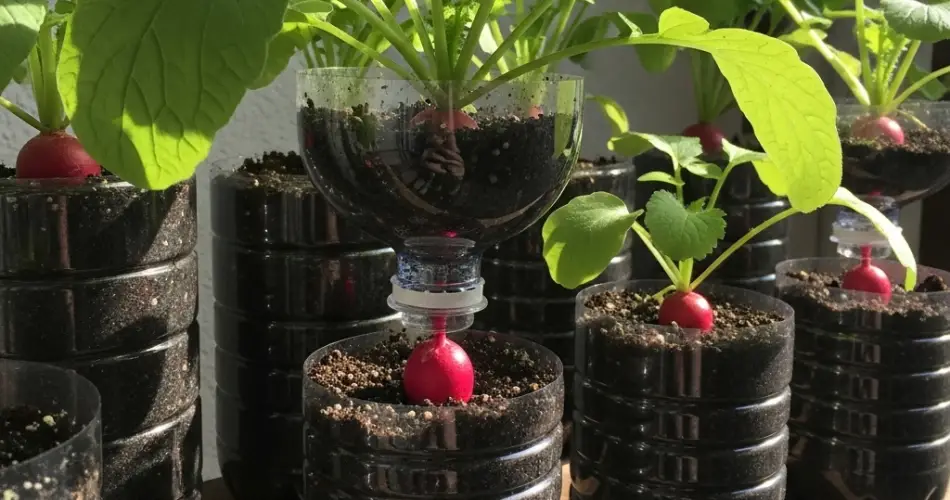
Why Grow Radishes Indoors in Bottles?
Radishes are well suited for indoor cultivation because they mature quickly—most varieties are ready for harvest within 25 to 40 days. Their shallow root system also makes them a good match for bottle containers.
Growing radishes indoors with bottles offers several benefits:
-
Space-saving: Ideal for small apartments or homes without outdoor gardens.
-
Eco-friendly: Repurposes bottles that would otherwise be thrown away.
-
Fast rewards: Provides fresh produce in under six weeks.
-
Low-maintenance: Radishes require minimal care once established.
-
Year-round harvest: Indoor growing allows you to enjoy radishes regardless of season.
Materials You’ll Need
To start growing radishes indoors with bottles, you only need a few simple materials:
-
Clean plastic bottles (1–2 liters work best)
-
Radish seeds (choose compact, fast-maturing varieties such as Cherry Belle or French Breakfast)
-
Potting soil or a soil-compost mix
-
Small pebbles or stones for drainage
-
A sharp knife or scissors
-
Watering can or spray bottle
Optional: Organic fertilizer or compost tea for boosting plant growth.
Preparing the Bottle Planters
-
Cut the bottle: Take a clean plastic bottle and cut it horizontally about one-third from the top.
-
Create drainage: Use the bottom portion as your planter and poke 3–4 small holes in the base for drainage.
-
Add drainage layer: Place a thin layer of pebbles or small stones at the bottom to prevent water buildup.
-
Fill with soil: Add potting soil until the bottle is nearly full, leaving about an inch of space from the rim.
This setup creates a functional mini-planter that is compact, easy to manage, and perfect for radishes.
Planting Radish Seeds
-
Make shallow holes in the soil about ½ inch deep.
-
Drop one radish seed into each hole, spacing them at least an inch apart.
-
Cover lightly with soil and press gently.
-
Water with a fine spray until the soil is evenly moist.
If you’d like a steady supply of radishes, consider planting a new batch every two weeks in additional bottles.
Caring for Indoor Radishes
Radishes are low-maintenance, but consistency is key to producing crisp, tender roots.
-
Light: Place the bottles in a sunny spot, such as a windowsill or balcony, where they receive at least 5–6 hours of sunlight daily. If natural light is limited, supplement with a grow light.
-
Watering: Keep the soil consistently moist but not waterlogged. Check daily, as bottles can dry out quickly indoors.
-
Fertilizer: If your soil is nutrient-rich, fertilizer is not always necessary. However, a diluted organic fertilizer once or twice during the growing cycle can encourage healthy growth.
-
Thinning: Once seedlings sprout (usually within 5–7 days), thin them so that the strongest remain spaced 2 inches apart. This ensures that each plant has enough room to form healthy roots.
Harvesting Your Indoor Radishes
Radishes are typically ready to harvest in about 25–35 days, depending on the variety. Signs of maturity include:
-
Round, firm roots pushing slightly above the soil surface
-
Bright, vibrant leaves that signal active growth
To harvest, gently pull the radish by the base of its leaves. Wash thoroughly before eating. Radishes are best enjoyed fresh, as their crisp texture and peppery flavor can diminish if left too long.
It is important to harvest promptly once radishes are mature, as leaving them in the soil too long may cause them to become woody or overly spicy.
Benefits of Bottle Gardening for Radishes
-
Eco-conscious gardening: Gives plastic bottles a new purpose.
-
Practical for small spaces: Makes indoor gardening accessible to anyone.
-
Quick turnaround: Provides fresh produce in just a few weeks.
-
Fun and educational: Great project for children and beginner gardeners.
-
Healthy living: Ensures a fresh, chemical-free addition to your meals.
Tips for Success
-
Choose smaller radish varieties for better results in compact bottle containers.
-
Use multiple bottles to stagger planting times for a continuous harvest.
-
Keep bottles in a spot with good air circulation to prevent mold or fungus.
-
Monitor water closely—radishes dislike both drought and soggy conditions.
Conclusion
Starting radishes indoors using bottles is a simple, sustainable, and rewarding gardening method. With minimal materials and effort, you can transform discarded plastic into productive planters and enjoy fresh, crisp radishes within weeks. Whether you are a seasoned gardener or a beginner, this method offers an eco-friendly way to grow food right inside your home.
Bottle gardening proves that you don’t need a large plot of land to enjoy homegrown vegetables. All it takes is creativity, care, and a little patience to turn everyday items into thriving mini-gardens.


