Many of us own a hoodie that we rarely wear simply because it doesn’t feel quite right. Maybe you’d prefer if it were easier to throw on and take off, or maybe you like the style of a zip-up hoodie better than a pullover. The good news is that you don’t have to give that hoodie away or let it sit unused in the back of your closet. With a little patience and a few sewing supplies, you can modify a regular hoodie by adding a zipper, giving it new life and making it more versatile.
Sewing can sound intimidating if you’re not experienced, but this project is much simpler than it seems. You don’t need advanced tailoring skills—just basic knowledge of handling a needle and thread or, ideally, a sewing machine to speed things up. If you’ve been looking for a beginner-friendly project that also leaves you with something practical, this is the perfect one to try.
Why Modify a Hoodie with a Zipper?
Before diving into the step-by-step instructions, it’s worth understanding why this modification is so useful.
-
Practicality – A zip-up hoodie is easier to wear and remove, especially in fluctuating weather. You can unzip it when it’s warm and close it when it’s cooler.
-
Style Flexibility – Adding a zipper transforms the look completely. You can wear it open over a T-shirt, giving it a casual jacket feel, or zipped up for warmth.
-
Sustainability – Rather than buying a new hoodie, you can upcycle one you already own. This saves money and reduces waste.
-
Personalization – Choosing your own zipper and trimming allows you to customize the look, making the garment unique.
Now, let’s walk through the actual process.
Tools and Materials You’ll Need
Gather the following supplies before you start. Most can be found at fabric stores, craft shops, or even online:
-
A hoodie (pullover style)
-
A zipper (choose the length according to your hoodie size)
-
Sewing machine (recommended) or needle and strong thread
-
Fabric scissors
-
Tailor’s chalk or washable fabric marker
-
Straight pins or sewing clips
-
Seam ripper (optional, for removing stitches if needed)
-
Fusible interfacing or iron-on fabric strips (for reinforcing edges)
-
Iron and ironing board
-
Decorative ribbon or fabric tape (optional, for finishing the inside seams)
-
Measuring tape
Step 1: Prepare the Hoodie
Lay your hoodie flat on a work surface, making sure it is smooth and free of wrinkles. Fold it neatly in half vertically so that the sleeves and side seams align perfectly. Use pins or sewing clips to hold the hoodie in place.
Once it’s aligned, mark the center front with tailor’s chalk. This will be the line where you’ll cut to insert the zipper. Measure carefully from the neckline down to the bottom hem and draw a straight line. Accuracy here is important, because even a small curve or angle could make your zipper sit unevenly later.
Step 2: Cut the Hoodie
Using sharp fabric scissors, carefully cut along the chalk line. Be cautious to cut only the front layer of fabric—you don’t want to slice through the back of the hoodie. If there are reinforced seams, use a seam ripper to undo any overlapping stitches cleanly.
Now your hoodie has an open front, ready to be reinforced and fitted with a zipper.
Step 3: Reinforce the Cut Edges
Cut strips of fusible interfacing or iron-on tape about 1 cm wide and as long as the front opening of your hoodie. Place the strips along both cut edges, on the inside of the fabric. With an iron, press them in place according to the interfacing instructions.
This step is essential: it prevents the fabric from stretching out or fraying when you sew in the zipper. It also gives the edges more stability, ensuring the zipper runs smoothly.
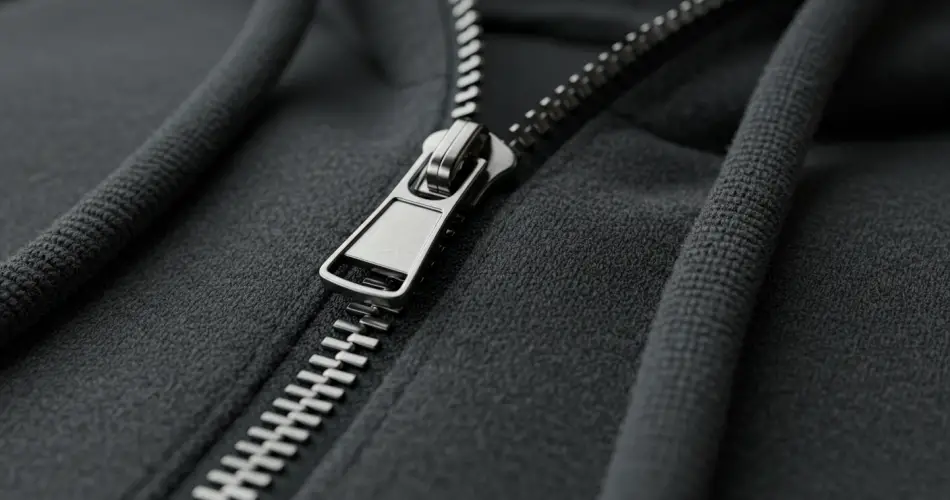
Step 4: Position the Zipper
Choose a zipper that complements the hoodie. You can go with a standard metal zipper for durability, a plastic zipper for a sporty look, or even a decorative one with contrasting colors for extra flair.
Place the zipper face-down along one edge of the opening, aligning it carefully so that the top of the zipper meets the neckline and the bottom aligns with the hem. Pin or clip it in place. Repeat the same process on the opposite side, ensuring the zipper is straight and symmetrical.
Step 5: Sew the Zipper
If you’re using a sewing machine, switch to a zipper foot. This allows you to sew close to the zipper teeth without difficulty. Stitch slowly along the pinned edge, keeping your line straight. Repeat for the other side.
If you’re sewing by hand, use a backstitch for strength. It takes more time, but it works just as well if you don’t own a machine.
Check that the zipper slides up and down smoothly before moving on.
Step 6: Finish the Top and Bottom Edges
At the top of the hoodie, you’ll likely have a bit of zipper tape extending past the neckline. Trim it down to about 2 cm above the fabric edge. Remove the excess zipper teeth with pliers and fold the tape inside. Sew it down securely so it doesn’t scratch your skin.
Do the same at the bottom hem if there is extra length.
For a polished look, you can cover the raw inside edges of the zipper tape with ribbon, fabric tape, or a strip of bias binding. This step is optional, but it makes the inside of the hoodie look neat and prevents fraying.
Step 7: Final Touches
Once the zipper is installed, try on the hoodie to check the fit. Zip it up to ensure it closes evenly and comfortably. If there are any wobbly seams or loose threads, fix them now. Give the entire hoodie a gentle press with the iron to smooth out any wrinkles and set the stitches.
Conclusion
Transforming a pullover hoodie into a zip-up might sound like a complex tailoring job, but as you can see, it’s really about taking small, careful steps. With a bit of patience, you can create a completely new piece of clothing from something you already own. Not only does this save money, but it also lets you practice sewing skills that will be useful for future projects.
The best part is the creativity you can add—whether it’s choosing a bold zipper, adding decorative trim, or even experimenting with contrasting fabrics along the zipper line. By the time you finish, you won’t just have a hoodie; you’ll have a customized garment that reflects your personal style.
So, the next time you’re tempted to buy a new zip-up hoodie, consider this DIY approach instead. You might surprise yourself with how simple—and satisfying—it is to give your clothes a second life.