Garlic is a kitchen staple with a bold flavor and countless health benefits. Growing it at home is not only satisfying but also surprisingly simple—even without a garden. By using plastic bottles, you can propagate garlic efficiently in compact spaces like balconies, patios, or sunny windowsills. This method is budget-friendly, space-saving, and an excellent way to reduce plastic waste while enjoying fresh, organic garlic right from home.
Whether you’re an experienced gardener or a beginner looking for a simple DIY project, this guide will walk you through how to propagate garlic using plastic bottles step by step.
Why Grow Garlic in Plastic Bottles?
Plastic bottle gardening is perfect for small spaces and urban settings. Here’s why garlic thrives in this setup:
-
Shallow root system – Garlic doesn’t need deep soil, making bottles ideal.
-
Minimal maintenance – Garlic is hardy and requires little attention once planted.
-
Eco-friendly – Repurposing bottles helps reduce plastic waste.
-
Portability – Easy to move around for optimal sunlight exposure.
-
Budget-friendly – No need to purchase pots or garden beds.
Garlic grown in bottles may produce smaller bulbs than those grown in open ground, but it still offers excellent quality and flavor—plus the satisfaction of home-growing.
What You’ll Need
Before starting, gather the following materials:
-
1 empty plastic bottle (1.5L or 2L)
-
Sharp scissors or a utility knife
-
Garlic cloves (organic or sprouting preferred)
-
Potting mix or homemade soil blend
-
A nail or skewer (to poke drainage holes)
-
Spray bottle or watering can
-
Optional: coconut husk, rice husk, or dried leaves for mulching
Step-by-Step Guide to Propagate Garlic in Bottles
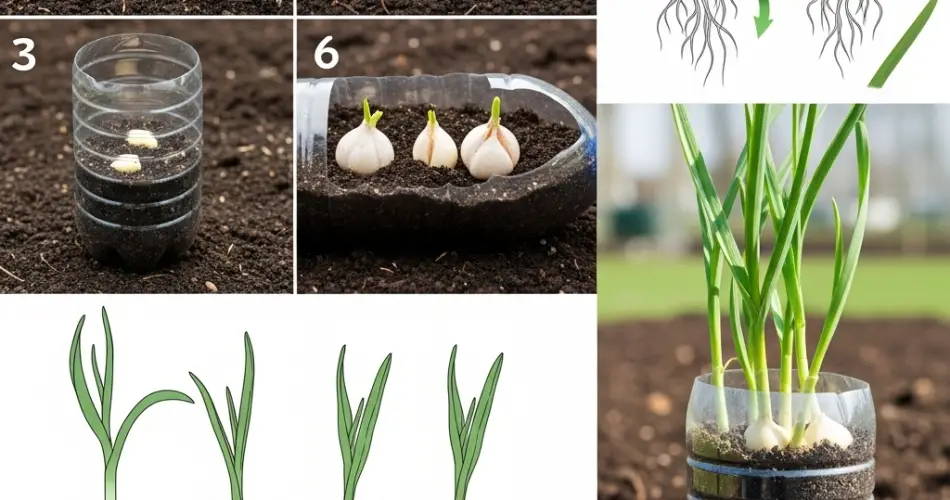
Step 1: Prepare the Bottle
Cut the bottle horizontally, about one-third from the top. Use the bottom part as the planting container. If you want to create a self-watering setup, keep the top part, insert a wick through the cap, and invert it into the bottom section.
Poke 4–6 small drainage holes at the base using a nail, skewer, or hot metal rod. Good drainage is essential to prevent root rot.
Step 2: Choose and Prepare Garlic Cloves
Use healthy, firm garlic cloves. Avoid soft, moldy, or damaged ones. You can use store-bought garlic, but organic or local varieties often sprout more reliably.
Separate the bulb into individual cloves. Choose the largest ones for planting, and avoid removing the papery skins. If the clove has already sprouted, that’s a bonus—it will grow faster.
Step 3: Prepare the Soil Mix
Garlic prefers loose, well-drained soil with good organic content. A good soil mix for bottle gardening includes:
-
40% compost or aged manure
-
30% garden soil or loam
-
30% cocopeat or perlite for aeration
Moisten the soil lightly before filling the bottle. Fill the container about 2 inches from the top.
Step 4: Plant the Garlic Cloves
Make small holes about 1 to 2 inches deep, spaced about 2 inches apart. Place the garlic cloves with the pointed end facing up and the flat root side down. Cover them with soil and press gently.
If you’re using a wide bottle or horizontal setup, you can fit 3–4 cloves per bottle. For vertical bottles with side holes cut into them (like a strawberry tower), plant one clove per opening.
Step 5: Provide Proper Light and Water
Place the bottle in a spot with at least 5–6 hours of sunlight daily. Garlic needs plenty of light to grow strong and healthy.
Water lightly after planting, and continue watering regularly to keep the soil evenly moist—but not soggy. Overwatering is a common mistake, so always check that excess water can drain out freely.
Step 6: Mulch and Maintenance
Add a thin layer of mulch (like dried leaves or rice husks) on top of the soil to help retain moisture and suppress weeds.
Garlic is a low-maintenance plant. It doesn’t require frequent fertilizing, but a light feeding of compost tea or diluted organic fertilizer once every 3–4 weeks can support healthy growth.
Keep an eye out for yellowing leaves or signs of fungal issues. Avoid overhead watering, and ensure good airflow around the container.
Step 7: Harvesting Garlic
Garlic takes about 6–8 months to fully mature, depending on the variety and growing conditions. You’ll know it’s ready to harvest when:
-
The leaves begin to yellow and dry out.
-
The plant begins to lean or fall over.
-
The bulb feels firm and has formed cloves inside.
To harvest, gently loosen the soil and pull out the bulbs. Let them dry in a shaded, well-ventilated area for about 1–2 weeks to cure. This process improves storage life and flavor.
If you want to harvest green garlic (young plants with tender stalks and undeveloped bulbs), you can do so about 6–8 weeks after planting.
Bonus Tips
-
Use vertical bottle towers to maximize space—cut side holes into stacked bottles and plant one clove per opening.
-
Label your containers with planting dates to track growth and harvest time.
-
Start new bottles every few weeks for a continuous garlic supply.
-
Save a few cloves from each harvest to replant and continue the cycle.
Final Thoughts
Propagating garlic in plastic bottles is a smart, sustainable, and rewarding gardening project. With minimal effort and resources, you can enjoy fresh, homegrown garlic right from your own space—even if you don’t have a backyard. This method is perfect for urban gardeners, beginners, or anyone looking to grow their own food more consciously.
Try it out, and soon you’ll be adding bold garlic flavor to your meals—fresh from your bottle garden.


