Growing your own potatoes at home can be both rewarding and cost-effective, but achieving strong, healthy plants starts before the tubers ever reach the soil. Pre-sprouting, also known as chitting, gives potato seeds a head start by encouraging shoots to form before planting. Traditionally done on trays or in shallow boxes, pre-sprouting can also be accomplished using an innovative, space-saving method—bottle cells made from recycled plastic bottles. This approach provides individual compartments for each potato seed, prevents rot caused by overcrowding, and offers a simple way to monitor progress.
Why Pre-Sprout Potatoes?
Pre-sprouting ensures that your seed potatoes begin growing in a controlled environment before they are placed into the garden or containers. This method provides several benefits:
-
Faster harvests: Pre-sprouted potatoes establish quickly once planted, cutting down overall growing time.
-
Better success rate: Strong sprouts mean fewer losses to poor soil conditions or pests.
-
Healthier plants: Pre-sprouting allows you to choose the strongest tubers before planting, discarding any that fail to sprout.
-
Space efficiency: Using bottle cells allows gardeners with small spaces to prepare multiple potato seeds in a neat, compact way.
Preparing Bottle Cells
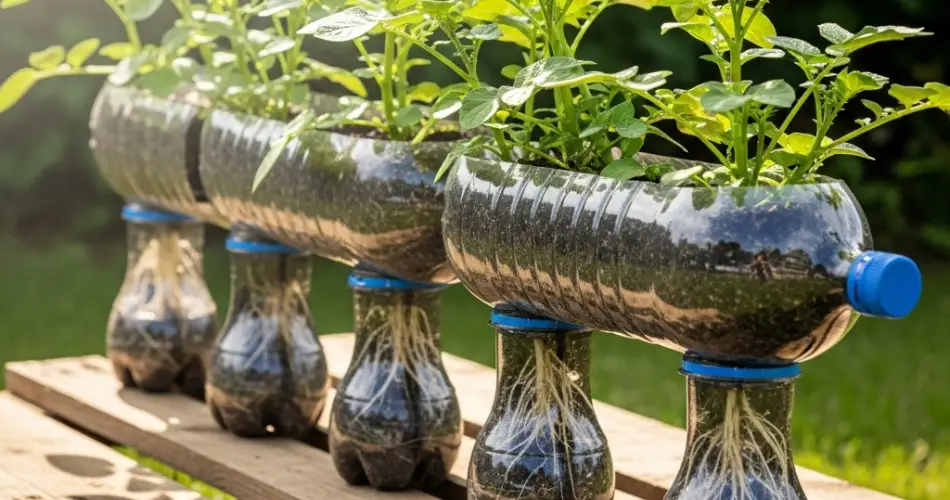
Recycled bottles are perfect for this project. Choose medium-sized plastic bottles (1–1.5 liters), as these provide enough space for individual potato seeds. Cut each bottle into two or three cylindrical sections, each about 8–10 cm tall. These sections will serve as the cells for your potatoes.
Make small drainage holes in the bottom of each cell to prevent waterlogging. Arrange them on a tray or shallow container that can catch any excess water. This setup mimics seedling trays but at virtually no cost.
Choosing Seed Potatoes
Select certified seed potatoes rather than grocery store tubers, as they are disease-free and bred for growing. Look for firm tubers with at least a few “eyes” (the small dimples where sprouts will form). Smaller seed potatoes can be planted whole, while larger ones may be cut into halves or quarters, each piece containing at least two healthy eyes.
Allow cut pieces to dry for a day or two before placing them in the cells. This helps the cut surfaces callus over, reducing the risk of rot.
Filling the Cells
To prepare the bottle cells for sprouting, add a thin layer of slightly moist medium. A mix of peat, coconut coir, or even sandy soil works well. The goal is not to provide deep soil but to create a slightly damp environment that encourages sprout development without burying the potatoes too deeply.
Place each seed potato piece cut-side down with the eyes facing upward. This orientation encourages upward sprouting while allowing roots to form underneath.
Positioning for Light and Warmth
Potatoes sprout best in a bright but indirect light environment. A windowsill, balcony, or shaded patio is ideal. Direct sunlight may cause the cells to overheat, while too little light will result in pale, weak sprouts.
Aim for a consistent temperature between 15–20°C (59–68°F). Warmer conditions may cause rapid but fragile sprouting, while cooler ones will slow the process.
Caring for the Sprouts
During the pre-sprouting phase, moisture control is essential. The growing medium should stay slightly damp but never soggy. Excess water can easily lead to rot, especially in the confined space of bottle cells. If the sprouts appear pale or stretched, move the setup to a brighter location.
Over two to four weeks, you’ll notice firm green shoots emerging from the eyes. By this stage, the tubers are primed for planting. Sprouts that are 2–3 cm long are ideal—they are sturdy enough to handle transplanting but not so long that they risk breaking.
Planting Out Pre-Sprouted Potatoes
When the sprouts are ready, carefully remove the potato seeds from their bottle cells. The individual compartments make this step easier, as the tubers are not tangled with each other. Handle the sprouts gently to avoid snapping them off.
Plant the sprouted potatoes directly into your prepared garden bed, raised crate, or large container. Place them about 10–15 cm deep with the sprouts pointing upward. Cover with loose soil and water lightly.
Within a short time, you’ll see green shoots breaking through the surface, proof that your pre-sprouting has given the plants a strong head start.
Benefits of Bottle Cell Pre-Sprouting
This simple method combines sustainability with practicality:
-
Upcycling: Turns discarded bottles into useful growing tools.
-
Organization: Each potato seed has its own space, reducing competition and disease spread.
-
Visibility: Transparent bottle walls allow you to monitor root and sprout development.
-
Accessibility: Suitable for gardeners with limited space or those growing on balconies.
Final Thoughts
Pre-sprouting potatoes in bottle cells is an effective way to ensure a healthy, productive harvest while making use of everyday materials. This method not only saves money but also helps reduce plastic waste by repurposing bottles that might otherwise be discarded. By giving your potato seeds a strong start in individual cells, you set the stage for vigorous growth, higher yields, and an earlier harvest.
Whether you’re gardening in a backyard or tending pots on a balcony, this simple propagation technique makes potato growing more efficient and sustainable. With a little preparation and care, you can enjoy a steady supply of fresh, homegrown potatoes from your own space.


