Creating a beautiful bonsai tree from Moss Rose (Portulaca grandiflora) using small zinc bars is a simple and enjoyable process. This method allows you to craft a unique, colorful bonsai that enhances your home decor. Follow these easy steps to make your own Moss Rose bonsai with minimal materials and effort.
Materials Needed:
- 6 small zinc wires (each about two glove lengths in size)
- Two pliers (one regular and one needle-nose)
- Black tape
- Screwdriver handle
- Multi-colored Moss Rose clusters
- Drawstring
- Scissors
- Well-draining pot
- Potting soil
- Watering can
Step 1: Creating the Bonsai Frame
Start by twisting the zinc wires together to form the bonsai trunk. Use your pliers to twist the wires securely, making sure they are tightly wound. Next, create the base by pulling out the bottom section of the wires to provide stability. Wrap black tape around the lower portion to hold the structure firmly.
Once the base is secure, begin shaping the branches. Pull one zinc wire downward, wrap it around the frame, and repeat this process until all wires are arranged in a structured form. Then, use the handle of a screwdriver to bend the wires gently, giving the bonsai frame a natural, tree-like shape. Adjust the branches to your desired style, ensuring they are evenly spread to support the Moss Rose clusters.
Step 2: Attaching the Moss Rose Clusters
Prepare your Moss Rose clusters by removing excess leaves, keeping only the stems. Carefully insert the stems into the zinc frame, ensuring they are evenly spaced. To prevent breakage, use a drawstring to fix the stems securely to the frame. Tie them lightly, as Moss Rose plants are fragile and can break easily.
Repeat this process for all clusters, securing each one in place with the drawstring. As you work through each cluster, check that they are arranged symmetrically for a balanced and visually appealing bonsai shape. Once all clusters are in place, use scissors to trim any excess drawstring and neaten the structure.
Step 3: Planting the Bonsai
Choose a well-draining pot to plant your newly formed bonsai. Fill the pot halfway with soil, then place the bonsai inside, ensuring it stands upright. Add more soil around the base to secure it firmly in place. Press down lightly to eliminate air pockets and provide a stable foundation.
For added decoration, you can plant small flowering plants around the bonsai base to enhance its visual appeal. Water the plant thoroughly after planting and place the pot in a shaded area for 3–5 days to allow the Moss Rose clusters to recover.
Step 4: Maintaining and Shaping the Bonsai
After about three weeks, the Moss Rose bonsai will have grown significantly, and the branches will begin to fill out. At this stage, it’s important to prune the bonsai to maintain its shape. Use scissors to trim any overgrown branches, ensuring the bonsai retains its structured appearance.
To further refine the shape, use small zinc bars to bend the branches gently. This technique helps train the plant to grow in a specific direction, creating a balanced and aesthetically pleasing bonsai canopy. Continue bending and adjusting until all branches have a uniform, circular arrangement.
Step 5: Encouraging Healthy Growth and Flowering
Once the bonsai has taken shape, continue caring for it by following these guidelines:
- Sunlight: Place the bonsai in a sunny location to encourage flowering. Moss Rose thrives in bright light and blooms best with at least 6 hours of direct sunlight daily.
- Watering: Water only when the soil is dry to prevent overwatering, which can cause root rot. Use a spray bottle for light misting to maintain moisture levels without over-saturating the soil.
- Fertilization: Use a balanced liquid fertilizer once every two weeks to promote healthy growth and vibrant blooms.
- Pruning: Regularly trim excess growth to maintain the bonsai’s shape and encourage more flowering. Pruning helps the plant develop a fuller canopy with abundant blooms.
Step 6: Final Shaping and Enjoying the Bloom
After another three weeks, the Moss Rose bonsai will have developed a full, balanced canopy with abundant flowers. Continue to prune lightly to keep the shape symmetrical and remove any fading blooms to encourage new growth.
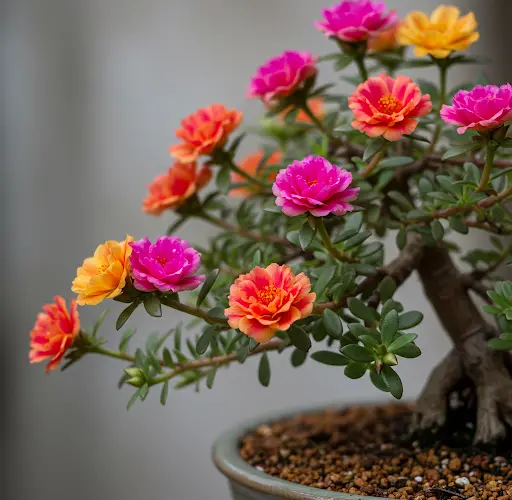
To maximize the visual appeal, consider planting multiple colors of Moss Rose in the same bonsai to create a vibrant and eye-catching display. A well-maintained Moss Rose bonsai will continue to bloom beautifully, adding charm and elegance to your home or garden.
Conclusion
Creating a Moss Rose (Portulaca grandiflora) bonsai using small zinc bars is a simple yet rewarding project. By following these steps, you can craft a stunning miniature tree that thrives with minimal effort. With regular care, pruning, and proper sunlight, your bonsai will flourish, providing a beautiful display of colorful flowers for weeks to come. Happy gardening!


