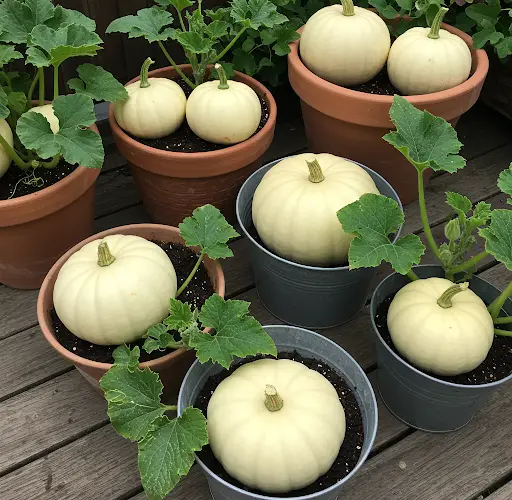
White pumpkins, especially the charming Casperita variety, are becoming a favorite among home gardeners. Known for their creamy skin, small size, and decorative appeal, they’re just as edible and delicious as their orange counterparts. Even better—they can be successfully grown in containers, making them a perfect option for patios, balconies, and small gardens.
This step-by-step guide will walk you through growing Casperita white pumpkins from seed in containers, from sowing to harvest.
Why Choose Casperita Pumpkins?
Casperita is a mini white pumpkin variety that produces small, round fruits typically 1–2 pounds in weight. They are perfect for cooking, roasting, or using as autumn décor. Because they are bush-type or semi-vining, they are more manageable in containers compared to larger pumpkin varieties. Their compact size makes them ideal for small-space gardening.
What You’ll Need
-
Casperita pumpkin seeds
-
Large containers or grow bags (minimum 15 gallons, ideally 18–20 inches deep)
-
High-quality potting mix enriched with compost
-
Trellis or stake (optional)
-
Liquid organic fertilizer or balanced vegetable fertilizer
-
Sunny outdoor space (6–8 hours of sunlight daily)
-
Watering can or hose with a gentle spray setting
Step 1: Prepare the Container
Select a container that’s at least 15–20 gallons in size and has excellent drainage. Pumpkins need room to spread their roots and enough soil to retain moisture during hot days. Fabric grow bags are a great option for breathability and moisture regulation.
Fill the container with rich, well-draining potting soil mixed with compost. Avoid heavy or compacted soil. Mix in a handful of organic fertilizer before planting to give your seedlings a strong start.
Step 2: Sow the Seeds
You can start Casperita seeds directly in the container once the weather is consistently warm—ideally when daytime temperatures are above 70°F (21°C). If starting earlier indoors, plant seeds in biodegradable pots 2–4 weeks before the last frost date.
Plant 2–3 seeds in the center of the container, about 1 inch deep. Water gently but thoroughly. Once the seedlings emerge (usually in 7–10 days), thin out the weaker ones, leaving the healthiest plant to grow.
Step 3: Position and Sunlight
Place your container in a location that receives at least 6–8 hours of direct sunlight per day. Casperita pumpkins are sun-loving plants that thrive in warm, bright conditions. Lack of sunlight will lead to weak vines and poor fruit production.
If you’re growing on a balcony or near a wall, rotate the container every few days to encourage even growth.
Step 4: Watering and Feeding
Consistent watering is crucial for pumpkin plants. Keep the soil moist but not soggy—water deeply whenever the top inch of soil feels dry. Container-grown plants tend to dry out faster, especially in summer, so check daily during hot weather.
Feed your pumpkin every 2–3 weeks with a balanced fertilizer or compost tea. Once flowers begin to form, switch to a fertilizer with higher phosphorus and potassium to promote fruiting.
Step 5: Support and Space Management
Casperita vines are relatively compact but may still sprawl. If you’re short on space, train the vines vertically using a small trellis or tomato cage. Gently tie the vines with soft garden ties as they grow.
If you have space for them to trail, allow the vines to spill over the edge of the container. You can place straw or mulch beneath developing pumpkins to prevent contact with the soil and reduce the risk of rot.
Step 6: Pollination
Pumpkins produce both male and female flowers. Male flowers appear first and don’t develop fruit. Female flowers have a tiny fruit at the base and must be pollinated to produce pumpkins.
In container gardens, pollinators may be limited, so consider hand-pollinating. Use a soft brush or cotton swab to transfer pollen from a male flower to the center of a female flower. This increases the chances of fruit setting.
Step 7: Harvesting
Casperita pumpkins typically mature in 75–90 days after germination. They are ready to harvest when the skin turns creamy white, feels hard, and the stem begins to dry and harden.
Use pruning shears or a sharp knife to cut the pumpkin from the vine, leaving about 2 inches of stem attached. This helps extend storage life.
Allow the harvested pumpkins to cure in a warm, dry place for 7–10 days before storing. Curing toughens the skin and improves shelf life.
Tips for Success
-
Don’t overwater—soggy soil can lead to root rot and mildew.
-
Mulch around the base of the plant to retain moisture and reduce weed competition.
-
Use floating row covers during early growth to protect seedlings from pests like squash bugs, but remove them once flowers appear to allow for pollination.
-
Keep the container clean and ensure proper airflow to prevent fungal issues.
Growing Casperita white pumpkins in containers is an easy and fun way to enjoy this unique variety at home. Whether you’re decorating for fall or roasting them for dinner, your compact pumpkin patch will be both beautiful and productive.


