Water spinach (Ipomoea aquatica), also known as kangkong or ong choy, is a fast-growing leafy green beloved in many Asian cuisines. It thrives in warm, moist environments and is incredibly easy to grow at home—even without a garden. One surprisingly effective method uses Styrofoam containers and discarded apple peels to produce a fresh, continuous harvest right on your balcony or backyard.
This budget-friendly growing system requires minimal space, recycles kitchen scraps, and yields healthy, organic greens within a few weeks. Here’s how you can set it up and enjoy fresh water spinach all year round.
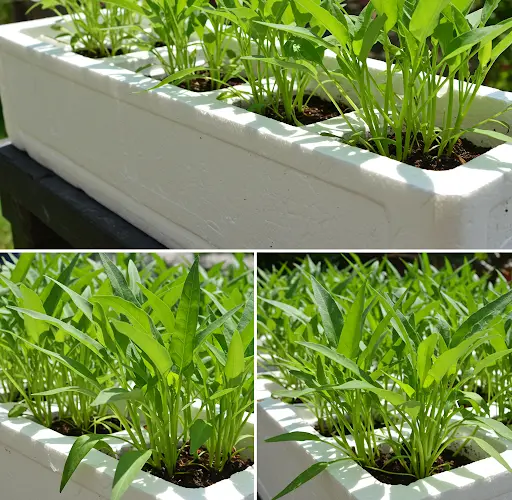
Why Grow Water Spinach in Containers?
Growing water spinach in containers offers several advantages:
-
Space-saving – Ideal for small patios, balconies, or urban homes.
-
Clean and controlled – Avoids pests and weeds common in open soil.
-
Water-efficient – Moisture is retained well, especially in enclosed containers.
-
No soil needed – When using organic waste like apple peels, you reduce the need for chemical fertilizers.
Using Styrofoam boxes, which are often discarded from grocery stores or markets, gives this method a sustainable twist. Pairing that with nutrient-rich food scraps like apple peels provides an excellent environment for water spinach to thrive naturally.
Materials Needed
-
1 large Styrofoam box (with a lid, if available)
-
Apple peels (or other fruit/vegetable scraps)
-
A few handfuls of compost or garden soil
-
Water spinach seeds or cuttings
-
Water
-
Small garden tools or a trowel
-
Optional: mesh or netting to protect seedlings from pests
Step 1: Prepare the Styrofoam Container
Start by cleaning the Styrofoam box to ensure it’s free of chemicals or residues. If the box doesn’t already have drainage holes, poke a few small holes at the bottom corners—but not too many, as water spinach enjoys moisture.
Layering the box:
-
Place a thick layer of apple peels (and other fruit or vegetable scraps if available) at the bottom of the box. These will decompose and release nutrients slowly.
-
Cover the peels with 3–5 inches (7–12 cm) of compost or rich garden soil. Mix lightly so the decomposition process begins evenly.
-
Water the mix thoroughly and let it sit for 2–3 days before planting. This allows the organic material to begin fermenting and breaking down.
Step 2: Sowing Water Spinach
You can grow water spinach from either seeds or stem cuttings.
If using seeds:
-
Soak seeds in warm water for 8–12 hours to speed up germination.
-
Scatter them evenly over the surface of the soil.
-
Lightly cover with a thin layer of soil or compost and water gently.
If using cuttings:
-
Choose fresh water spinach stems with at least 2–3 nodes.
-
Stick them into the soil vertically, with one node buried and others above the surface.
-
Space cuttings about 4–6 inches apart for optimal growth.
Cover the container with a lid or breathable cloth to retain humidity during the first few days.
Step 3: Watering and Care
Water spinach grows best in consistently moist soil, so regular watering is crucial.
-
Water daily, especially in hot weather. The Styrofoam helps retain moisture, but avoid letting the soil dry out.
-
Keep the container in a sunny location, as water spinach requires at least 4–6 hours of sunlight per day.
-
If growth seems slow after a few weeks, you can boost the nutrients by adding compost tea or diluted liquid fertilizer.
As the apple peels break down, they release potassium, phosphorus, and micronutrients that support healthy leaf development without chemical fertilizers.
Step 4: Pest Control and Maintenance
Water spinach is relatively hardy, but you may encounter:
-
Aphids or leaf miners – Remove manually or spray with a mild soap and water solution.
-
Fungal spots – Avoid overhead watering and maintain good airflow around the plants.
-
Snails or slugs – Use crushed eggshells or place mesh netting over the container.
Weeding is minimal in containers, but remove any unwanted seedlings that compete for space.
Step 5: Harvesting Water Spinach
Water spinach grows quickly, and you can expect to begin harvesting within 3–4 weeks of planting.
Harvesting method:
-
Use scissors or garden shears to cut the leafy stems 4–6 inches above the base.
-
Leave a few nodes and leaves intact to encourage regrowth.
-
You can harvest every 7–10 days with this method, ensuring a continuous supply of greens.
With good care, each planting can yield several harvests before needing to be re-seeded or replanted.
Extra Tips for Success
-
Rotate new apple peels or kitchen scraps into the soil between harvests to keep the nutrient cycle going.
-
Use a second container to start new cuttings while the first batch regrows—this ensures a steady supply.
-
In cooler climates, water spinach can be grown indoors near a sunny window or under grow lights.
Final Thoughts
Growing water spinach in Styrofoam containers with apple peels is an easy, sustainable way to produce your own nutritious greens. It combines resourcefulness with simplicity—using everyday scraps and a repurposed container to create a thriving mini-garden at home.
With minimal investment and care, you can enjoy an ongoing harvest of fresh, tender water spinach that’s perfect for stir-fries, soups, or salads. Whether you’re a beginner or an experienced gardener, this method is an excellent way to turn waste into wellness—right from your backyard or balcony.


