How to Grow Tomato Plants in Plastic Containers
Tomatoes are one of the most popular and rewarding plants for home gardeners. Whether you’re working with a small balcony, patio, or limited backyard space, growing tomatoes in plastic containers is an efficient and space-saving way to produce fresh, flavorful fruit right at home. This method also allows for better control over soil, drainage, and mobility—perfect for urban or small-space gardeners.
Using recycled or store-bought plastic containers is not only affordable but also environmentally friendly. Here’s a detailed guide on how to grow thriving tomato plants in plastic containers, from choosing the right pot to harvesting ripe, juicy tomatoes.
Why Grow Tomatoes in Plastic Containers?
Plastic containers are lightweight, durable, and readily available. They help retain moisture better than clay pots and are easy to move around to follow the sun or avoid bad weather. Best of all, you can reuse large containers like paint buckets, water jugs, or storage bins, giving them a second life as garden planters.
What You’ll Need:
-
Tomato seeds or healthy seedlings
-
A plastic container (minimum 5-gallon size, about 12–14 inches deep)
-
Quality potting mix
-
Organic compost or natural fertilizer
-
Stakes, cages, or trellises for support
-
A sunny location (at least 6–8 hours of direct sunlight)
-
Watering can or spray bottle
-
Optional: mulch (straw, dried leaves, or coco husk)
Step 1: Choosing and Preparing the Container
Choose a clean, sturdy plastic container with a capacity of at least 5 gallons. Deeper containers are better for root development. Wash thoroughly if reusing an old bucket or storage bin, especially if it previously held chemicals.
Using a drill or heated nail, make 5–7 drainage holes at the bottom. Without proper drainage, water can pool and lead to root rot.
If your container is deep, you can place a layer of small stones or broken clay pieces at the bottom to improve drainage.
Step 2: Preparing the Soil
Tomatoes thrive in nutrient-rich, well-draining soil. Create your own mix using:
-
50% potting soil or garden soil
-
30% organic compost (like kitchen compost or cow dung)
-
20% sand, cocopeat, or rice husk for aeration
Mix in a handful of crushed eggshells, wood ash, or bone meal to boost calcium and prevent blossom end rot.
Fill the container up to 3–4 inches below the rim to leave room for watering and mulching later.
Step 3: Planting Your Tomato
If starting from seed, sow seeds ¼ inch deep and keep the container in a warm, sunny spot. Water gently and wait 7–14 days for germination. If transplanting a seedling, dig a hole deep enough to bury two-thirds of the stem. Tomatoes can grow roots along the buried stem, leading to stronger, more stable plants.
Gently press the soil around the base and water lightly.
Step 4: Providing Support
Tomato plants need support as they grow and begin fruiting. Insert a bamboo stick, tomato cage, or vertical trellis at the time of planting to avoid damaging roots later. Secure the plant with soft ties as it grows taller to prevent it from bending or breaking.
Step 5: Watering and Feeding
Tomatoes need consistent watering, especially in containers where soil dries out faster. Water when the top inch of soil feels dry—usually once a day in hot weather. Avoid splashing water on the leaves to reduce fungal issues.
Feed the plant every 10–15 days with natural fertilizers like banana peel tea, compost tea, fish emulsion, or diluted cow dung slurry. Tomatoes are heavy feeders, so regular nutrition is essential for flowering and fruiting.
Step 6: Sunlight and Temperature
Tomato plants love warmth and need at least 6–8 hours of direct sunlight daily. If you’re growing on a balcony, place the container where it gets the most sun, ideally near a south-facing wall or window.
Protect plants from strong winds or sudden drops in temperature. If needed, move the container to a sheltered spot during storms or chilly nights.
Step 7: Mulching and Maintenance
Mulching helps retain moisture, regulate temperature, and prevent weed growth. Use straw, dry leaves, or shredded coconut husk to cover the soil surface around the plant.
Regularly remove yellowing or diseased leaves, especially near the base. Pinch off the side suckers (small shoots that grow in the junction of the main stem and branches) to direct the plant’s energy toward fruit production.
Step 8: Pollination and Fruit Development
Tomatoes are self-pollinating, but in still air, they might need a little help. Gently shake the plant or tap the flowers to release pollen and improve fruit set. You can also use a small paintbrush to transfer pollen between flowers.
Once fruits appear, reduce nitrogen-rich fertilizers and focus on potassium sources to enhance flavor and size. Crushed banana peels or wood ash are excellent natural options.
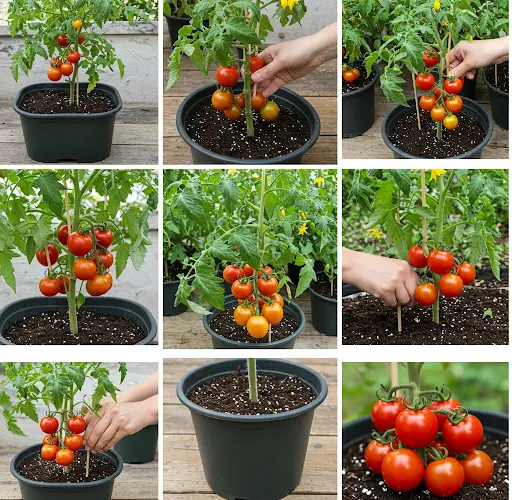
Step 9: Harvesting
Tomatoes are ready to harvest when they turn fully red, yellow, or orange—depending on the variety—and feel slightly soft to the touch. Avoid leaving ripe fruits on the vine too long, as they may attract pests or crack.
Harvest regularly to encourage the plant to keep producing.
Conclusion
Growing tomatoes in plastic containers is a smart, eco-friendly way to enjoy fresh produce from your own home, even with limited space. With the right setup, regular care, and a sunny spot, you can look forward to a bountiful harvest of juicy, homegrown tomatoes all season long.
This container method is especially great for beginners, renters, or anyone who wants to grow food without a full garden. So grab a plastic bottle or bucket, add some soil and sunshine, and watch your tomatoes thrive!


