Growing your own potatoes at home might sound like a task reserved for gardeners with big backyards, but in reality, it can be done with limited space and surprisingly little soil. By using recycled plastic containers, you can easily grow an abundance of large, healthy tubers—even on a balcony, terrace, or small patio. This method is ideal for urban dwellers or anyone looking to cultivate fresh food in a sustainable and space-saving way.
Here’s how you can grow potatoes in plastic containers at home and enjoy a big harvest from a small setup.
Why Use Plastic Containers to Grow Potatoes?
Plastic containers are a practical and budget-friendly choice for home gardening. They are lightweight, easy to move, and typically offer good moisture retention. When growing potatoes, containers allow for excellent control over soil quality, drainage, and pests, reducing the risk of common problems like rot or disease found in ground planting.
Moreover, this method makes harvesting much easier. Instead of digging through the ground, you simply tip over the container and gather your tubers.
What You’ll Need
-
Plastic containers (20–30 liters or more; old buckets, storage bins, or paint tubs work well)
-
Seed potatoes (you can buy certified ones or sprout organic store-bought potatoes)
-
Quality soil (loamy and well-draining; you can use a mix of compost, coconut coir, and garden soil)
-
Compost or organic fertilizer
-
Drill or tool to make drainage holes
-
Mulch or dry leaves (optional for moisture retention)
Step-by-Step Guide to Growing Potatoes in Containers
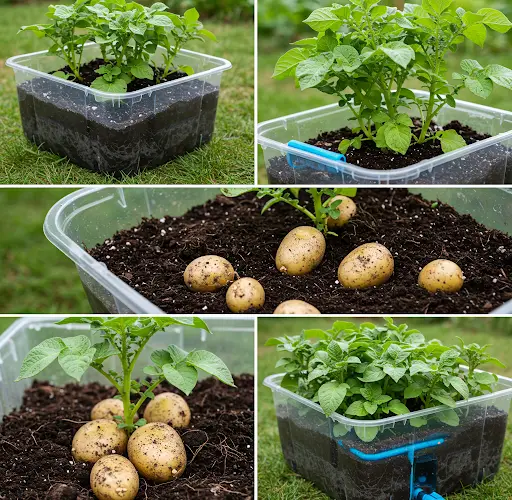
1. Prepare Your Container
Choose a plastic container that is at least 12–15 inches deep and 16–18 inches wide. Potatoes need vertical room to grow as tubers form along the buried stems.
Drill several holes in the bottom of the container to ensure good drainage. Without proper drainage, water can accumulate and cause the seed potatoes to rot.
2. Sprout the Potatoes (Chitting)
Before planting, allow your seed potatoes to sprout. Place them in a well-lit, cool location for about 1–2 weeks until you see short, stubby shoots coming out of the “eyes.” This process is known as chitting and helps give the plants a head start.
3. Planting
Add about 4–6 inches of soil mix to the bottom of your container. Place 2–3 sprouted seed potatoes on top, with the eyes facing upward. Cover them with 3–4 inches of soil.
As the plants grow, continue to add more soil to the container every time they reach about 6–8 inches tall. This technique, called “hilling,” encourages more tubers to develop along the buried stems.
Continue the hilling process until the container is nearly full, leaving about 1–2 inches at the top.
4. Watering and Feeding
Potatoes need consistent moisture but dislike being waterlogged. Water the containers thoroughly when the top inch of soil feels dry. During hot months, daily watering might be necessary, especially if your containers are in full sun.
For feeding, mix compost or a balanced organic fertilizer into the soil every few weeks to boost plant health and tuber development.
5. Sunlight and Placement
Place your containers in a location that receives at least 6 hours of direct sunlight daily. Potatoes are sun-loving plants, and the more sunlight they receive, the better the yield.
If you’re using multiple containers, space them slightly apart to allow for good airflow and access.
When and How to Harvest
Potatoes are ready to harvest when the plants begin to flower and the leaves start turning yellow. For new potatoes, you can harvest earlier—usually around 8–10 weeks after planting. For mature, larger tubers, wait until the foliage has completely died back, around 12–16 weeks.
To harvest, gently tip the container on its side and sift through the soil to collect your potatoes. This no-dig method makes it easy and fun, especially for kids to participate in.
Tips for a Bigger Harvest
-
Don’t overcrowd: Limit the number of seed potatoes per container to avoid overcrowding and allow each plant enough space to develop a good root system.
-
Use quality soil: The richer and looser the soil, the better the tuber formation. Avoid compacted or poor-quality soil.
-
Avoid waterlogging: Drainage is critical. Elevate containers on bricks if needed to ensure water flows out freely.
-
Replant: You can replant in the same container with fresh soil for another crop, especially in warmer climates that allow year-round gardening.
Benefits of Growing Potatoes in Containers
-
No need for a garden or backyard
-
Reduces pests and disease risks
-
Easy to move, rotate, or adjust sunlight
-
Simple harvesting
-
Ideal for children and beginners
Final Thoughts
Growing potatoes in plastic containers is a fantastic gardening method that delivers big results with minimal effort and soil. With just a bit of space and a few common materials, you can enjoy your own homegrown potatoes that are fresher and tastier than store-bought ones.
Whether you’re an experienced gardener or trying this for the first time, this container method offers a reliable, low-cost way to grow plenty of potatoes right at home. Start with one container, and soon you might have an entire corner of your terrace producing an impressive harvest!


