
Growing potatoes from seeds is a fun and rewarding gardening project that can yield a bountiful harvest. Unlike many other vegetables, potatoes are typically grown from seed potatoes (small, whole potatoes or pieces of larger potatoes) rather than true seeds. However, potato seeds, also known as “true potato seeds” (TPS), can be used to grow potatoes from the very beginning of their life cycle. In this guide, we’ll walk you through the process of growing potatoes from seeds, from seed selection to harvesting, in a way that’s perfect for beginners and seasoned gardeners alike.
Choosing the Right Seeds
When you grow potatoes from true potato seeds (TPS), you’re starting with the seeds that are naturally produced in the fruit of the potato plant. These seeds are tiny and look similar to tomato seeds but must be treated and started in a different way than typical vegetable seeds.
However, if you’re new to growing potatoes, you might want to begin with seed potatoes (the small tubers) rather than starting with true potato seeds, as growing from seed potatoes is much easier and faster. For the sake of this guide, we’ll focus on the steps for starting from true potato seeds (TPS).
Preparing for Planting
-
Start Indoors: Since potatoes are sensitive to frost, it’s best to start your true potato seeds indoors about 8 to 10 weeks before your local last frost date. Plant your seeds in seed trays or small pots with a quality potting mix. True potato seeds need warmth and light to germinate, so place the trays in a warm area with temperatures between 65°F to 75°F (18°C to 24°C).
-
Planting the Seeds: Sow the true potato seeds about 1/4 inch deep into the soil. You can plant several seeds in one tray or container. Water the seeds gently, keeping the soil moist but not soggy. Potatoes like well-drained soil that’s rich in organic matter, so choose a light, airy soil mix to encourage healthy root growth.
-
Germination: True potato seeds generally take 1 to 2 weeks to germinate. Ensure that the seedlings receive adequate light to prevent them from becoming leggy. If natural sunlight is insufficient, consider using grow lights to help the seedlings thrive.
Transplanting Seedlings Outdoors
Once the danger of frost has passed and your seedlings have developed a sturdy root system, it’s time to transplant them outdoors. Choose a location in your garden that gets full sun—potatoes thrive in sunny spots with at least 6 to 8 hours of sunlight each day.
Before planting, prepare the soil by loosening it to a depth of about 8 to 10 inches (20 to 25 cm). Potatoes need well-drained, loose soil to allow their tubers to grow freely. Amend the soil with organic matter like compost to ensure it’s nutrient-rich.
When transplanting your potato seedlings, space them about 12 to 15 inches apart. Create small mounds or ridges to help the soil drain better, and plant the seedlings about 6 inches deep. The seedling should be placed with the seed leaf (cotyledon) just above the soil surface.
Caring for Your Potato Plants
-
Watering: Potatoes need consistent moisture, especially during the growing season. Water them regularly, ensuring the soil stays moist but not waterlogged. Be mindful of watering around the base of the plant to avoid waterlogging, which could cause rot.
-
Fertilizing: Potatoes are heavy feeders, so regular fertilization is important. Use a balanced, organic fertilizer or one specifically designed for root crops. Apply the fertilizer as recommended during the growing season, usually a few weeks after transplanting, and again as the plants begin to flower.
-
Hilling: As your potato plants grow, you’ll need to hill the soil around the base of the plants. This means adding additional soil around the stems to encourage the production of more tubers. Hill the soil every few weeks as the plants grow taller, ensuring the base of the plant is covered by about 3 to 4 inches of soil at all times.
-
Pest Control: Potatoes are susceptible to pests such as aphids, Colorado potato beetles, and wireworms. Keep an eye out for any signs of damage to the leaves or stems, and remove pests by hand or use organic pest control methods like neem oil or insecticidal soap.
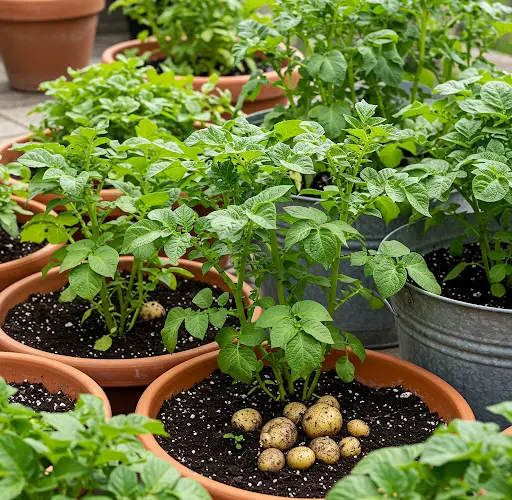
Harvesting Potatoes
Potatoes grown from true potato seeds will take longer to mature than those grown from seed potatoes, usually around 100 to 120 days. Your plants will begin to flower when the tubers are starting to form beneath the soil.
To determine when your potatoes are ready to harvest, look for signs like the yellowing of the plant leaves or the plant dying back. Gently dig into the soil around the base of the plant to check the size of the tubers. If they’re large enough, it’s time to harvest.
To harvest, carefully dig up the tubers with a shovel or garden fork. Be sure not to damage the potatoes as you dig. Once harvested, brush off any excess soil, but do not wash the potatoes until you’re ready to eat them. Allow them to cure in a cool, dry, dark place for a few days to harden the skins.
Storing Your Potatoes
After curing, store your potatoes in a cool, dark, and well-ventilated area. Ideal storage temperatures are between 40°F to 50°F (4°C to 10°C). Avoid storing them in the refrigerator, as this can cause them to turn sweet due to increased sugar content. Proper storage can help extend the shelf life of your potatoes for several months.
Conclusion
Growing potatoes from true potato seeds can be a rewarding challenge that allows you to experience the full life cycle of a potato plant, from seed to harvest. Though it requires patience and care, the satisfaction of growing your own potatoes is well worth the effort. Follow these simple steps for success, and soon you’ll be enjoying fresh, homegrown potatoes from your own garden.


