Growing your own vegetables at home is not only satisfying but also a great way to enjoy fresh, chemical-free food. Among the easiest and most rewarding vegetables to grow on your terrace is okra—also known as lady’s finger. This warm-season crop thrives in containers and requires minimal care once established. With the right approach, you can grow tender, organic okra right at home from seeds to harvest.
Why Grow Okra on the Terrace?
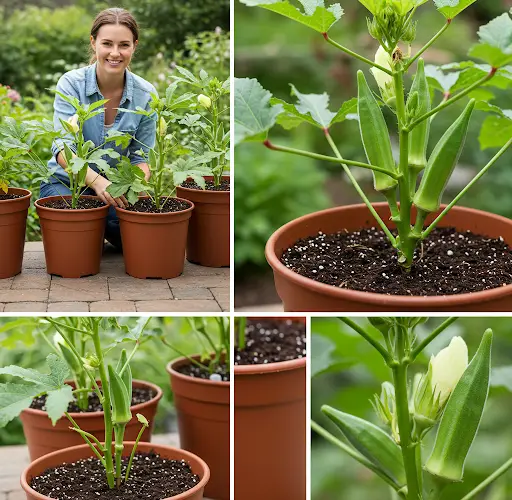
Okra is a fast-growing and productive plant that does well in pots and containers. Its deep roots and upright growth make it perfect for vertical gardening on terraces or balconies. Homegrown okra is fresher, healthier, and free from synthetic pesticides. Plus, its attractive green pods and vibrant flowers add a decorative touch to your urban garden.
Step-by-Step Guide to Growing Okra from Seed to Harvest
1. Choosing the Right Container
Okra needs space to grow deep roots, so choose a pot or grow bag at least 12–15 inches deep and 12 inches wide. If you’re planting multiple plants, use larger containers or raised beds. Ensure that the container has adequate drainage holes at the bottom.
2. Preparing the Soil Mix
Okra prefers well-draining, nutrient-rich soil. Prepare a mix using:
-
40% garden soil
-
30% well-rotted compost or organic manure
-
20% cocopeat or coarse sand (for drainage)
-
10% neem cake powder or wood ash (to prevent pests)
Mix thoroughly to ensure good aeration and moisture retention. Fill your pot with this mix, leaving about 2 inches from the top.
3. Soaking and Sowing Seeds
Soak okra seeds in water for 6–8 hours before sowing. This helps soften the seed coat and speeds up germination. Sow the seeds about 1/2 to 1 inch deep, spacing them 4–6 inches apart if planting more than one in a container.
Water lightly after sowing and keep the soil moist, but not soggy. Germination typically takes 5–10 days, depending on the temperature.
4. Sunlight Requirements
Okra thrives in full sunlight, needing at least 6–8 hours of direct sunlight daily. Place the container in the sunniest spot on your terrace or balcony. The more sunlight it gets, the better the growth and yield.
5. Watering Schedule
Okra prefers moderate watering. Water the plants every 2–3 days or when the top inch of soil feels dry. Avoid overwatering, which can lead to root rot. During flowering and fruiting, increase watering slightly to support healthy pod development.
Mulching with dry leaves or rice husks can help retain moisture and reduce watering frequency.
6. Fertilizing Naturally
Feed your okra plants with natural fertilizers every 15–20 days. Use compost tea, banana peel fertilizer, or a diluted mix of cow dung slurry. Sprinkle wood ash or crushed eggshells for extra potassium and calcium.
Avoid synthetic fertilizers; okra responds well to organic nutrition, especially during its flowering phase.
7. Supporting the Plants
As okra plants grow taller, they may need some support. Use bamboo sticks or thin stakes to keep them upright, especially in windy conditions. This also helps maximize sunlight exposure to the entire plant.
8. Pest and Disease Control
Okra is relatively pest-resistant, but watch for common issues like aphids, whiteflies, or fungal spots. Use natural remedies such as:
-
Neem oil spray (every 10–14 days)
-
Garlic or chili spray as a deterrent
-
Soap water spray for soft-bodied insects
Maintain good airflow between plants and avoid waterlogging to minimize fungal infections.
9. Flowering and Fruit Development
Okra starts flowering in 35–45 days from sowing. The flowers are self-pollinating and develop into pods quickly. Monitor the plants daily during this stage, as pods grow fast and need to be harvested while young and tender.
Harvesting Okra
Harvest okra pods when they are 2–4 inches long, typically every 2–3 days once the plant starts producing. Use garden scissors or hand-pick carefully. Delaying harvest results in tough, fibrous pods.
Regular harvesting encourages more flowers and increases total yield. Most okra plants continue to produce for 2–3 months with proper care.
Final Tips for Success
-
Rotate crops: Avoid planting okra in the same soil repeatedly. Rotate with leafy greens or legumes.
-
Save seeds: Let one or two pods mature and dry out fully on the plant. Store the seeds for your next planting.
-
Keep the area clean: Remove fallen leaves and debris to avoid pests and maintain healthy plants.
Conclusion
With just a bit of space and attention, you can grow fresh, organic okra right on your terrace. This low-maintenance crop is ideal for beginner and experienced gardeners alike. From seed to harvest, the process is simple, and the rewards are delicious. Start your okra garden today and enjoy the satisfaction of homegrown vegetables, naturally.


