Mint is one of the most versatile and easy-to-grow herbs. From teas and cocktails to salads and desserts, its refreshing leaves are a staple in many kitchens. If you’ve ever bought a bunch of mint from the store or harvested more than you need from your garden, don’t throw away the offcuts. With a little creativity, you can turn those stems into thriving new plants using something as simple as a plastic bottle.
This method not only helps you grow fresh mint year-round but also makes use of materials that would otherwise end up as waste. Creating a homemade bottle propagator is simple, inexpensive, and rewarding. Here’s a complete guide to turning mint offcuts into a flourishing plant supply.
Why Use Offcuts for Propagation?
Offcuts—those leftover stems after trimming mint—are perfect for propagation because mint is a fast and vigorous grower. Instead of discarding them, you can re-root them and expand your herb supply. Here are some benefits of this approach:
-
Waste reduction: Makes use of what might otherwise be thrown away.
-
Cost savings: No need to buy new plants or seeds.
-
Reliability: Cuttings ensure the new plant has the same flavor and aroma as the original.
-
Sustainability: A plastic bottle propagator gives new life to single-use containers.
Materials You’ll Need
Creating your bottle propagator requires only a few everyday items:
-
One large plastic bottle (1.5 to 2 liters works well)
-
Sharp scissors or a craft knife
-
Mint offcuts with healthy stems
-
Fresh water
-
Potting soil
-
A small container or pot for transplanting later
Optional: a rubber band or tape to secure the setup.
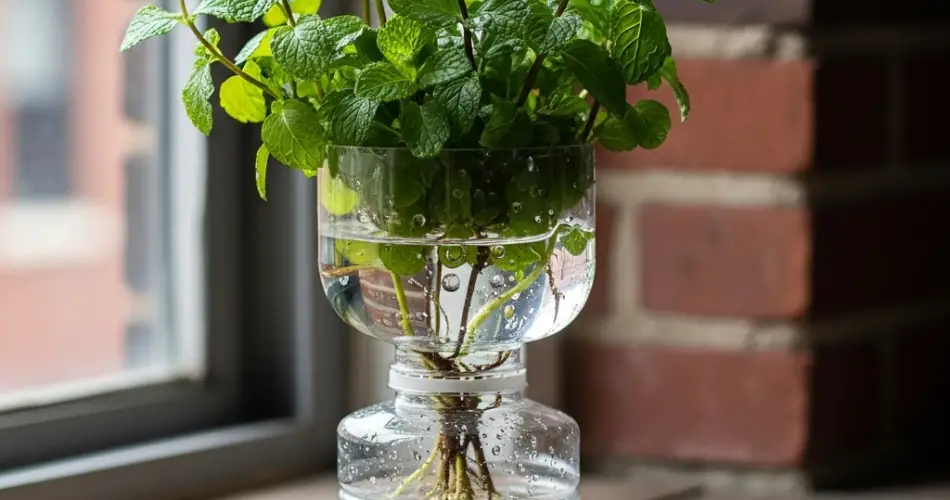
Step 1: Prepare the Bottle
Start with a clean plastic bottle. Cut it carefully across the middle so you end up with two sections—the base and the top. The bottom part will serve as the water reservoir, while the top acts like a dome or humidity cover.
If you’re rooting the cuttings in water first, you can use the bottom half as your container. If you prefer soil propagation, the bottle can be filled with potting mix and topped with the dome to create a mini greenhouse.
Step 2: Select and Trim Your Offcuts
Choose offcuts that are at least 4–6 inches long with a few sets of healthy leaves. Remove the lower leaves from the stem, leaving the top pair or two intact. This reduces stress on the cutting and prevents rotting in water or soil.
For water propagation: place the stems into the lower half of the bottle filled with fresh water. Make sure the leaf nodes (where leaves were removed) are submerged, as this is where new roots will form.
For soil propagation: poke small holes in the soil with a pencil or stick, insert the stems gently, and press the soil around them for stability.
Step 3: Assemble the Propagator
If you’re using the water method, simply cover the base with the top half of the bottle, creating a dome to trap humidity. Leave the bottle cap unscrewed or pierced with small holes to allow some airflow.
For soil propagation, place the top half of the bottle upside down over the bottom half like a cloche. This keeps the environment moist and warm, which is ideal for root development.
Step 4: Position and Care
Place the propagator in a location with bright but indirect light, such as a windowsill that doesn’t get harsh midday sun. Too much direct sunlight can overheat the bottle and damage the cuttings.
For water propagation, replace the water every two to three days to keep it fresh. For soil propagation, check moisture levels regularly—soil should remain damp but not soggy.
Step 5: Watch Roots Develop
One of the joys of this method is seeing the progress. In the water method, roots usually appear within 7–10 days, emerging as tiny white threads from the nodes. In soil, new leaves and resistance when gently tugging the cutting indicate that roots are forming.
After about two to three weeks, the roots should be strong enough for transplanting.
Step 6: Transplant Your Mint
When roots are at least 2 inches long, transfer the cutting to a pot filled with nutrient-rich soil. Choose a container with good drainage, as mint doesn’t like waterlogged roots.
Water thoroughly after transplanting and place the pot in a sunny spot. Mint thrives in partial to full sunlight, so a windowsill or balcony works perfectly.
Step 7: Maintain and Harvest
Once established, mint is a hardy plant that grows vigorously with minimal care. Keep the soil consistently moist but not waterlogged. Pinch back the growing tips regularly to encourage bushier growth and prevent the plant from becoming too leggy.
When harvesting, snip stems just above a leaf node. This not only gives you fresh sprigs for your kitchen but also stimulates new growth.
Final Thoughts
Turning mint offcuts into new plants with a plastic bottle propagator is a simple, sustainable, and satisfying gardening project. It reduces waste, saves money, and keeps your kitchen stocked with fresh, fragrant leaves. Whether you choose the water or soil method, the process requires little effort but offers big rewards.
With just a plastic bottle and some patience, you can transform leftover stems into a thriving mint patch right at home.


