How to Grow Garlic and Harvest Bulbs at Home – High Yield, Easy and Productive
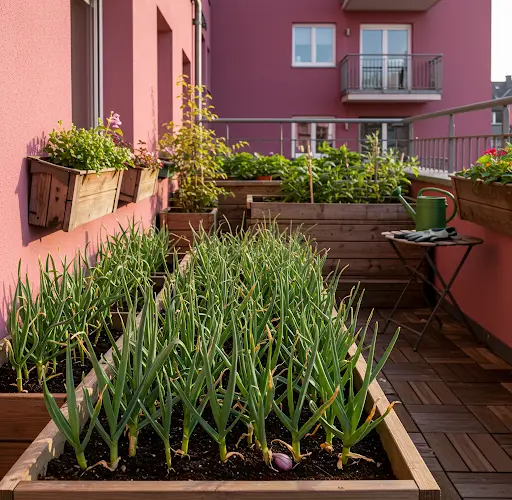
Garlic is one of the easiest and most rewarding crops to grow at home. Whether you have a backyard garden, a balcony, or just a few pots on a windowsill, you can successfully cultivate garlic with minimal effort. With the right care, you can achieve a high yield of large, flavorful bulbs that are perfect for cooking and even medicinal use.
In this guide, we’ll walk you through the step-by-step process of growing garlic at home, from planting to harvesting, so you can enjoy fresh, organic garlic all year round.
1. Why Grow Garlic at Home?
Growing garlic at home offers many benefits:
- Fresh and Organic: No pesticides or chemicals—just pure, homegrown garlic.
- Low Maintenance: Garlic requires very little care and thrives in small spaces.
- High Yield: Each clove planted produces an entire bulb.
- Saves Money: Homegrown garlic is more cost-effective than store-bought options.
- Year-Round Availability: You can grow garlic indoors or outdoors in different seasons.
2. Choosing the Right Garlic Variety
There are two main types of garlic to choose from:
- Softneck Garlic: Best for warmer climates, stores longer, and has more cloves per bulb. (Varieties: Silverskin, Artichoke)
- Hardneck Garlic: Ideal for colder climates, has fewer but larger cloves, and produces garlic scapes. (Varieties: Rocambole, Purple Stripe)
For the best results, purchase organic garlic bulbs from a nursery or farmer’s market, as grocery store garlic is often treated to prevent sprouting.
3. Materials Needed
- Garlic bulbs (organic and untreated)
- Well-draining soil (loamy or sandy)
- Containers or garden space
- Mulch (straw, leaves, or wood chips)
- Watering can or drip irrigation system
- Fertilizer (organic compost or balanced NPK fertilizer)
4. How to Grow Garlic at Home – Step by Step
Step 1: Preparing the Soil
- Choose the Right Location:
- Garlic thrives in full sun (6-8 hours of sunlight daily).
- If growing indoors, place near a south-facing window or use grow lights.
- Prepare the Soil:
- Ensure the soil is well-draining and rich in organic matter.
- Add compost or aged manure to improve fertility.
- Ideal soil pH is 6.0-7.0 (neutral to slightly acidic).
Step 2: Planting Garlic Cloves
- Separate the Cloves:
- Break apart the garlic bulb into individual cloves, keeping the papery skin intact.
- Choose the largest cloves for the best yield.
- Planting in Containers or Garden Beds:
- Depth: Plant cloves 2 inches (5 cm) deep with the pointed side up.
- Spacing: Space cloves 4-6 inches apart in rows.
- Row Spacing: Maintain 10-12 inches between rows for proper growth.
- Watering Immediately After Planting:
- Water the soil lightly to help settle the cloves.
- Mulching:
- Apply a 2-3 inch layer of mulch to retain moisture and prevent weeds.
Step 3: Caring for Garlic Plants
Watering:
- Keep the soil moist but not soggy.
- Water once or twice a week, increasing during dry periods.
- Reduce watering 3 weeks before harvest to allow bulbs to harden.
Fertilizing:
- Apply organic fertilizer every 3-4 weeks.
- Use compost tea, fish emulsion, or a balanced fertilizer (10-10-10).
Weed Control:
- Regularly remove weeds to prevent competition for nutrients.
Pest and Disease Prevention:
- Aphids and onion thrips: Spray neem oil or insecticidal soap.
- Fungal diseases: Ensure proper drainage and avoid overwatering.
Step 4: Growing and Harvesting Garlic Scapes (For Hardneck Garlic)
- Hardneck garlic produces scapes (flower stalks) before bulb formation.
- Remove scapes when they curl to redirect energy to the bulbs.
- Scapes are edible and can be used in soups, stir-fries, and pesto.
5. How to Know When Garlic is Ready to Harvest
Garlic takes 90-150 days to mature, depending on the variety and growing conditions. Look for these signs to determine harvest time:
- Leaves turning yellow and drying out (usually late spring to early summer).
- Bulbs firm and fully developed (gently dig around one to check size).
- Stop watering 2-3 weeks before harvest to prevent mold and rot.
How to Harvest Garlic:
- Gently loosen soil around the bulbs with a small garden fork.
- Carefully pull out the garlic by the stem (avoid damaging bulbs).
- Shake off excess soil and let garlic dry for 2-3 weeks in a shaded, airy place.
- Trim roots and remove outer layers once dry.
- Store in a cool, dry place (softneck varieties can last up to 6 months!).
6. Common Problems and Solutions
| Problem | Cause | Solution |
|---|---|---|
| Small bulbs | Poor soil nutrients | Add compost or organic fertilizer |
| Yellow leaves | Overwatering or lack of nitrogen | Reduce watering and add compost |
| Moldy garlic | Humid storage conditions | Cure garlic properly before storing |
| Pests (aphids, thrips) | Common garden pests | Use neem oil or insecticidal soap |
7. Benefits of Growing Garlic at Home
Growing garlic at home is not just easy but also highly beneficial:
- Fresh and Flavorful: Homegrown garlic has a stronger taste than store-bought.
- Health Benefits: Contains antioxidants, supports immunity, and reduces inflammation.
- Sustainable Gardening: Reduces reliance on store-bought produce.
- Cost-Effective: A single bulb can produce many cloves for replanting.
Final Thoughts: Start Growing Garlic Today!
Growing garlic at home is simple, low-maintenance, and highly rewarding. Whether you have a large garden or just a small balcony, you can cultivate a high-yield garlic crop with just a little effort.
By following these easy steps—from choosing the right variety to harvesting and curing—you’ll soon have a steady supply of fresh, homegrown garlic for cooking and medicinal use.
So why not start today? Plant some garlic cloves and enjoy the taste of homegrown goodness!


