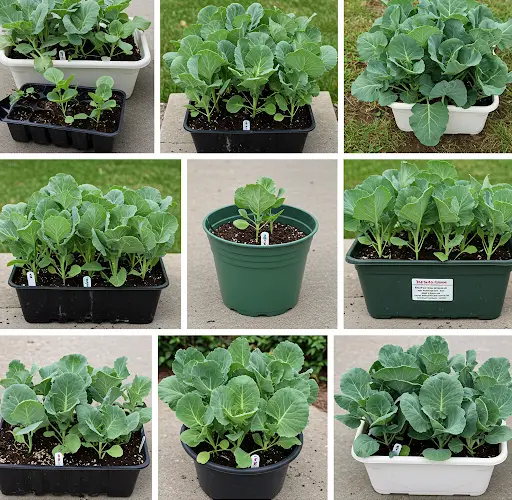
Collard greens are a highly nutritious leafy vegetable rich in vitamins A, C, and K, as well as fiber and antioxidants. Known for their fast-growing nature and resilience, collard greens are perfect for home gardening—even if you have limited space. One of the simplest and most effective ways to grow collard greens is in plastic containers, making it easy for urban dwellers, beginners, or anyone who wants a fresh, homegrown harvest without the need for a garden bed.
This guide will walk you through a simple and efficient method to grow collard greens in plastic containers, from planting to harvest.
Why Choose Collard Greens?
Collard greens are not only easy to grow, but they also tolerate a wide range of conditions. They thrive in both warm and cooler climates and can be harvested continuously over weeks or even months. Their sturdy leaves are ideal for cooking and full of flavor. Growing them at home ensures a pesticide-free, fresh, and nutritious supply right at your fingertips.
Benefits of Growing in Plastic Containers
Plastic containers are:
-
Lightweight and easy to move
-
Inexpensive or recycled (such as old buckets, tubs, or storage bins)
-
Durable and weather-resistant
-
Space-efficient, great for balconies, terraces, patios, and rooftops
-
Easy to control soil quality and moisture
What You’ll Need
-
Plastic containers (at least 12 inches deep and wide)
-
Collard green seeds or seedlings
-
Good quality potting mix
-
Compost or organic fertilizer
-
Watering can or hose
-
Mulch (dry leaves, straw, or rice husks)
-
Small garden tools (optional)
Step-by-Step Guide to Growing Collard Greens in Plastic Containers
1. Select and Prepare Your Container
Choose a container that is 12 to 16 inches deep with enough room for root development. You can use old storage boxes, plastic tubs, paint buckets, or any recycled plastic container.
Drill 4–6 holes in the bottom for proper drainage. If the container doesn’t have holes, water may collect and lead to root rot.
2. Prepare the Soil Mix
Collard greens grow best in rich, well-draining soil. A great potting mix includes:
-
40% garden soil
-
30% compost or aged cow manure
-
20% cocopeat or sand (for moisture retention and aeration)
-
10% ash or neem cake (to deter pests and add nutrients)
Mix the ingredients well and fill the container, leaving about 2 inches at the top.
3. Planting the Seeds or Seedlings
If starting from seed:
-
Sow seeds about 1/4 inch deep and 2 inches apart
-
Water gently and keep the soil moist
-
Seeds usually germinate in 5–10 days
Once seedlings grow 2–3 true leaves, thin them to allow one plant every 8–10 inches for good air circulation and healthy growth.
If planting seedlings, transplant them directly into the soil mix at the same spacing.
4. Sunlight Requirements
Collard greens need at least 5–6 hours of sunlight daily. Place your containers in a sunny spot—like a terrace, balcony, or any area that receives good light. Morning sun is ideal.
In very hot climates, partial afternoon shade helps prevent leaf scorching.
5. Watering Schedule
Keep the soil consistently moist but not soggy. Water every 2–3 days, or when the top inch of soil feels dry. Use a watering can with a gentle spout to avoid damaging young leaves.
Containers tend to dry out faster than ground soil, so monitor moisture levels regularly, especially in hot weather.
6. Feeding Your Plants
Feed your collard greens every 2–3 weeks using organic options like:
-
Compost tea
-
Banana peel fertilizer (for potassium)
-
Vermiwash or diluted cow dung water
-
Seaweed solution (if available)
These natural fertilizers promote leafy growth and keep the soil healthy.
7. Mulching for Moisture and Weed Control
Add a layer of mulch such as dried leaves, straw, or rice husks on top of the soil. This helps:
-
Retain soil moisture
-
Suppress weed growth
-
Keep the roots cool
-
Add organic matter as it decomposes
8. Pest Management
Collard greens are susceptible to pests like aphids, caterpillars, and snails. Use natural remedies such as:
-
Neem oil spray every 7–10 days
-
Garlic-chili spray
-
Handpicking visible pests in the morning
-
Crushed eggshells around the base to deter snails
Maintain good airflow between plants to prevent fungal issues.
Harvesting Collard Greens
You can begin harvesting individual leaves 30–40 days after planting, starting with the outermost leaves. Leave the center of the plant intact so it can continue producing. With proper care, a single plant can provide greens for several weeks.
For a larger harvest, wait 60–70 days and cut the entire plant near the base. New leaves may regrow if the root system remains healthy.
Final Tips
-
Rotate containers every few weeks for even sunlight exposure
-
Refresh the top layer of soil with compost monthly
-
Replace old plants after 3–4 months with new seedlings for continuous harvest
-
Clean and reuse containers after each cycle
Conclusion
Growing collard greens in plastic containers is one of the easiest and most rewarding ways to start home gardening. It requires minimal space, low investment, and offers quick results. Whether you’re on a balcony, rooftop, or small backyard, this method ensures a steady supply of nutritious greens for your kitchen—fresh, organic, and straight from your own garden.


