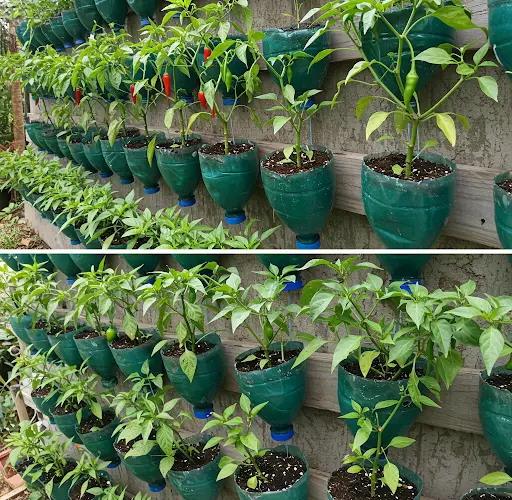
Growing chilis at home is a simple and rewarding gardening project that doesn’t require a lot of space. One of the most efficient and space-saving methods is to grow them vertically using recycled plastic bottles. This method is perfect for people with small balconies, terraces, or even windowsills. Not only will you be reducing plastic waste, but you’ll also enjoy fresh, homegrown chilis without taking up too much room.
This guide will show you how to grow chilis vertically in plastic bottles, maximizing your space and yielding a plentiful harvest.
Why Grow Chilis Vertically in Plastic Bottles?
Growing chilis vertically offers several advantages:
-
Space Efficiency: Growing vertically allows you to utilize vertical space, making it ideal for small areas or urban gardens.
-
Recycling: Using plastic bottles to grow chilis helps reduce plastic waste, making it an environmentally friendly gardening method.
-
Easy Care: Vertical growing allows for easy watering and maintenance, as the bottles are simple to access and manage.
-
Great for Small Gardens: If you live in an apartment or don’t have a large garden, using plastic bottles to grow chilis is a great solution.
Materials Needed
To grow chilis vertically in plastic bottles, you’ll need the following materials:
-
3-4 large plastic bottles (2-liter bottles work well)
-
A sharp knife or scissors
-
A drill or nail to make drainage holes
-
Potting soil (or a well-draining mix)
-
Chili seeds or young chili plants
-
Watering can or hose
-
A sunny spot (balcony, windowsill, or terrace)
-
Twine or strong string for vertical support
Step-by-Step Guide to Growing Chilis Vertically in Plastic Bottles
1. Preparing the Plastic Bottles
Before you start planting your chilis, you need to prepare the plastic bottles.
-
Cut the Bottles:
Using a sharp knife or scissors, cut the plastic bottles into two parts. Keep the bottom portion of the bottle, which will act as the container for the soil and chili plant. You can use the top part as a funnel to help with watering, or you can discard it. -
Make Drainage Holes:
Drill a few holes in the bottom of each bottle. Proper drainage is crucial to prevent water from accumulating and causing root rot. If you don’t have a drill, a nail or sharp object can be used to make several small holes. -
Prepare Vertical Support:
To grow your chili plants vertically, you’ll need to support the bottles in a way that they don’t tip over. You can use a strong piece of twine or string to tie the bottles vertically. If you have multiple bottles, hang them in a vertical line by attaching the twine to a sturdy structure like a railing or a fence.
2. Preparing the Soil
Chili plants require well-draining soil to thrive. Choose a good-quality potting mix, and ensure it retains moisture while still draining excess water. Avoid using garden soil, as it can become compacted and limit drainage.
-
Fill the Bottles with Soil:
Fill each plastic bottle with potting soil, leaving a couple of inches at the top. Gently tap the bottle to ensure the soil settles and doesn’t leave any large air pockets. Make sure the soil is loose and not too compacted. -
Add Fertilizer (Optional):
If desired, you can mix a slow-release organic fertilizer into the soil. Chili plants are hungry for nutrients, and a little extra boost can help them grow stronger and produce more fruit.
3. Planting the Chili Seeds or Seedlings
-
Planting Seeds:
If you’re starting from seeds, plant a few seeds in each bottle. Press them gently into the soil, covering them lightly. Water the seeds carefully, ensuring the soil is evenly moist. Place the bottles in a warm location with plenty of sunlight to encourage germination. It can take about 1-2 weeks for the seeds to sprout. -
Planting Seedlings:
If you’re using young chili plants instead of seeds, make a small hole in the soil of each bottle, and carefully transplant the seedling into the bottle. Gently pack the soil around the roots to secure the plant in place.
4. Providing Sunlight and Watering
Chilis require full sun to grow, so place the bottles in a location that receives at least 6 hours of direct sunlight daily. A sunny balcony, terrace, or windowsill is perfect.
-
Watering:
Water your chili plants regularly, but make sure the soil is not too soggy. The soil should stay moist, but not waterlogged. Water the plants when the top inch of soil feels dry. If you have a funnel from the top part of the bottle, it can help direct water down to the roots without spilling.
5. Supporting the Plants
As your chili plants grow, they will need support to stay upright and prevent the stems from breaking under the weight of the fruit.
-
Tie the Plants to the Vertical Support:
As the plants grow taller, tie the main stem to the vertical support using soft twine. This will help the plants grow vertically and keep them from toppling over. Be sure not to tie the twine too tightly, as this can damage the stem. -
Pinch Back for Better Growth:
If the plants become too bushy, pinch back the tips of the branches to encourage side growth. This will result in a more productive plant and more chilis.
6. Harvesting the Chilis
After several months of growth, your chili plants will begin to produce fruit. Once the chilis change color (depending on the variety, they may turn red, yellow, or orange), they are ready to be harvested.
-
Pick the Chilis Carefully:
Use scissors or pruning shears to cut the chilis from the plant. Be gentle when harvesting to avoid damaging the plant or surrounding fruits. -
Continual Harvesting:
Continue to pick the chilis as they ripen. This will encourage the plant to produce more fruit, leading to a longer harvest season.
Conclusion
Growing chilis vertically in plastic bottles is a simple, effective, and space-saving way to enjoy homegrown chilis. This method allows you to maximize limited space while recycling plastic bottles that would otherwise be discarded. With a little care and attention, your chili plants will thrive and produce abundant, flavorful fruit that you can use in cooking, pickling, or even as a natural spice for your dishes.
So, why not give it a try? Start your own vertical chili garden today and enjoy the benefits of homegrown produce with minimal effort.


