If you’re short on space but dream of harvesting your own fiery chilies, wall gardening with recycled materials is the perfect solution. You don’t need traditional pots or garden beds—just some used plastic bottles, a sunny wall, and a little creativity. This sustainable method not only saves space but also transforms your vertical surfaces into productive and visually appealing edible gardens.
Here’s a complete guide on how to grow chilies on the wall without using pots, using upcycled bottles and smart vertical planning.
Why Grow Chilies on the Wall?
Chili plants are excellent candidates for vertical gardening. They’re compact, productive, and visually stunning when in full fruit. Growing them on the wall offers several benefits:
-
Space efficiency: Ideal for balconies, fences, or walls with good sun exposure.
-
Sustainability: Reuses discarded plastic bottles, reducing waste.
-
Convenience: Harvesting, watering, and pruning are easier when plants are at eye level.
-
Aesthetic value: A wall lined with green plants and colorful peppers adds charm and utility to any outdoor space.
Whether you enjoy mild peppers or blazing hot varieties, you can successfully grow them vertically.
Choosing the Right Chili Varieties
For vertical wall gardens, opt for chili varieties that are naturally compact or have a bushy growth habit. Here are some ideal choices:
-
Thai chili: Small, prolific, and fiery hot.
-
Cayenne: Slim and long, suitable for vertical spaces.
-
Bird’s eye: Another compact and spicy variety.
-
Jalapeño: Slightly larger, but manageable in well-supported containers.
-
Mini bell or ornamental peppers: Mild and decorative.
Avoid large varieties that grow tall and heavy unless you can provide strong support.
Materials You’ll Need
You won’t need pots, but you will need a few recycled and basic items:
-
Empty 1.5L or 2L plastic bottles (cleaned and dried)
-
Scissors or cutter
-
Nail or drill (for making holes)
-
Twine, zip ties, or wire
-
A wall, trellis, or vertical frame for mounting
-
Quality potting mix
-
Organic compost or fertilizer
-
Chili seeds or seedlings
Preparing the Bottle Planters
-
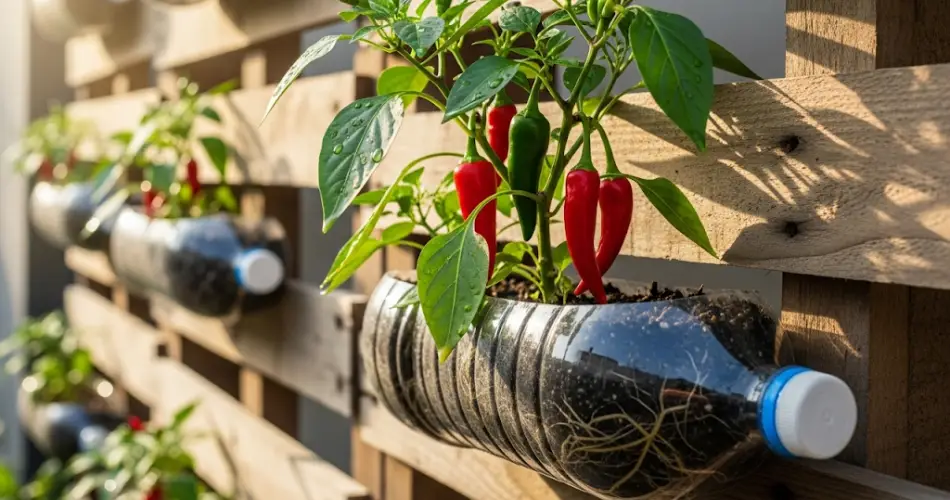
Cut the Bottles:
Lay each bottle on its side and cut a horizontal window into one side, wide enough to plant your chili. Leave enough structure around the edges so the bottle keeps its shape. -
Add Drainage Holes:
Make 4–5 holes in the bottom using a heated nail or drill. Drainage is essential to prevent root rot. -
Mount the Bottles:
Use twine or zip ties to secure the bottles horizontally onto your wall or frame. Stagger the rows to allow each plant space to grow and receive sunlight.
Soil Mix and Planting
Chili plants require loose, nutrient-rich soil that drains well. Mix compost with coconut coir, perlite, or sand to improve drainage in small containers.
-
Filling: Fill each bottle with the soil mix, leaving about an inch from the top.
-
Planting Seeds: Sow 2–3 seeds per bottle. Once the seedlings appear, thin them down to the healthiest one.
-
Transplanting Seedlings: If starting from nursery plants, gently transfer one plant into each bottle planter.
Water the soil thoroughly after planting to help the roots settle.
Growing Conditions and Care
Sunlight
Chilies need plenty of light—at least 6 hours of direct sun daily. Choose the sunniest spot on your wall to install the bottles.
Watering
Due to the limited soil in bottles, they dry out faster. Water daily in hot weather, but always ensure the water drains properly. Avoid overwatering.
Fertilization
Chili plants are heavy feeders. Every 2–3 weeks, apply a balanced organic fertilizer or compost tea. You can also add crushed eggshells and banana peel compost for an extra nutrient boost.
Support
As the plants grow and start to fruit, they may need light support. Use soft twine to gently tie them to the bottle or nearby mesh.
Pests and Problems
Watch for common issues like:
-
Aphids and whiteflies: Spray with diluted neem oil.
-
Fungal infections: Ensure good airflow and don’t let water sit on leaves.
-
Blossom drop: Usually caused by heat stress or poor nutrition. Ensure even watering and proper feeding.
Because wall gardens are elevated, they are less prone to soil-borne diseases and slug infestations.
Harvesting Chilies
Chili plants usually begin to produce fruit within 60–90 days, depending on the variety. Harvest when the peppers reach full size and color. Regular harvesting encourages more fruiting.
Use scissors or garden snips to avoid damaging the plant. Wear gloves if harvesting hot varieties to protect your skin from capsaicin.
Maintenance Tips
-
Refresh the soil between growing cycles to avoid nutrient depletion.
-
Mulch the bottle surface with dry leaves or coconut husk to retain moisture.
-
Periodically check for root binding, and replace or expand the containers if needed.
Final Thoughts
Growing chilies on the wall without pots is not only a practical gardening solution for small spaces but also a rewarding way to enjoy fresh, organic produce. This method embraces recycling, reduces household waste, and brings greenery into urban environments in a creative way.
With just a few bottles, some basic tools, and a sunny wall, you can turn any vertical space into a productive chili garden—no pots required.


