How to Graft Adenium Obesum (Desert Rose) at Home
Grafting is a popular technique used to combine the desirable traits of two different plants into one. When it comes to Adenium obesum, commonly known as the Desert Rose, grafting allows you to create unique flowers, improve growth, and strengthen the plant. With proper techniques, you can successfully graft your Adenium at home and enjoy a beautiful, thriving plant with multiple flower varieties on a single trunk. In this guide, we will walk you through the process of grafting Adenium obesum step by step.
Why Graft Adenium Obesum?
Grafting Adenium offers several benefits, such as:
- Faster Growth: The rootstock (base plant) provides a strong foundation, allowing the scion (grafted part) to grow quickly.
- Unique Flower Colors: You can mix different varieties of Adenium on one plant for a multi-colored bloom.
- Disease Resistance: Some rootstocks have better resistance to diseases and pests, making the plant more robust.
- Better Adaptability: Grafting helps the plant adapt to different growing conditions more effectively.
Materials Needed
Before starting, gather the following materials:
- A healthy Adenium plant (rootstock)
- A scion from a different Adenium variety
- A sharp, sterilized knife or grafting blade
- Grafting tape or plastic wrap
- Rubber bands or clips
- Rubbing alcohol for sterilization
- A small brush or cloth for cleaning
- Rooting hormone (optional)
Step-by-Step Guide to Grafting Adenium Obesum
Step 1: Choose the Right Plants
- Select a healthy, well-established Adenium plant to serve as the rootstock. It should have a thick, firm caudex (swollen base) and be free from pests or diseases.
- Choose a scion from another healthy Adenium plant with desirable flower traits. The scion should be a young, fresh branch with a diameter similar to that of the rootstock’s stem.
Step 2: Prepare the Rootstock and Scion
- Sterilize your knife or grafting blade with rubbing alcohol to prevent infections.
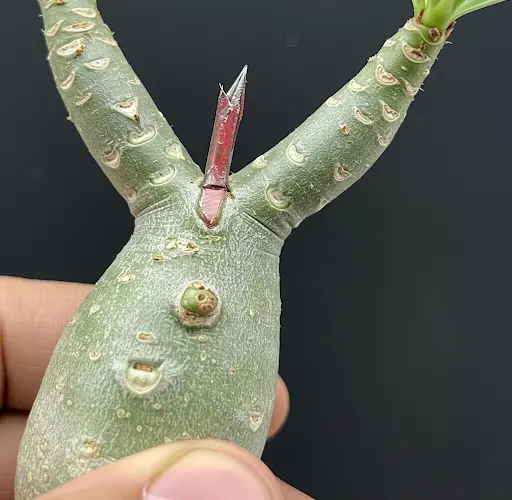
- Use the knife to make a clean, slanted cut (around 45 degrees) at the top of the rootstock. The cut should be smooth and even to ensure good contact with the scion.
- Cut the scion at the same angle to match the rootstock’s cut. Ensure both pieces fit together perfectly to allow for maximum contact.
Step 3: Attach the Scion to the Rootstock
- Align the cut surfaces of the scion and rootstock carefully, ensuring that the cambium layers (the thin green layer under the bark) are touching as much as possible.
- Secure the graft using grafting tape, plastic wrap, or rubber bands. Wrap the joint firmly but not too tightly, as excessive pressure can damage the delicate tissue.
Step 4: Provide the Right Environment
- Place the grafted plant in a warm, shaded area with indirect sunlight.
- Avoid overwatering during the first few weeks, as excessive moisture can lead to rot.
- Maintain a temperature of around 75-85°F (24-29°C) for optimal healing.
- If the air is dry, consider covering the grafted area with a plastic bag to retain humidity, but ensure there is ventilation to prevent fungal growth.
Step 5: Monitor and Care for the Grafted Plant
- Check the graft regularly for signs of successful healing. The scion should remain green and start showing new growth within 2-4 weeks.
- If the scion dries out or turns black, the graft may have failed. In such cases, remove the failed graft and try again with a fresh scion.
- Once the graft is firmly attached and new growth appears, gradually remove the grafting tape to prevent constriction.
Aftercare for a Grafted Adenium
- Watering: Water sparingly until the graft fully heals. Once established, follow a regular watering routine, allowing the soil to dry between waterings.
- Fertilizing: After 4-6 weeks, feed the plant with a balanced liquid fertilizer to encourage healthy growth.
- Pruning: Trim any unwanted shoots from the rootstock to direct energy toward the grafted scion.
- Sunlight: Gradually introduce the plant to more sunlight, ensuring it gets at least 6 hours of direct sun daily.
Common Grafting Mistakes and How to Avoid Them
- Loose Wrapping: Ensure the scion and rootstock are tightly bound to prevent air from entering the graft.
- Mismatched Cuts: The cambium layers must align for the graft to take successfully. Make precise cuts to improve contact.
- Overwatering: Keep the grafted plant slightly dry until new growth appears to avoid fungal infections.
- Using Weak Scions: Always select healthy, vigorous branches for grafting to improve success rates.
Conclusion
Grafting Adenium obesum at home is a rewarding process that allows you to create a unique and vibrant plant. By following the proper techniques and providing the right care, you can successfully graft different varieties onto a single rootstock, producing stunning flowers and a healthier plant. With patience and practice, you’ll be able to master this technique and enjoy a diverse collection of Desert Roses in your garden.


