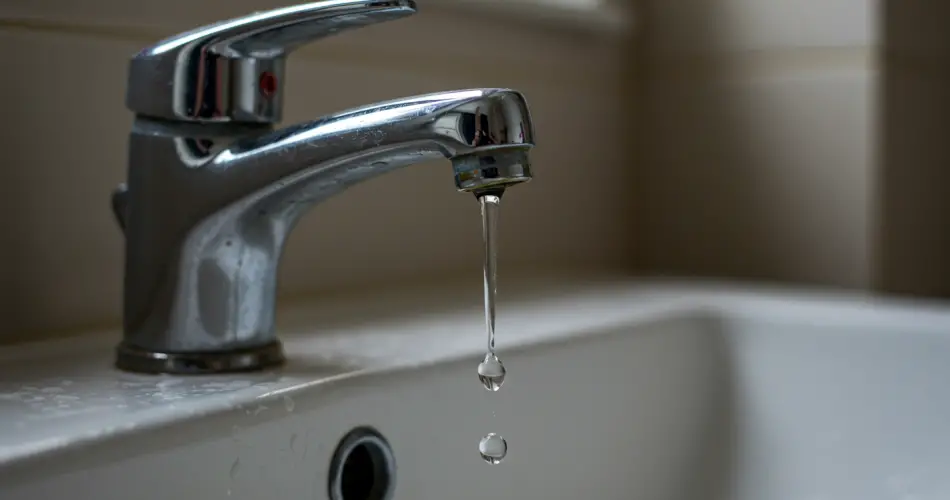
A dripping faucet is more than just an annoyance—it’s a problem that can waste water, raise utility bills, and eventually damage fixtures if left unresolved. Many people immediately think of calling a plumber, but in reality, most faucet leaks can be repaired at home with minimal tools and a little patience. By learning the right procedure, you can restore your bathroom or kitchen faucet in just a couple of minutes and save yourself a considerable amount of money.
Why Faucets Leak
Before diving into the repair process, it’s important to understand why faucets start to leak. In most cases, the problem lies in the sealing gaskets inside the faucet. These small but essential rubber or silicone components create a watertight barrier. Over time, however, they wear out, become brittle, or lose their shape. Once this happens, water begins to escape, causing that familiar steady drip.
Fortunately, replacing these gaskets is a simple task that doesn’t require professional expertise. The key is to know what type of faucet you have, since the internal mechanism may differ depending on the model.
Types of Faucets You May Encounter
Not all faucets are built the same way. Knowing the internal structure will help you identify which parts to remove and replace during the repair. Here are the main types:
-
Compression Faucet
-
Features two separate handles—one for hot water and one for cold.
-
It’s the oldest and most recognizable style.
-
Uses rubber washers that wear down over time, causing leaks.
-
-
Ceramic Disc Faucet
-
Has a single central lever that controls both temperature and flow.
-
Inside, a pair of ceramic discs fit tightly together to block or allow water flow.
-
While durable, the rubber seals around the discs may degrade.
-
-
Cartridge Faucet
-
Also equipped with a single handle.
-
Operates through a replaceable cartridge made of brass, plastic, or stainless steel.
-
Leaks often occur when the cartridge’s O-rings wear out.
-
-
Ball Valve Faucet
-
Uses a single lever as well.
-
The mechanism involves a ball-shaped component that regulates water pressure and temperature.
-
Seals or springs inside may need replacement when dripping starts.
-
Regardless of the type, the most common culprits are the washers and seals. By replacing these, you can restore your faucet to perfect working condition.
Tools and Materials You’ll Need
To carry out the repair, gather a few basic household tools and items:
-
An adjustable wrench or plumber’s pliers
-
A flathead screwdriver
-
Replacement gaskets, washers, or O-rings (depending on your faucet type)
-
White vinegar or a commercial descaling solution
-
A clean cloth for wiping parts
Having these on hand ensures you won’t have to stop mid-repair to search for missing tools.
Step-by-Step Guide to Fixing a Faucet in 2 Minutes
Follow this general procedure to repair most leaky faucets efficiently:
-
Turn Off the Water Supply
-
Before you start, make sure to shut off the water valves under the sink. This prevents accidental flooding while working.
-
-
Disconnect the Faucet
-
Use the adjustable wrench to loosen the flexible water hoses (called “flex lines”) that connect the faucet to the supply valves.
-
-
Disassemble the Handle and Cover
-
Remove the faucet’s handle or knob using a screwdriver.
-
Next, unscrew and remove the decorative cap or cover plate.
-
-
Access the Inner Components
-
With the help of pliers, gently loosen the retaining nut or collar.
-
Take out the ball, cartridge, or ceramic cylinder, depending on your faucet model.
-
-
Remove the Old Washers and Seals
-
Carefully extract the worn gaskets, O-rings, or washers.
-
Clean the surrounding components with vinegar or descaling solution to remove any limescale buildup.
-
-
Replace with New Seals
-
Insert the new washers or O-rings in the exact position of the old ones.
-
Ensure they fit snugly and sit evenly inside their grooves.
-
-
Reassemble the Faucet
-
Reinsert the internal components (ball, cartridge, or ceramic disc).
-
Tighten the retaining nut and replace the decorative cover.
-
Secure the handle back in place.
-
-
Reconnect and Test
-
Reattach the flexible hoses and tighten them with a wrench.
-
Turn the water supply back on and test the faucet.
-
The leak should now be completely gone.
-
Pro Tip: Remove Scale for Longer Life
Even if the leak is fixed, it’s wise to treat all faucet components with a descaling product or soak them in vinegar before reassembling. This step removes mineral deposits that often cause stiffness in the handle and can shorten the life of gaskets. By doing so, you’re not only repairing the faucet but also performing preventative maintenance.
The Benefits of DIY Faucet Repair
Learning how to repair a faucet yourself offers several advantages:
-
Cost Savings: A plumber’s visit can cost significantly more than a simple set of replacement washers. Doing it yourself costs just a fraction.
-
Speed: Instead of waiting for professional service, you can resolve the problem immediately.
-
Sustainability: Preventing leaks reduces water waste, which benefits both the environment and your water bill.
-
Skill Development: Once you’ve repaired one faucet, you’ll feel confident handling other small plumbing issues around the house.
Final Thoughts
A leaky faucet doesn’t have to be a nightmare. With just a few simple tools and the right approach, you can repair most household faucets in only two minutes. Whether it’s in your bathroom or kitchen, the solution usually involves replacing worn-out gaskets or O-rings. By following the steps above, you’ll eliminate drips, prevent further water waste, and save a good amount of money—without ever needing to call an expensive plumber.
Taking the time to learn this simple skill means that the next time your faucet starts leaking, you won’t panic. Instead, you’ll roll up your sleeves, grab your wrench, and fix it with confidence.