Thyme is one of the most popular herbs for both culinary and medicinal uses. With its distinctive aroma and flavor, it enhances soups, stews, roasted vegetables, meats, and even teas. Beyond its kitchen value, thyme is also a hardy and drought-tolerant herb, making it ideal for home gardens. While thyme can be grown from seeds, many gardeners prefer propagation through cuttings. This method is quicker, more reliable, and ensures the new plants retain the same qualities as the parent plant.
A key factor in successful propagation is providing the right environment for your cuttings. Thyme, like many herbs, roots more effectively in a humid atmosphere that prevents leaves from drying out while encouraging root development. One simple, low-cost way to achieve this is by creating a humid dome using a recycled plastic bottle.
Why Humidity Helps Thyme Cuttings
When a cutting is separated from its parent plant, it loses its established root system, which normally absorbs water and nutrients. During this vulnerable stage, cuttings rely solely on their stems and leaves to maintain moisture. If the surrounding air is too dry, the cutting may wilt before roots have time to form.
By covering thyme cuttings with a bottle dome, you create a miniature greenhouse effect. Moisture evaporates from the soil and leaves, condenses on the dome’s walls, and then drips back down—keeping the environment consistently humid. This reduces water stress and helps the cutting survive until new roots emerge.
Preparing Thyme Cuttings
Before building the dome, you’ll need to prepare healthy thyme cuttings:
-
Select a mature thyme plant with vigorous growth.
-
Using clean scissors or pruning shears, snip a stem that is about 4–6 inches long.
-
Remove the lower leaves from the bottom half of the stem, leaving just a few pairs of leaves at the top.
-
If desired, dip the cut end into a natural rooting agent like aloe vera gel, cinnamon, or honey to prevent fungal problems and encourage root growth.
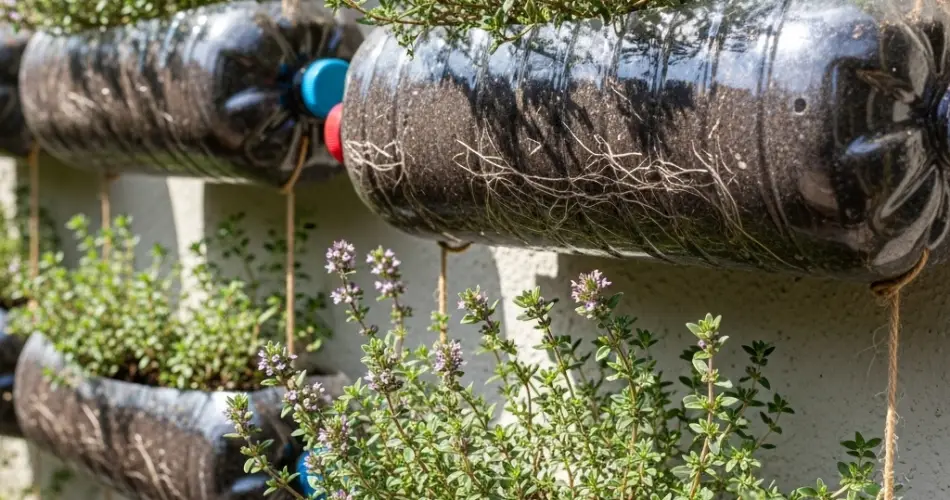
Making a Bottle Dome
Creating a humidity dome from a plastic bottle is simple, inexpensive, and eco-friendly. Here’s how:
-
Choose the Bottle: A clear 1–2 liter plastic bottle works best. The transparency allows light in while trapping humidity.
-
Cut the Bottle: Use a sharp knife or scissors to remove the bottom portion. Leave the top half intact, as this will serve as your dome.
-
Prepare the Container: Plant your thyme cutting in a small pot or directly in the soil of a larger container. Use a well-draining mix of potting soil with added sand or perlite.
-
Position the Dome: Place the cut bottle over the cutting, pressing it slightly into the soil to create a seal. The cap can be left on for maximum humidity or removed to allow a small amount of air circulation.
Managing the Mini-Greenhouse
Once your thyme cutting is covered by the dome, the environment inside will quickly become warm and moist. To ensure success, pay attention to these care tips:
-
Light: Place the cutting in a spot with bright, indirect light. Too much direct sun can overheat the bottle and damage the cutting.
-
Moisture: Check the soil regularly. It should remain slightly damp but never soggy. Overwatering can cause fungal problems.
-
Ventilation: Remove the dome for 10–15 minutes every day to allow fresh air in and prevent mold growth. If condensation becomes too heavy, loosen the cap or tilt the dome slightly for airflow.
-
Temperature: Keep the cutting in a warm area, ideally between 65–75°F (18–24°C), to encourage root growth.
Root Development and Transplanting
Thyme cuttings usually develop roots within 2–4 weeks, depending on growing conditions. You’ll know roots are forming when you see new leaves emerging or feel resistance when you gently tug on the stem.
Once the cutting is rooted:
-
Begin gradually removing the dome for longer periods each day to acclimate the young plant to normal room conditions.
-
When the cutting looks sturdy and healthy, remove the dome entirely.
-
If the cutting was started in a small pot, transplant it into a larger container with well-draining soil.
Caring for Young Thyme Plants
After transplanting, continue caring for your thyme plant with these guidelines:
-
Sunlight: Place in full sun for at least 6 hours per day. If indoors, use a bright windowsill.
-
Watering: Allow the soil to dry slightly between waterings. Thyme is drought-tolerant and dislikes excess moisture.
-
Pruning: Regularly trim stems to encourage bushier growth and prevent the plant from becoming too woody.
-
Fertilizing: Thyme does not need heavy feeding. A monthly dose of diluted liquid fertilizer or compost tea during the growing season is enough.
Final Thoughts
Creating a humid bottle dome for thyme cuttings is a simple yet effective way to boost your chances of successful propagation. With just a recycled bottle, some healthy cuttings, and a bit of patience, you can grow strong thyme plants without the need for expensive equipment.
This eco-friendly method provides a sustainable way to expand your herb collection while ensuring a steady supply of fresh thyme for your kitchen. Whether you’re new to gardening or simply looking for creative ways to reuse materials, bottle domes offer a practical solution that turns everyday waste into a valuable gardening tool.
Fresh thyme grown from your own cuttings is not only more flavorful but also deeply rewarding. With this propagation technique, you’ll never be short of this versatile herb.


