Celery is a highly nutritious vegetable used in soups, juices, stir-fries, and salads. It’s packed with fiber, vitamins, and minerals, making it a great addition to any home garden. But many people are hesitant to grow it because celery requires consistent moisture and long growing periods.
Fortunately, there’s a clever and low-cost solution: building a self-watering celery garden using recycled plastic bottles. This simple method not only ensures your celery receives a steady water supply but also speeds up its growth while reducing the time and effort needed for daily care.
Whether you have limited space or a busy schedule, this automatic watering setup makes growing celery at home easy and productive.
Why Use Plastic Bottles for a Self-Watering Garden?
Plastic bottles are lightweight, durable, and readily available in most homes. With a few modifications, they can be transformed into an efficient automatic watering system. This setup works by using capillary action—where water is slowly drawn up from a reservoir to keep the soil consistently moist.
Benefits of this method include:
-
Constant moisture levels (ideal for celery)
-
Less frequent watering required
-
Reduced risk of overwatering or drying out
-
Repurposing waste into productive planters
-
Ideal for balconies, patios, and small spaces
Materials You’ll Need
To create your self-watering celery garden, gather the following items:
-
Several 1.5 or 2-liter plastic bottles (clean and label-free)
-
Cotton rope, thick yarn, or strips of cloth (for wicks)
-
Potting mix or a blend of compost and cocopeat
-
Celery bases (saved from store-bought stalks or started from seed)
-
A utility knife or scissors
-
Water
-
Optional: a drill or heated nail for making holes
Step-by-Step Setup
1. Cut the Bottles
-
Take each bottle and cut it in half.
-
The bottom half will serve as the water reservoir.
-
The top half (with the cap) will become the planting pot, inverted and placed into the bottom half.
2. Prepare the Wick System
-
Use a thick cotton rope or strip of cloth that can absorb and transfer water.
-
Thread it through a hole in the bottle cap so that part of it hangs down into the reservoir and the other part lies inside the bottle where the soil will be.
This wick will draw water up from the bottom as the soil dries, keeping moisture levels balanced.
3. Fill with Soil
-
Fill the top (now inverted) portion of the bottle with potting mix.
-
Ensure the wick is well-embedded in the soil.
-
Gently water the soil to settle it.
Regrowing Celery from Kitchen Scraps
Instead of planting seeds, you can grow celery from leftover kitchen scraps. Here’s how:
-
Cut the base of a celery bunch, leaving about 5–7 cm.
-
Soak it in shallow water for 5–7 days until you see roots and new green shoots emerging.
-
Transplant the rooted base into your prepared bottle planter, with the new growth just above the soil line.
This is a fast and efficient way to start your garden with minimal cost.
Positioning and Care
-
Sunlight: Place your self-watering bottles where they can receive 4–6 hours of sunlight daily. A sunny windowsill or balcony is perfect.
-
Refilling: Check the water reservoir every few days and refill when needed. The wick will keep the soil moist automatically.
-
Fertilizing: Add organic fertilizer (like compost tea, fish emulsion, or diluted banana peel water) every 2–3 weeks for better growth.
-
Humidity and Temperature: Celery prefers cooler, moist conditions. The self-watering system helps maintain these conditions consistently.
Why This Method Accelerates Growth
Celery thrives in even moisture, and stress from drying out can lead to bitter, tough stalks. With the self-watering bottle system, the plant doesn’t experience water fluctuations, which leads to:
-
Faster leaf production
-
Crisp, tender stalks
-
Healthier root systems
-
Better resistance to pests and diseases
Since the plant gets exactly what it needs—steady hydration, airflow, and nutrients—it grows faster and more robust compared to traditional methods.
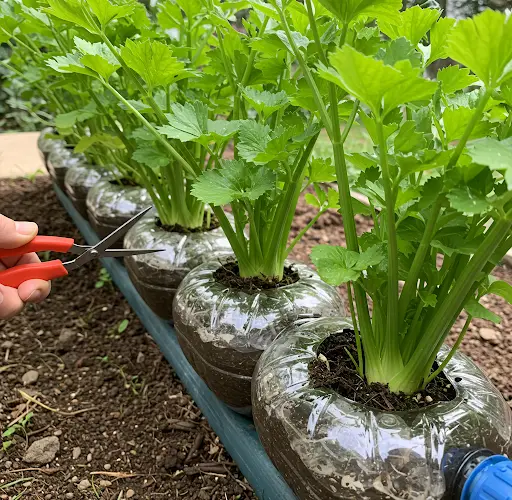
Harvesting Your Celery
Celery grown in plastic bottles typically reaches a harvestable size in 10–12 weeks. However, instead of harvesting the whole plant at once, you can use the cut-and-come-again method:
-
Snip the outer stalks as needed while leaving the inner shoots to grow.
-
This allows continuous harvesting for weeks or even months.
You’ll enjoy fresh celery on demand without pulling up the entire plant.
Final Thoughts
Creating an automatic watering celery garden from plastic bottles is a practical, eco-friendly, and highly effective way to grow your own food. It’s perfect for beginners and seasoned gardeners alike—no soil mess, no daily watering, and no special tools required.
This method can be expanded to grow dozens of celery plants in a small space, offering a reliable and continuous harvest for your kitchen. By transforming ordinary plastic waste into a productive garden system, you’re not only saving money but also helping the environment.
Give it a try and enjoy fresh, fast-growing celery with minimal effort—right from your own home.


