[Home Gardening] Tips for Growing Peanuts at Home – Harvest a Whole Basket Without a Garden!
Peanuts are a nutritious and delicious crop that many people assume can only be grown in large fields or warm climates. However, the truth is that you can successfully grow peanuts at home, even if you don’t have a traditional garden! With the right methods, peanuts can thrive in containers, raised beds, or small backyard spaces, allowing you to enjoy a fresh harvest straight from your home. In this guide, we will take you through the step-by-step process of growing peanuts, from selecting seeds to harvesting a whole basket full of homegrown peanuts.
Why Grow Peanuts at Home?
Growing your own peanuts comes with many advantages:
- Fresh and Organic – No need to worry about pesticides or chemicals in store-bought peanuts.
- Space-Efficient – Peanuts can be grown in pots or containers, making them ideal for balconies or patios.
- Nutritious and Delicious – Homegrown peanuts are rich in protein, fiber, and healthy fats.
- Easy and Fun to Grow – Peanuts require minimal care and are an exciting crop for beginner gardeners.
Understanding the Peanut Plant
Peanuts (Arachis hypogaea) are unique because they grow underground. The plant produces small yellow flowers, which then send “pegs” into the soil where the peanuts develop. Peanuts thrive in warm conditions and require loose, well-drained soil to produce an abundant harvest.
Step-by-Step Guide to Growing Peanuts at Home
Step 1: Choosing the Right Peanut Seeds
- Purchase raw, unroasted peanuts from a garden center or organic grocery store.
- Avoid salted or processed peanuts, as they won’t germinate.
- Popular peanut varieties include Spanish, Virginia, Valencia, and Runner peanuts, each with different flavors and growth habits.
Step 2: Preparing for Planting
Peanuts need a warm growing season of at least 4-5 months, making them best suited for spring or early summer planting. If you live in a cooler climate, start your peanuts indoors and transplant them once the weather warms up.
Growing in Containers
- Use a pot that is at least 12 inches deep and wide to allow room for peanut development.
- Fill the pot with well-draining, loose soil mixed with compost or sand.
- Ensure the container has drainage holes to prevent waterlogging.
Growing in Raised Beds or Small Garden Spaces
- Choose a sunny location with at least 6-8 hours of direct sunlight per day.
- Loosen the soil to a depth of 8-10 inches and mix in organic compost for nutrients.
- Avoid compacted soil, as peanuts need space to spread underground.
Step 3: Planting the Peanuts
- Remove the shells from the peanuts but keep the thin, papery skin intact.
- Plant the peanuts 1-2 inches deep and space them about 6 inches apart.
- If growing in rows, keep at least 12 inches between each row to allow room for spreading.
- Water lightly after planting to help with germination.
Step 4: Providing the Right Growing Conditions
- Temperature: Peanuts thrive in warm temperatures between 70-90°F (21-32°C).
- Watering: Keep the soil consistently moist but not waterlogged. Water deeply once or twice a week.
- Sunlight: Ensure the plants get full sunlight, at least 6 hours per day.
- Fertilizing: Use a balanced organic fertilizer or compost tea every few weeks to encourage healthy growth.
Step 5: Watching for Peanut Pegging
Around 30-40 days after planting, the peanut plant will start to flower. After pollination, the flowers will produce pegs that extend downward and bury themselves into the soil, where peanuts will form.
- Avoid disturbing the soil during this stage to allow proper development.
- If growing in containers, ensure the soil remains loose and aerated.
- Adding a layer of mulch can help retain moisture and protect the developing peanuts.
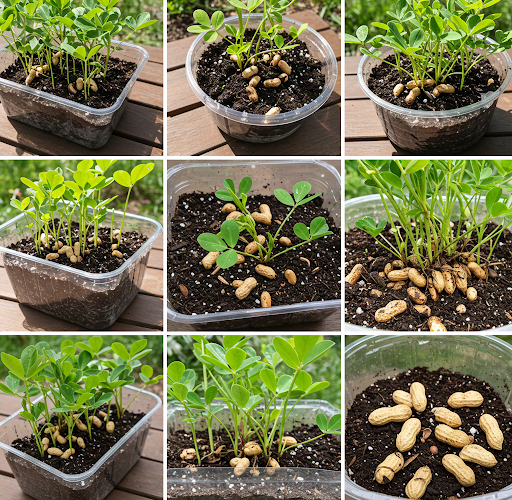
Step 6: Harvesting Peanuts
Peanuts take about 4-5 months to mature. You’ll know they are ready to harvest when:
- The plant’s leaves start turning yellow.
- The pegs are fully buried, and the shells have hardened.
- Gently dig up a few peanuts to check if they are fully formed.
To harvest:
- Use a small shovel or garden fork to carefully lift the plants from the soil.
- Shake off excess dirt and hang the plants upside down in a dry, shaded area for a few days.
- After drying, remove the peanuts and let them cure in a well-ventilated space for another 1-2 weeks.
Step 7: Storing and Enjoying Your Homegrown Peanuts
- Fresh Peanuts: Can be boiled immediately after harvesting for a soft, delicious snack.
- Dry Peanuts: Store in a cool, dry place for months.
- Roasting: Roast the peanuts in an oven at 350°F (175°C) for 15-20 minutes for a crunchy treat.
- Homemade Peanut Butter: Blend roasted peanuts with a little oil and salt for fresh peanut butter.
Common Issues and Solutions
| Problem | Cause | Solution |
|---|---|---|
| Peanuts not sprouting | Too cold or planted too deep | Keep soil warm and plant 1-2 inches deep |
| Yellowing leaves | Overwatering or nutrient deficiency | Water moderately and add compost |
| Small peanut yield | Compacted soil or lack of sunlight | Loosen soil and ensure full sun exposure |
| Pests (aphids, mites) | Infestation on leaves | Use neem oil or insecticidal soap |
Additional Tips for a Successful Peanut Harvest
- Rotate Crops: Avoid planting peanuts in the same soil every year to prevent soil depletion.
- Mulch for Moisture: A light layer of mulch helps retain soil moisture and prevents weeds.
- Companion Planting: Grow peanuts with corn, beans, or squash for a healthy garden ecosystem.
- Extend the Season: If temperatures drop early, cover plants with row covers to extend the growing period.
Conclusion
Growing peanuts at home is easier than you might think, and you don’t need a traditional garden to do it. By following these simple steps, you can cultivate a healthy peanut crop in containers, raised beds, or small spaces. With patience and proper care, you’ll soon be harvesting a whole basket of delicious, homegrown peanuts to enjoy fresh, roasted, or as peanut butter. Try growing your own peanuts today and experience the joy of home gardening!


